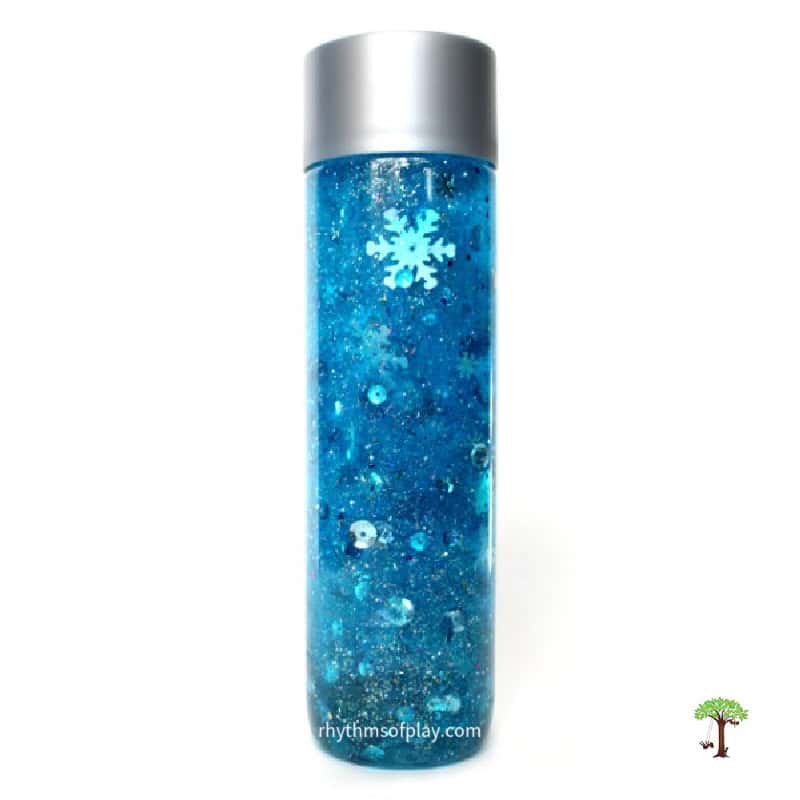
Both children and adults will love this Frozen-inspired winter sensory bottle DIY filled with swirling blue glitter and silver snowflake confetti to give it the appearance of a blustery snowstorm or blizzard.
Winter sensory bottles, such as this DIY Sensory bottle with softly falling snowflakes inspired by the Disney movie “Frozen,” are captivating and educational tools for classrooms, therapy sessions, and little hands engaging in sensory play at home. First published on December 11, 2015, this post about how to make a winter-themed Frozen-inspired snowstorm sensory bottle filled with large, slow-falling snowflakes is regularly updated and republished to improve the content. Use the winter sensory bottle recipe and step-by-step DIY tutorial to learn how to make these snowflake snowstorm discovery jars at home or in the classroom.
DIY winter snowstorm glitter sensory bottles provide a fun and creative activity and a multifaceted educational tool. Sensory bottles support sensory development, learning, and emotional well-being across different age groups and abilities. Both young kids and adults can benefit from these great resources. Offering this Frozen-inspired snowstorm sensory bottle to children can engage them in sensory play, help develop their motor skills, and serve as an educational aid.
Snowflake Snowstorm Winter Sensory Bottles:
Make a snow globe with a plastic bottle or glass jar using this snowflake sensory bottle tutorial. This DIY winter snowstorm glitter sensory bottle, inspired by the popular movie “Frozen,” offers a captivating and therapeutic experience for children and adults. The essence of a snowstorm is captured in the bottle as glitter swirls and floats, mimicking falling snowflakes in a mesmerizing display.
“As the bottle clears, so does the mind.” ~Nell Regan Kartychok
It is full of snowflakes and silver sequins, slowly moving inside like a gentle blizzard. The swirling snowflakes in the sensory bottle resemble a snow globe, featuring a wild winter snowstorm. This makes it a unique toy that can be used as everything from an imaginative play prop to a winter science weather bottle.
Playing with this winter-themed toy can inspire a young child to imagine a snowstorm all around them or help them learn about different types of winter precipitation, such as gentle falling snow or a blizzard. This winter sensory bottle mimics both. They also make great party favors or gifts for a Frozen-themed birthday party. My daughter thinks Elsa and Anna would love it, along with her Frozen-Inspired Olaf crafts.
Softly Falling Winter Snowflake Sensory Bottle Inspired by “Frozen” Movie:
This winter snowflake sensory bottle is made with clear, sealable containers with bottled water, clear liquid hand soap, and clear or blue glitter glue to make it look like a snowstorm straight out of the movie “Frozen.” An array of winter-themed items, such as glitter and sequins in shades of blue, white, and silver, flutter around inside, mimicking the contents of a snow globe. Snowflake confetti is added to make the viewer feel as if they are alongside Anna and Kristoff in the middle of the snowstorm Elsa created in the first movie, as they gaze into it. You might also enjoy making a sensory bottle with slow-falling hearts.
The gentle movement of the winter snowstorm inside this snowflake sensory bottle is calming and soothing, making it an excellent sensory toy for children who need help with self-regulation. Sensory jars, such as this swirling snowflake glitter bottle, are commonly used for mess-free sensory play, as a self-regulation tool to help calm an overwhelmed child, or as a meditation technique for children. Calm-down sensory bottles work wonders for adults, too! For more information about sensory bottles, including several quick and easy DIY recipes, visit Calm Down Sensory Bottles 101.
How to Make a Frozen-inspired Winter Sensory Bottle with Snowflake Confetti and Glitter:
This magical DIY project will bring a touch of Frozen enchantment into your home! Perfect for fans of the beloved Disney movie, the step-by-step instructions below will show you how to create your own Frozen-inspired Winter Sensory Bottle. This delightful craft combines the shimmering beauty of snowflake confetti and sparkling glitter, encapsulating the winter wonderland of Arendelle in a mesmerizing sensory experience. Or, make this winter-themed see-through Rainstick Musical Sensory Bottle.
Please watch the video tutorial and read the step-by-step instructions before making this snowflake sensory bottle DIY:
Please watch the video below and read the step-by-step instructions in the next section before starting this DIY Frozen-inspired snowstorm sensory bottle. Doing so will help you understand the steps involved and what to expect, making it much more straightforward to choose the craft supplies you want to use from the recommended options for this winter sensory bottle.
Amazon affiliate links are provided below for your convenience, but most of these winter snow globe sensory bottle ingredients can also be found at most hobby and craft stores. (Rhythms of Play will earn a small commission at no cost to the consumer if purchases are made using the orange links below.) You might also enjoy this Glittering Mermaid Tail Sensory Bottle.
Snowflake DIY Glitter Sensory Bottle DIY Video Tutorial:
Watch the winter sensory bottle DIY video below to learn more about this swirling-snowflake, homemade calm-down jar that looks like a snowstorm is raging inside, with snowflakes swirling everywhere. Then scroll down to read the step-by-step instructions before making this DIY sensory bottle inspired by the Movie “Frozen” by Disney.
Frozen-Inspired Sensory Bottle Craft Supplies:
- Empty water bottle or tempered glass jar (choose one of the following):
- Clear plastic Voss water bottles.
- Empty plastic craft bottles.
- Heat-resistant 24-ounce or 32-ounce wide-mouth glass mason jars with leak-proof bands.
- Recycled plastic bottles or jars that will hold water without leaking.
- Warm water (distilled water is best, but tap water can be substituted.)
- Glue (choose at least one of the following):
- Blue or turquoise paint or food coloring (Each of these recommended ingredient options will add a blue color to the liquid; choose one):
- Blue glitter tempera paint
- Turquoise or blue tempera paint,
- Blue liquid watercolor paint,
- Blue food coloring.
- Fine glitter (choose at least one of the following)
- Fine turquoise glitter.
- Alternatively, use a mixture of blue, teal, and silver fine glitter
- Snowflake sequins and confetti (Choose at least one of the following snowflake confetti options):
- Silver snowflake sequins,
- Sparkly snow snowflake confetti mix,
- Snowflake confetti mix,
- and/or iridescent snowflakes confetti mix.
- I don’t recommend using regular sequins to make this snowflake snow globe because they tend to stick to the inside of the sensory bottle, and the paint chips off the colored sequins:
Optional Winter Sensory Bottle Supplies:
- Tempered 4-cup liquid glass measuring cup or mixing bowl (optional) for mixing the sensory bottle solution if desired.
- Whisk to combine ingredients (optional; can also be shaken in the bottle).
- Super glue the lid on. This is recommended if young children, such as toddlers and preschoolers, will be using it to prevent accidents and ingestion.
- Duct tape for ensuring the lid stays on the bottle (optional).
What can you use instead of glycerin for sensory bottles?
Blue glitter glue or clear liquid glue is the recommended alternative craft supply to glycerin for these beautiful homemade sensory tools. Clear liquid glue works like glycerin to slow the movement of the ingredients in this winter wonderland snow globe. I also use clear liquid hand soap to slow down sensory bottles like this slow-falling heart sensory bottle DIY.
In this winter snowstorm sensory bottle, the glue slows the movement of the swirling snowflakes inside, creating a soothing “snow globe” effect when the bottle is gently shaken, tipped, or flipped over. The sparkling silver sequins, blue glitter, and snowflake confetti of various sizes and shapes, suggested in the winter snowstorm sensory bottle craft supplies above, make this effect more visually striking.
Frozen Snowstorm Sensory Bottle Recipes for Different-Sized Bottles and Jars:
Please note that the amounts of each ingredient in these recipes are approximate: Everyone likes their sensory bodily mixtures to move a little differently. More water and less glue will make the ingredients move faster, while less water and more glue will make them move slower. Please read the step-by-step instructions to learn how to make these sparkly, swirly, blustery winter sensory bottles and determine whether you need a little more or a little less of any of these ingredients to fill the bottle perfectly for you.
Recipe for the 500ml plastic Voss bottles (shown in the photographs):
500ml is just under 17 ounces, or a little more than 2 cups or 1 pint.
- 1 1/4- 1 3/4 cups of warm water.
- 2 tablespoons or 4 ounces turquoise or blue glitter glue, or liquid clear glue.
- A few drops to 1 tsp of blue or turquoise paint or food coloring.
- 1 tsp to 1 tbs of fine turquoise, blue, or silver glitter (can use more or less if desired).
- Snowflake sequins and confetti:
- Drop in as many of these beauties as you like, but don’t overdo it. Snowflake sequins can quickly overpower the sensory bottle. Start with 5 to 10 larger pieces.
Winter sensory bottle recipe for 24-ounces (3-cup) tempered glass canning jar:
- 1 3/4 cup of warm water
- 3 tbsps or 6 oz of turquoise or blue glitter glue, or liquid clear glue.
- 1 to 2 tsp of blue or turquoise paint or food coloring.
- 2 tsp to 2 tbs of fine turquoise, blue, or silver glitter (can use more or less if desired).
- Snowflake sequins and confetti:
- Add as many as you like, but don’t overdo it. Large snowflakes can quickly overpower the sensory bottle. Start with 5 to 15 larger pieces.
Sensory jar recipe for a 32-ounce (4-cups or 1-quart) tempered mason jar:
- 2 1/4 – 2 1/2 cups of warm water.
- 4 tbsps or 8 oz of turquoise or blue glitter glue, or liquid clear glue.
- 1 tbsp to 2 tbsp of blue or turquoise paint or food coloring.
- 1 – 3 tbs of fine turquoise, blue, or silver glitter (can use more or less if desired).
- Snowflake sequins and confetti:
- Drop in as many as you like, but don’t overdo it. They can quickly overpower the sensory bottle. Start with 10 to 20 larger pieces, and add more if desired.
Related: Soothing Sea Shells Sensory Bottle
DIY Snowstorm Glitter Sensory Bottle Recipe and Step-by-Step Instructions:
Please read the instructions before making these winter-themed sensory bottle crafts. I also recommend reviewing the tips in Calm Down Sensory Bottles 101 before making your first DIY sensory bottle.
1. Gather Materials and Tools to make winter sensory bottles:
- Start by choosing and gathering the craft materials you want to use for this frozen sensory bottle DIY from the craft supply list above.
- You can mix ingredients directly into the sensory bottle as long as the water is not too hot.
- Alternatively, mix the sensory bottle recipe in a heat-resistant 4-cup glass measuring cup or directly into a tempered glass bottle or jar to prevent the plastic bottle from melting or warping.
2. Mix warm water and glue together:
- Add warm water and a good amount of glue.
- Use the approximate recipe amounts above for the size of bottle or jar you are using.
- Start by adding water.
- If you want to use boiling water, please don’t pour it directly into a clear plastic bottle or untempered glass.
- Instead, mix the hot water and glue in a tempered 4-cup glass measuring cup and allow it to cool to room temperature before pouring it into the clear plastic bottle or glass mason jar.
- Then add glue to the warm water in the 4-cup liquid measuring cup, or directly into the recycled empty water bottle or a tempered glass jar.
- As a reminder, you can use either liquid clear glue, turquoise glue, or blue glitter glue.
- Any one of these ingredients works well. Use the type of glue you have on hand, or try something new!
- Put the lid on and give the bottle a good shake, or mix the warm water and glue well with a whisk in the glass measuring cup before proceeding to the next step.
A Note About Mixing Glue and Water:
Cold water is tough, if not impossible, to mix with glue, especially when glitter is involved. This is why I recommend using the warmest water possible because it makes mixing the glue with the water and glitter much easier. I typically use boiling water to make sensory bottles made with glitter and glue. Not only does this practice make mixing the glue with the water much easier, but the hot water also prevents the glitter from clumping and sticking together when added to the solution.
However, please do not pour boiling water directly into the clear plastic bottle, as it can warp or melt. It’s also not a good idea to pour boiling water directly into a non-tempered glass jar, as it can crack or shatter. Instead, mix the hot water and glue in a tempered 4-cup glass measuring cup. Then let the glue-and-water mixture cool a bit before pouring it into a clear plastic bottle or a glass mason jar.
Alternatively, you can mix boiling water and glue directly in a heat-safe canning or mason jar. Or you can use warm water as directed in the step-by-step instructions below. Using warm water is safer for children and eliminates the need to mix it in a heat-safe glass container.
When you use a tempered, heat-safe glass mason jar, you can pour boiling water directly into the winter sensory bottle to mix the glue, water, and other ingredients. This is just as easy as mixing warm water in a plastic bottle, but the ingredients don’t clump as much. If the lid is water-tight, you can also use it to mix the ingredients by vigorously shaking it. Choose the option that best suits your needs and style. The complete step-by-step directions cover both options, making it easy to choose your preferred option.
3. Add blue paint or food coloring to the solution:
- Next, add a squirt of blue paint or food coloring to give it a blue color.
- Choose one of the following craft supply options to add color to your winter discovery jar or calm-down jar:
- Blue glitter tempera paint.
- Turquoise or blue tempera paint.
- Blue liquid watercolor paint.
- Blue food coloring.
- Mix well with a whisk before proceeding to the next step.
5. Add Fine Glitter to the Frozen sensory bottle Mixture:
- Sprinkle a small amount of fine turquoise glitter (or a mixture of blue and silver glitter) into the frozen DIY sensory bottle mixture, then whisk to combine.
- The amount of glitter you use will determine the opacity or transparency of the winter snowflake sensory bottle.
- In other words, using more fine glitter will make the bottle look “fuller,” more opaque and less transparent or “see-through,” while using less will make it look less “full” and more transparent.
6. Mix the winter sensory bottle solution well:
- Either put the lid on the bottle and give it a good shake, or use a whisk to mix the solution in the glass measuring cup, ensuring all ingredients are well blended and free of clumps or lumps.
- If you choose to mix your sensory bottle solution with boiling water in a tempered glass measuring cup, please allow the mixture to cool to a warm temperature before moving on to the next step. About 10-20 minutes.
- You will notice that the sensory bottle recipe ingredients will sink to the bottom of the measuring cup as it cools.
- If you are mixing the ingredients in a heat-safe bottle or jar, you can give it a vigorous shake and move on to step 8 without waiting.
7. (optional) Once the water has cooled, mix and quickly pour the snowstorm sensory bottle ingredients into a clear plastic bottle or glass jar:
- Skip this step and move directly to the next if you mixed your sensory bottle recipe directly into an empty plastic water bottle, or if you are using a heat-safe, tempered glass bottle to make this winter discovery bottle.
- Allow the winter sensory bottle mixture to cool so it won’t warp or melt the plastic bottle or shatter an untempered glass jar when you pour the Frozen-inspired snowstorm discovery bottle mixture into it.
- Use a whisk to remix the ingredients, and quickly pour the mixture into the empty plastic bottle or jar once it is cool enough to pour into plastic or untempered glass.
- Stop pouring before you reach the top of the bottle or jar. Don’t pour it all the way to the top, just yet.
- There are a few more ingredients to add to the snowstorm sensory bottle recipe.
- You can also determine whether to add a bit more glue, glitter, or paint, depending on how quickly or slowly the mixture in the bottle is moving.
8. Drop pieces of snowflake confetti into the snowy day sensory bottle:
- Add the snowflake confetti by dropping it directly into the jar containing the sensory bottle mixture.
- I originally used blue sequins and large silver snowflake confetti to make the winter snowstorm sensory bottle with large snowflakes.
- The silver snowflake confetti worked magically, and I still recommend sequins like these today.
- However, I have since discovered a few other ingredients I like better for these winter sensory bottles than the large blue sequins, so I don’t even recommend them anymore. You can use them if you like, but the paint flakes off and tends to stick to the sides of the bottle. Which isn’t so bad because the flakes add to the bottle’s pretty blue color, but it can be annoying when the sequins stick to the inside of the bottle. Especially for sensory-sensitive children like mine.
- There are several fantastic snowflake glitter options in the sensory bottle craft materials above that make a better choice because they look and act more like snow in this sensory bottle snow globe.
10. (optional) Consider adding more primary Frozen-Inspired Sensory Bottle ingredients to speed up or slow down the swirling snowflakes or make the mixture more opaque:
- Once the sensory bottle mixture is completely cool, put the lid on and shake it well.
- Determine whether you need to add a little more water, clear glue, blue glitter glue, paint, or liquid food coloring to the Frozen-inspired snowstorm calm-down jar.
- Add more water if you want the snowflake-discovery bottle mixture to move faster. If you want the calm-down jar recipe ingredients to move more slowly, add glitter glue, clear glue, or clear liquid hand or dish soap to the mix.
- For example, adding more glue will slow the movement of the snowflake sensory bottle DIY mixture even more (so the larger snowflakes will swirl and float for a bit instead of sinking to the bottom of the bottle), thereby increasing the calming effect.
- If desired, pour a little bit of the sensory bottle solution out to make room for more of this or that, if needed, and follow the directions below:
- Adding more water will make it move faster, while adding more glue will make the snowflake sensory bottle mixture move slower.
- Pouring more paint or food coloring will deepen or darken the color of the winter snowstorm inside the sensory bottle.
- Adding more glitter will make the snowstorm sensory bottle look more opaque and less transparent.
- When adding more glue or water to the mixture, pour it directly into the snowstorm sensory bottle until the glittery snowstorm mixture reaches the top of the bottle and begins to overflow.
11. Top off the winter snowstorm sensory bottle, put the lid on, and give it a shake and watch the glitter swirl:
- Add a tiny bit more water or glue to top off the snowstorm jar if needed.
- Put the lid on and give it a good shake to mix well.
- Tip it, turn it over, and play with it to ensure you like the way it moves and flows before moving on to the next step.
12. (optional) Glue the lid of the calm-down jar shut and secure it with duct tape:
- Once you are happy with how your Frozen-inspired snowstorm sensory bottle moves and flows, put a drop or two of super glue on the cap and screw the cap onto the bottle to glue it shut.
- Then, pass it over to the kiddos. Unless you are keeping it for yourself, of course. 😉
- If young children will use it, I recommend gluing the lid to prevent accidents and ingestion. The glue and duct tape help ensure toddlers and preschoolers can’t open the bottle, but it is not foolproof. Please supervise children while they play with this Snowlake sensory bottle.
- Now that my daughter is older, I choose not to glue some of our DIY sensory bottles shut because everyone in our household knows how to handle them safely. Please scroll down to discover why we don’t glue the lid on.

Related: Rainbow Galaxy Glitter Sensory Bottle
Snowflake Sensory Bottle DIY Tips and Troubleshooting:
- Don’t glue the lid onto this Frozen-inspired sensory bottle right away.
- It’s hard to make changes after the cap is glued on.
- Because I used large snowflake confetti for this Frozen-inspired DIY calm-down bottle, I soon realized I needed to make the solution more viscous so the snowflakes would float and swirl rather than sink to the bottom. So, I added about 1/8 cup of clear liquid hand soap into the mixture. It worked wonderfully! Today, I recommend using more glue instead.
- Add more glitter glue (or clear glue) to thicken the solution of this winter sensory bottle to slow it down.
- If you add soap to slow the ingredients, allow the snowflake sensory bottle mixture to cool before shaking it to minimize soapy bubbles and froth.
- If bubbles form at the top of the snowflake sensory bottle, let it sit and settle for a few hours.
- If bubbles remain after settling, slowly fill the bottle with water or glue until it overflows. Allow the bubbles to flow over the side until none remain in the sensory bottle DIY.
- Although I added colored sequins to the mixture the first time I made this sensory bottle. Today, when I make this DIY glitter sensory bottle, I avoid painted sequins and use only glitter and snowflake confetti instead.
- The paint chips off colored sequins, which didn’t matter for this bottle because they added more blue glittery color to the mix.
- I recommend using only silver sequins if you don’t want this to happen.
- Another potential problem with sequins is that they tend to stick to the side of the snowstorm sensory jar rather than swirl. Use your discretion when deciding whether to include them in your Frozen-inspired snowflake sensory bottle.
Why don’t I glue some of my sensory bottles shut?
I have noticed that after DIY sensory bottles are made and left to sit for a while, they tend to suck in and form an indentation. Not gluing the lid to the bottle allows it to be opened slightly, letting air in and removing the dent.
However, be mindful when opening your homemade snowflake discovery bottle or calm-down jar. They can spill and create a messy glitter explosion if not handled properly. I find it best to open them over a sink, bathtub, or bucket, just in case!
Please exercise caution if you choose not to glue your DIY sensory bottle shut, especially if you have young children nearby, such as toddlers or preschoolers. If young children will use it, I recommend gluing the lid to prevent accidents and ingestion.
Educational and Developmental Benefits of DIY Winter Sensory Bottles:
These sensory bottles serve multiple educational and developmental purposes for toddlers, preschoolers, and school-aged children. Not only are these winter sensory bottles visually appealing, but they also serve an essential purpose in child development. Here’s a list of several ways they can benefit child development and act as an educational aid:
1. Mess-free and Safe Sensory Play Activity:
Babies, toddlers, preschoolers, kindergarteners, and young elementary school-aged children can investigate the contents and the actions or inner workings of this winter sensory bottle without making a mess or directly touching hazardous objects. This makes DIY sensory bottles an excellent resource for sensory exploration, as children engage their visual and tactile senses while observing and handling the bottle.
2. Strengthen Fine-motor Skills:
Winter calm-down jars like this one help develop fine motor skills as children grasp and manipulate the bottle, and this interaction supports hand-eye coordination.
3. Calming and Soothing an Overwhelmed or Anxious Child:
Believe it or not, this snowstorm can be calming and particularly beneficial for children who experience sensory overload or struggle with strong emotions and self-regulation. The slow, graceful movement of the glitter can be soothing and helps foster focus and relaxation. (Practicing yoga is another fantastic calming strategy for kids. Learn how to get kids started, or look at our favorite FREE yoga videos for kids.)
4. Imaginative, Open-Ended Play:
The “Frozen” theme adds a layer of engagement, especially for kids who are movie fans. It can spark creative storytelling and encourage open-ended dramatic or imaginative play, thereby enhancing language and cognitive skills.
5. DIY Weather Sensory Bottle for Winter Science:
The swirling snowflake snowstorm inside this winter sensory bottle makes it ideal for educational use. Read how in the next section.

Winter Weather Sensory Bottle DIY:
This winter snowstorm bottle also serves as a weather sensory bottle, offering an opportunity to educate children about snowflakes, snowstorms, weather patterns, and similar winter weather phenomena in an interactive way.
Winter sensory bottles, such as this winter snowstorm weather bottle filled with swirling snowflakes and blue glitter that looks like snow and ice, can be a valuable educational tool to teach about the winter season, weather patterns, and the concept of snow.
For younger children, it can be a tool for introducing basic weather concepts such as snowflakes, snow, and storms. At the same time, for older kids, it can be a starting point for discussions about meteorology, the science behind snowstorms, the symmetry of snowflakes, and more!
Related: Beaded Snowflake Ornaments
Frozen-Inspired Snowflake Snowstorm Sensory Jar:
Ideal for kids and adults who love a bit of whimsy, this sensory bottle is a beautiful decorative piece and a calming tool that can help soothe and captivate—making it a fun, mess-free DIY calm-down toy for kids.
Think of it like a giant snow globe craft that can help toddlers, preschoolers, kindergarteners, and elementary-aged kids learn to calm down and self-regulate. Focusing on the objects in this Frozen-inspired DIY glitter sensory bottle filled with sparkling snowflake confetti can help children and adults calm down, focus, and even learn to meditate.
Gather the materials from the winter sensory bottle craft supplies list above and embark on this enchanting snowstorm sensory bottle crafting adventure! We hope you love this calming tool as much as we do. You might also enjoy these winter art projects and painting ideas, as well as this list of fun winter activities with a printable bucket list for kids and adults.
Learn more about Nell Regan Kartychok, author, photographer, and creator of this original Frozen-Inspired DIY winter sensory bottle craft HERE, and Rhythms of Play HERE!
More DIY Glitter Sensory Bottles:
- Rainbow Galaxy Sensory Bottle
- Sunburst Glitter Sensory Bottle DIY
- Glittering Mermaid Tail Calming Sensory Bottle


How did you keep yours from getting foamy?
Hi Ashley! My bottles are always foamy when I first make them and shake them up. They can take up to a day to settle. Once settled they never foam up again. If yours do, make sure you take all the air out. I hope that helps!
this is beautiful! It looks like it would be cold to touch lol. I’m new to making sensory bottles, but wanted to make one for each season so hopefully mine turns out as gorgeous as this. I can’t wait to see it in motion
Lol! It does look cold to the touch Kaci, so glad you like it! Sending you all my sensory bottle making ju-ju so it’s just as awesome!
I made some for my 3 year old preschool class who are pretty rough on the bottles. They managed to actually break the caps on the Voss bottles!! Is there something I did wrong?
No Jennifer, You did nothing wrong. Voss bottles can break if thrown around or dropped. This is the only con I have found with them.
Use duct tape or electrical tape on the lid. It helps.
Brilliant solution Kasey! Thank you for sharing 🙂
This is my first attempt at a sensory bottle! I used a bottle that I had at home, but I had trouble adding some items to the solution, because the opening was small. How large is the opening for the VOSS bottles? And what size bottle do you use? The 330 ml size? I thought of adding buttons that I bought for the bottle, but a few of the buttons wouldn’t fit into the opening. I hope I can find the items you suggested for the Frozen bottle!!
So glad you are giving it a try Patty! This bottle is actually one of the most challenging of my bottles to make, but it was my first too 🙂 I use the 500ml Voss bottles. They have a larger opening than most bottles at almost an inch and 1/2 diameter. This is another reason I like to use them. You can easily fit fun items in them like the larger snowflakes. I think you can probably bend the snowflakes just a bit to get them inside bottles with smaller openings. They are flexible but will stay permanently bent if folded too far. Good luck!
Hi I am new to making these but I wanted to make one for my grandson I have all the ingredients in and gave it a shake but everything just went straight to the bottom. So I poured out some water and added more soap and it still will not float just straight to the bottom like rocks! What did I do wrong? Help!
Hello, I’m so sorry it did not come out as you expected. Did you heat the water and mix it with the glue before adding the other ingredients? It won’t work if everything is added all at once.
Hi. I’m planning on making these with kids. I was trying to figure out for how many kids the materials you listed are. Do you have any suggestions?
Besides the bottles and doing the math on the liquids you will need, the rest should be enough? A little glitter goes a long way!
What are your pro/con comments on plastic water bottles?
Sorry for delayed response Rebecca. This is a loaded question for me and why we prefer to use bottles from the recycle bin. We get ours from the recycle bin at my husband’s work because we choose not to purchase plastics. At home, we filter our own water and use reusable stainless steel canteens for our water. Using mason jars to make sensory bottles is another option, but as you know glass can be dangerous if broken!
I like your Frozen sensory bottle much better than Amazon’s.
Thanks for the vote of approval, Pam! We always appreciate hearing when people love our sensory bottles. <3
Will any clear gel hand soap work? I am not finding the particular one listed. Just curious if it makes a difference.
Hi Laura. Any clear gel hand soap should work, yes. The one you use may have slightly different viscosity, so you may need a bit more, or a bit less than mentioned. Good luck!
Can we use blue food coloring instead of tempera paint? Since that’s what we have on hand.
Great question, Pricilla!
Yes, blue food coloring would work perfectly. Put a drop or two in and see if you like the color and add more if needed!
Hello. I’m looking to make these as party favors for our daughter’s birthday party. I’m curious how long the whole process takes? I have to make at least 15.
Hi Katy, that’s a qreat question.
The answer depends on if you are planning to make them beforehand. Or, if you will be assisting the children in making them at your daughters birthday party.
They don’t take longer than about 20-30 minutes from start to finish. But if you have all the materials gathered beforehand they can be made even quicker than that.
If you have a limited supply of boiling water, or tempered glass to mix the frozen snowstorm winter sensory bottle solution in, they will take longer to make because you will need to boil water and mix each one. If that’s the case, add 5-10 minutes per bottle to the 20-30 minute estimate.
Once the solution is mixed, you can add room temperature water to cool it to be able to pour it into a plastic bottle faster, but make sure you add enough of the clear glue or liquid handsoap, and the glitter and snowflakes before you do this because it will dilute the solution.
I hope that makes sense. Please let me know if you need further assistance. Enjoy sensory bottle making!