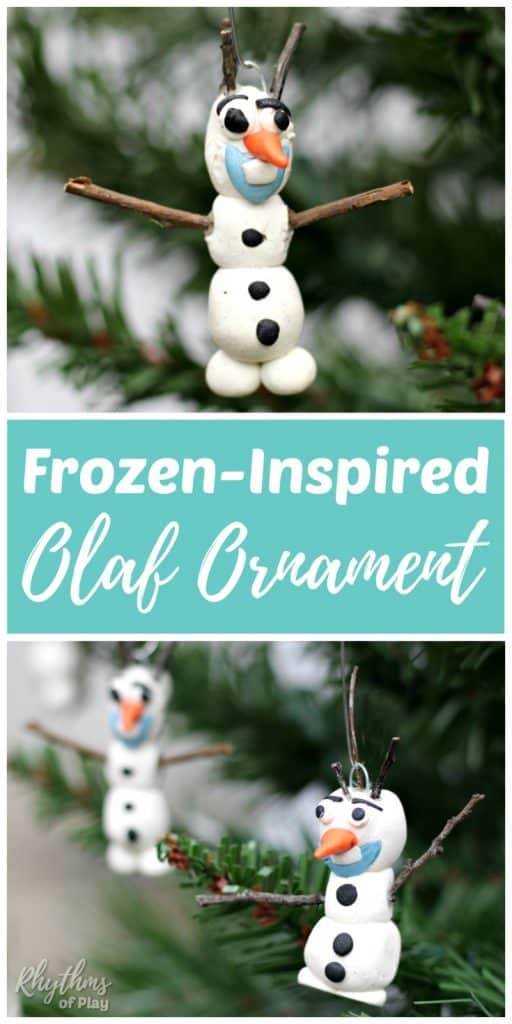
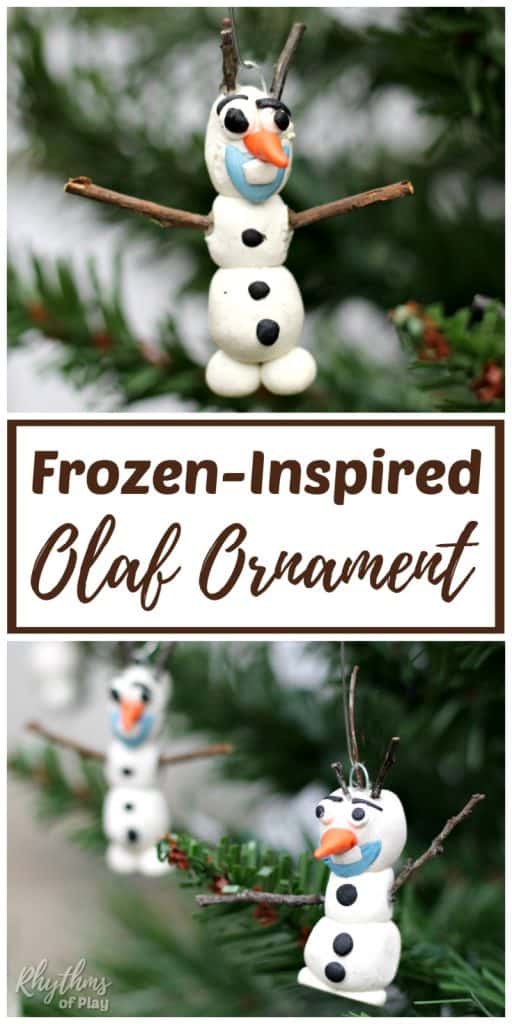
This DIY tutorial teaches how to make Olaf Christmas ornaments inspired by the Disney movie Frozen using polymer clay.
One winter’s day, I asked my daughter, “Do you want to build a snowman?” She squealed with excitement. Here I was dreaming of making snowman ornaments while she dreamed of bringing Olaf to life. So we did both!
She helped me make these cute little snowman ornaments, then I helped her figure out how to assemble a few Frozen-inspired Olaf ornaments. Each of these polymer clay projects turned out fantastic. We even made snowman head ornaments!
Related: Meaningful Christmas Traditions for a Magical Holiday
Frozen-Inspired Olaf Ornament Kids Can Make
Have fun connecting with the kids, making snowman ornaments this holiday season. This Olaf ornament was inspired by Disney’s “Frozen” and the children’s book, “Frozen Olaf’s Night Before Christmas.” You might also enjoy making this Frozen-Inspired Snowstorm Sensory Bottle.
‘Twas the night before Christmas, and all through the house, not a creature was stirring . . . until a sound awakens Olaf.”
Whether you want to make a classic snowman, snowman heads, or a Frozen-Inspired Olaf ornament, the supplies are the same. Might as well make a few of each of these polymer clay crafts for Christmas!
Use the links above to see the step-by-step tutorials for each of the other polymer clay snowman projects. You might also enjoy making this handprint jewelry dish and ring bowl using polymer clay. It makes a great homemade gift idea from the kids for parents or grandparents.
How to Make a Frozen-Inspired Olaf Ornament:
Gather craft materials from the list of recommendations, then follow the step-by-step instructions below to make Olaf snowman ornaments with polymer clay. It’s essential to wash your hands and clean the surface you will be working on before starting this Christmas craft project. Polymer clay picks up every speck of dirt it can find. When working with white, this is especially important.
You will also need to wash your hands after working with a color if you will be working with white again. Yes, really. I kept a wet washcloth nearby to keep my and my daughter’s hands clean as we worked. Scroll down for more DIY details and tips. You might also enjoy 10 Reasons to Choose the Kindness Elves Over the Elf on the Shelf.
Frozen-Inspired Olaf Ornament Craft Materials and Supplies:
- Polyform clay assorted Colors & White
- twigs
- Galvanized wire
- Wire cutters
- Parchment paper and a baking sheet or a shallow dish
- Ornament hooks or baker’s twine, jute twine, string, or ribbon
- Oven-bake clay bond and glaze pack (optional)
Related: Elf Peg Doll Ornaments Kids Can Make
Related: Walnut Shell Manger Ornament
Step-by-Step Olaf Ornament DIY Assembly Instructions:
Follow the instructions below to build an Olaf ornament with polymer clay:
1. Prepare Olaf Body Pieces and Ornament Parts:
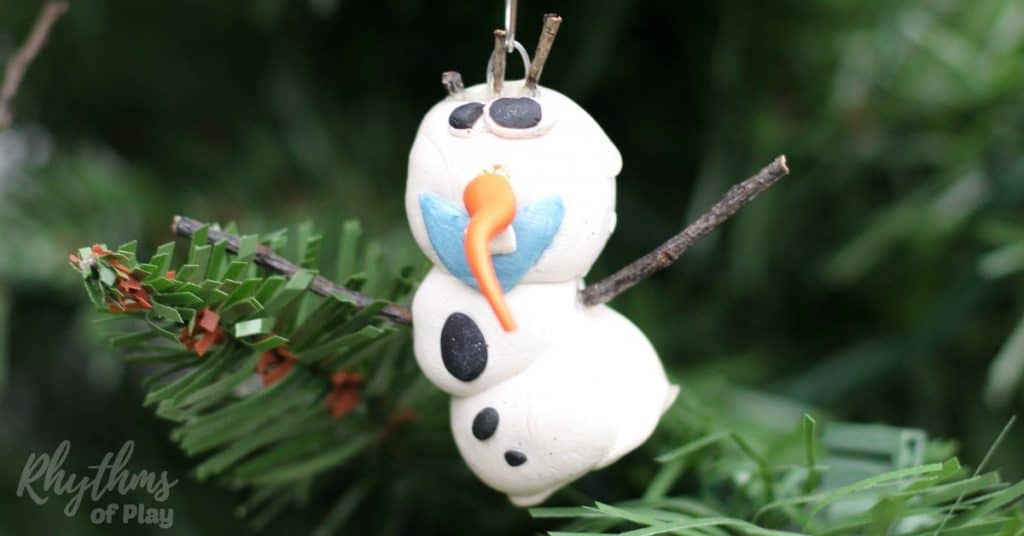
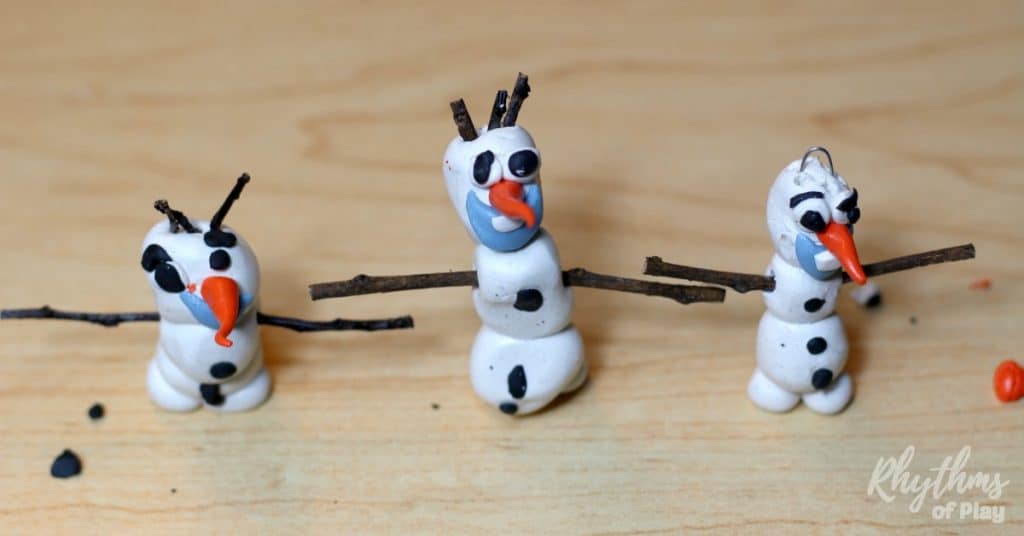
- Make clay pieces of Olaf: body, snowball legs, nose, eyes, eyebrows, mouth, tooth, and buttons as shown in the photo below.
- The easiest way to make a carrot nose is to roll a little bit of orange polymer clay into a small ball.
- Next, roll one side of it like a snake until you have a small carrot.
- Select and trim twigs to use for arms and hair.
- Cut a 2-1/1/2 inch piece of galvanized wire and bend it in half.
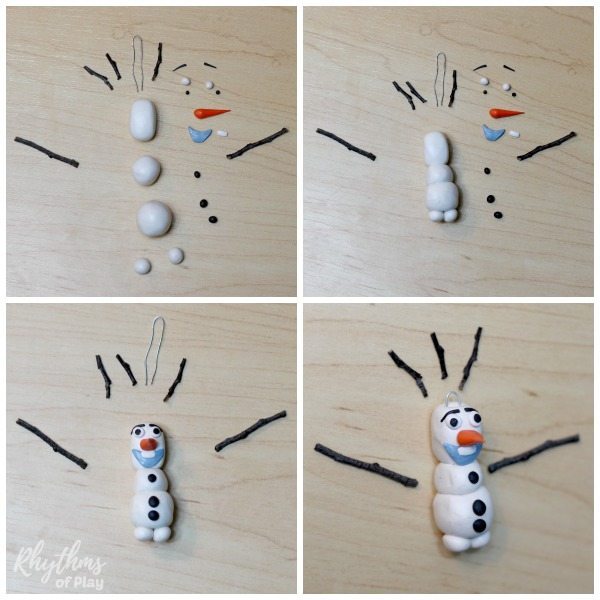
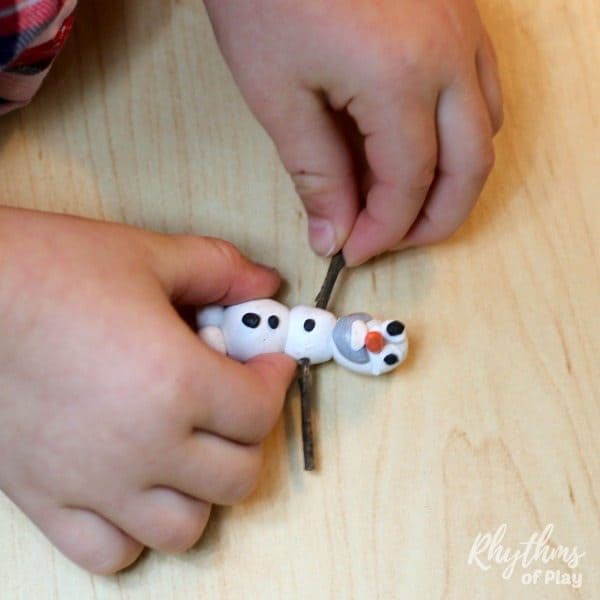
2. Assemble Olaf:
- Assemble Olaf by sticking the clay pieces of his body together.
- Start with the body, next attach the mouth, tooth, nose, eyes, and buttons.
- Have fun making Olaf Ornaments in different positions if you wish.
- Finally, add twig arms and snowball legs.
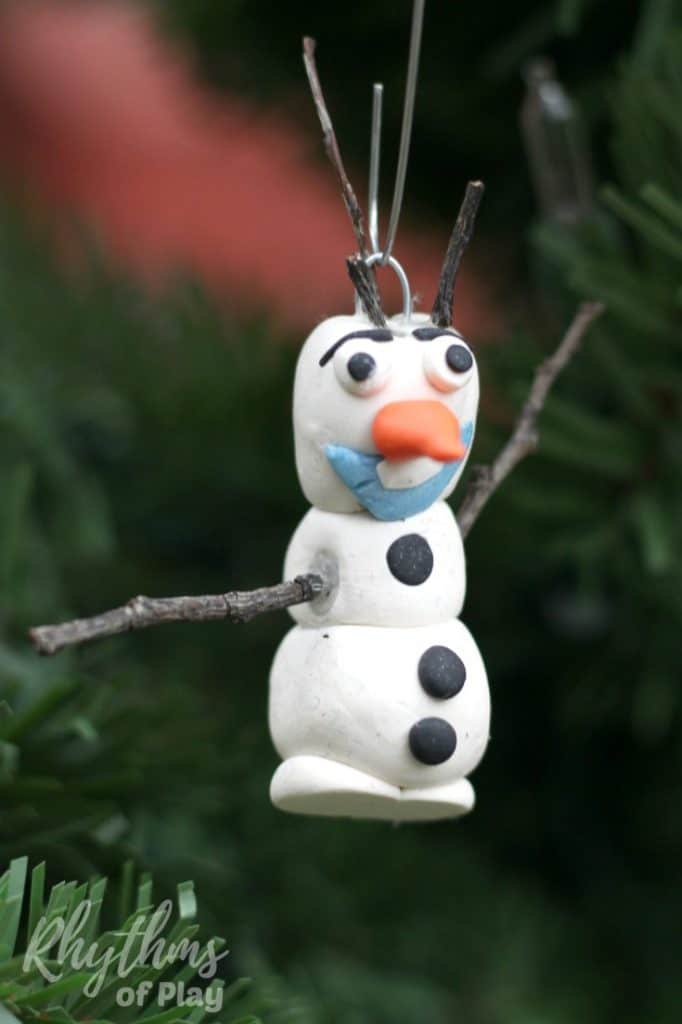
- Place the bent galvanized wire hook you made in step one, prongs down, into the top of the ornament.
- This will make it possible to hang the ornament once it is baked. If you want to make a clay Olaf figurine that doesn’t need a hanger, don’t add this hook.
3. Glue Olaf’s Arms, Legs, and Hair in Place (optional)
- Gently pull out each twig arm and each piece of twig hair one at a time.
- Place a drop of polyform bake-and-bond (also included in the oven-bake clay bond and glaze pack listed above) into the hole, then insert the twig back into it.
- My daughter and I discovered that this step really helped the twigs stay attached to Olaf’s body.
4. Bake Olaf Ornaments:
- Bake Olaf ornaments according to the polymer clay manufacturer’s directions.
- I baked the clay ornaments in the photographs at 275°F for 25 minutes on a baking sheet lined with parchment paper.
5. Glaze to Seal and Protect (optional):
- Finally, use a foam brush to apply the glaze on the Olaf ornament to seal, protect, and add a professional shine.
Related: Rustic Acorn Marble Ornaments
6. Make the Ornament Hanger (optional):
- Cut a piece of string, twine, or ribbon, or use an ornament hook.
- Loop it through the ornament hook and tie the ends together to hang it.
- An ornament hanger is unnecessary if you are making an Olaf figurine that you don’t intend to hang.
Related: Reverse Fingerprint Christmas Tree Cards Kids Make
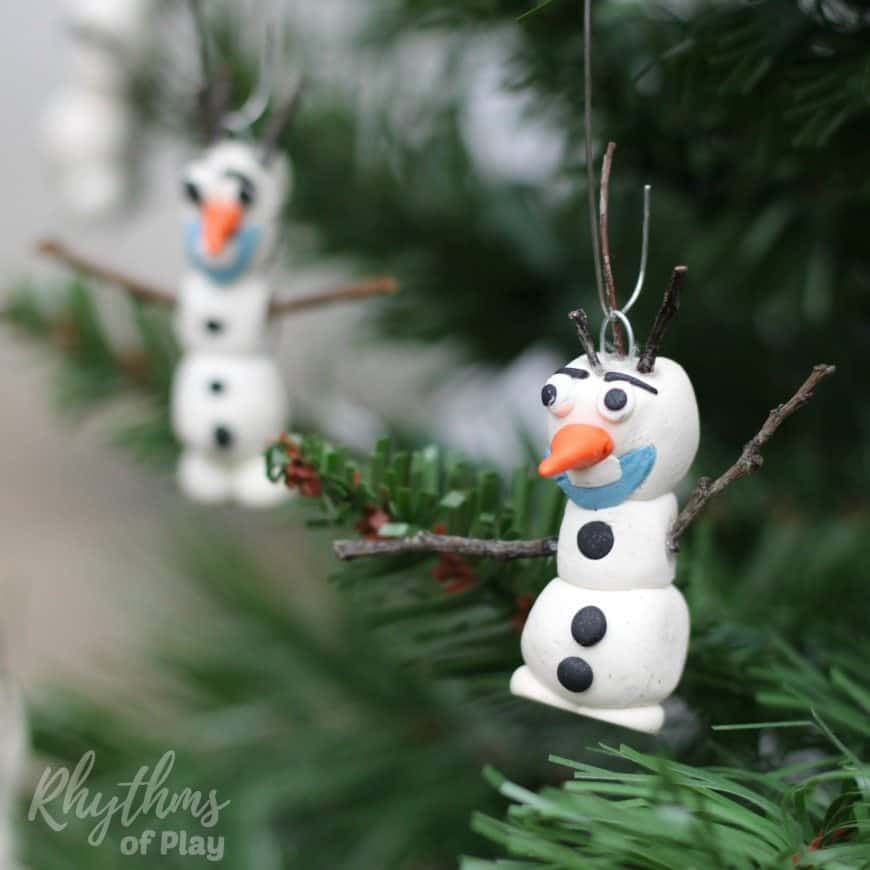
My Daughter’s Collection of Frozen-Inspired Homemade Olaf Ornaments:
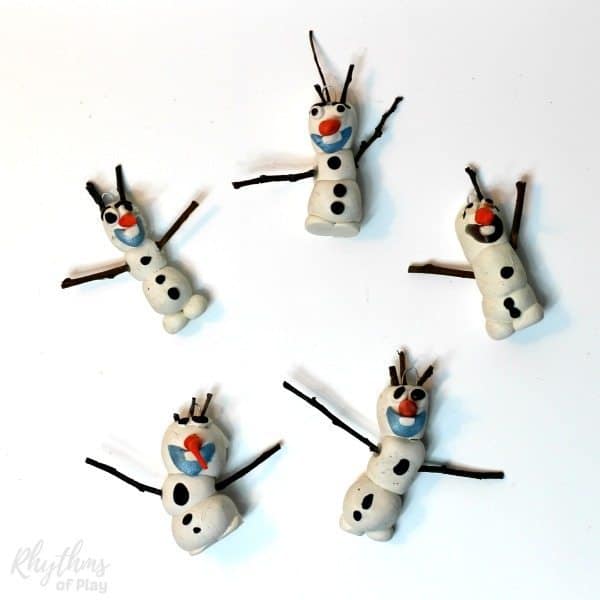
Making Olaf ornaments is a fun winter activity and Christmas craft that my daughter thoroughly enjoyed. Look at all of the wonderful Olaf ornaments she made. Aren’t they awesome!
As you can see in the photograph below, she made a total of five Frozen-inspired Olaf ornaments, and she still wants to make more. For more Christmas ornament craft ideas, check out these DIY Christmas ornaments.
Related: Simple Stone Advent Calendar
DIY Olaf Ornaments Inspired by Disney’s “Frozen”
Making a homemade DIY Olaf ornament is an easy Christmas craft for kids inspired by Disney’s “Frozen” and “Frozen Olaf’s Night Before Christmas Book and CD.“
Handmade ornaments like this polymer clay Olaf ornament are perfect for the Christmas tree. They make beautiful holiday decorations and a great kid-made gift idea! You might also enjoy making these DIY Christmas ornaments.
Be sure you check out this Family Gift Guide and this collection of Unique Handmade Gifts Kids Can Make. Friends and family always adore unique handmade gifts from the kids!
You might also enjoy these meaningful family Christmas traditions for a magical holiday season.
Learn more about Nell Regan Kartychok, author, photographer, and creator of this original Olaf Ornament craft HERE, and Rhythms of Play HERE!
If you Like These DIY Ornaments, you may also like:
- Meaningful Christmas Traditions for a Magical Holiday
- Ultimate Family Gift Guide with DIY and Ready-Made Ideas!
- 10 Reasons to Choose the Kindness Elves Over the Elf on the Shelf
- Winter Bucket List


What a lovely snowman and thank you for the detailed instructions. I’m assembling a list of things to do over Christmas and this will be on the list.
So glad you like these ornaments, Robyn. If your kids are anything like mine they will love making these! Be sure to ask them, “Do you want to build a snowman?” The reaction of my daughter was priceless. And… These ornaments and the other snowmen we made will be enjoyed for years to come. They are really sturdy and built to last. We are going to store them away for next year in an egg carton to protect their twig parts. Have fun!