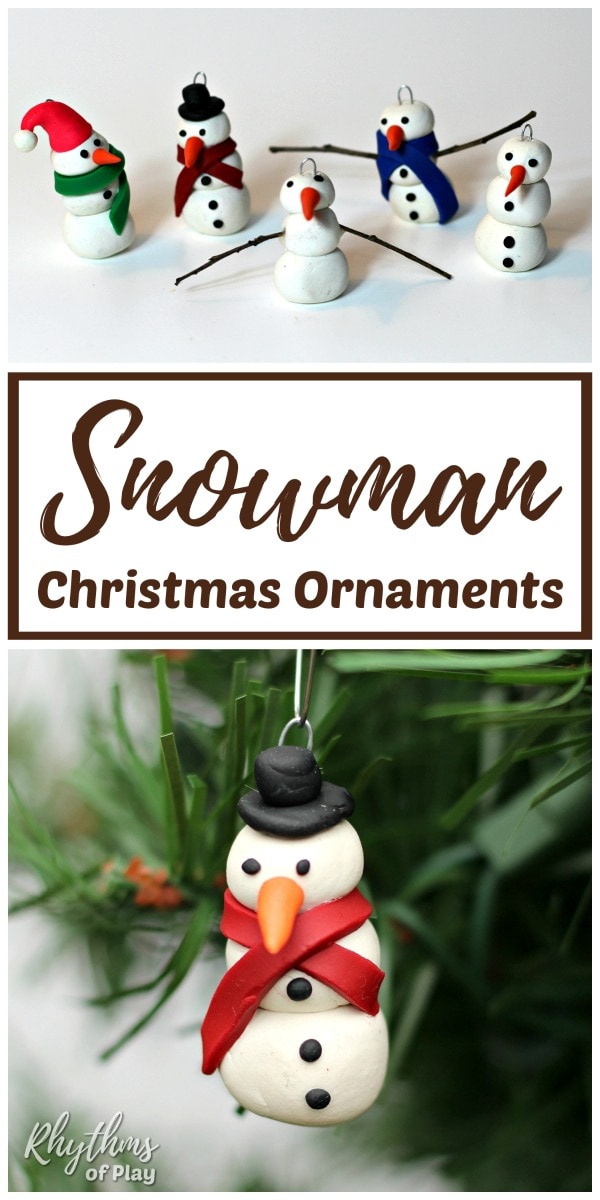
Children love to make Snowman Ornaments for Christmas. Make these cute and easy snowman Christmas crafts with kids or adults at home or in the classroom!
Clay snowman ornaments are easy Christmas crafts for kids and adults to make at home or in the classroom. Use the step-by-step DIY craft tutorials below to make clay snowman ornaments for your Christmas tree. Working with polymer clay to make snowman crafts is easy for children and adults. The adorable snowman craft ideas below can be made into festive DIY Christmas crafts and decorations. Simple snowman crafts, like those shown in the photographs below, make lovely standing figurines for winter displays, fairy gardens, and other festive DIY decor. Or make these easy Fingerprint Snowman Cards for family, friends, and relatives.
“Do you want to build a snowman?” My daughter squealed excitedly when I asked her this question, and I’ll bet your kids will, too! My daughter and I made each of the cute DIY snowman ornaments shown in the photographs using polymer clay. Because we were building snowmen and snowwomen, we also made Frozen-inspired Olaf ornaments and snowman head ornaments. My daughter didn’t want to build a snowman without building Olaf! First published on December 8, 2016, these adorable snowman craft tutorials are regularly updated to improve content, offer new ideas, and stay current.
Snowman Ornaments: Fun Winter Crafts for all Ages and Abilities:
Crafting these polymer clay snowman crafts is enjoyable and rewarding for the entire family or classroom. The finished snowman crafts are the cutest little things. They can become charming DIY winter figurines and decorations, personalized gifts, fun Christmas tree ornaments, and festive additions to holiday displays to be cherished for generations to come. Clay Christmas craft projects like these snowman ornaments have the added benefits of building hand strength and developing stronger fine motor skills. You might also enjoy these homemade DIY Christmas ornaments.
Working with Polymer Clay:
Polymer clay is easy to work with and offers an inexpensive way for children (and adults) to explore their creativity. Use your hands to mold polymer clay into snowmen and snowwomen crafts as instructed below, or try various clay tools to create your finished pieces. You might also enjoy making a polymer clay ring bowl or jewelry dish. (Click the link for step-by-step DIY instructions.)
I recommend using polymer clay for snowman crafts because it does not air-dry and remains soft and flexible until baked in your home oven. Sculpey and Fimo are two popular polymer clay brands. It is a versatile and easy-to-mold craft material ideal for crafting snowmen and women with festive, intricate details and vibrant colors, as shown in the photographs. Best of all, no kiln is needed to bake and harden. Making snowman ornaments and crafts with polymer clay offers a delightful, creative experience for both children and adults.
Making polymer clay crafts (like these snowmen and women ornaments) can enhance fine motor skills, boost creativity, and provide a therapeutic, calming activity for kids and adults of all ages and abilities. Children can benefit from the sensory experience of shaping and texturing clay, which aids their cognitive and emotional development.
For adults, crafting with polymer clay can be a stress-relieving hobby, offering a break from the digital world and fostering a sense of accomplishment. Working with polymer clay can also promote family bonding and provide opportunities to learn and share artistic skills across generations. Build some polyform clay snowman ornaments like the one in the photograph below to deliver a warm hug to someone you love today!
Adorable Melted Snowman Crafts for Kids or Adults:
The cute little snowman crafts and ornaments shown in the photographs are inspired by the children’s book “Snowmen at Night.” While my daughter dreamed of bringing Olaf to life, I thought of the beautiful ways to build snowman ornaments to hang on our Christmas tree and display around our home as DIY Christmas decor. I couldn’t wait to see how each snowman craft would melt and change in the oven, like “Snowmen at Night!”
Have you ever built a snowman and discovered the next day that his grin has gotten a little crooked, or his tree-branch arms have moved? And you’ve wondered . . . what do snowmen do at night? This delightful wintertime tale reveals all!
Snowmen at Night
In other words, these snowman crafts are melted snowman ornaments. However, these adorable melted snowman crafts don’t melt down to lie flat. Instead, they tilt and shift slightly to give each snowman ornament a unique expression with individual personality and distinctive character. Look at how well the homemade clay snowman crafts turned out in the photograph below. Each snowman craft melted slightly and leaned perfectly here and there to look like melted snowmen at night. The melted snowman ornaments and crafts look adorable, standing on our nature table, playing in a winter fairy garden, and hanging on our Christmas tree along with other store-bought and DIY ornaments.
Related: Winter Bucket List
DIY Snowman Ornaments: How to Make Snowman Ornaments
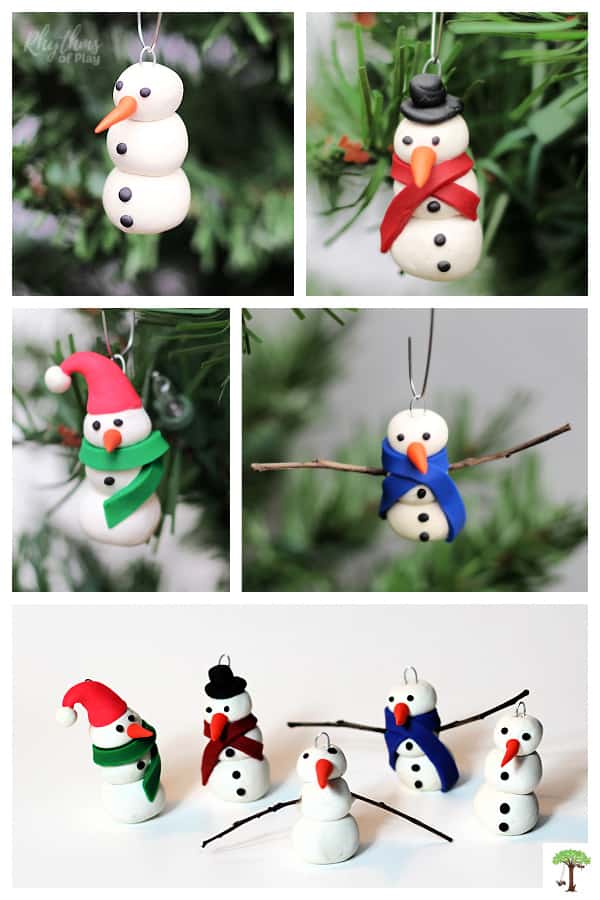
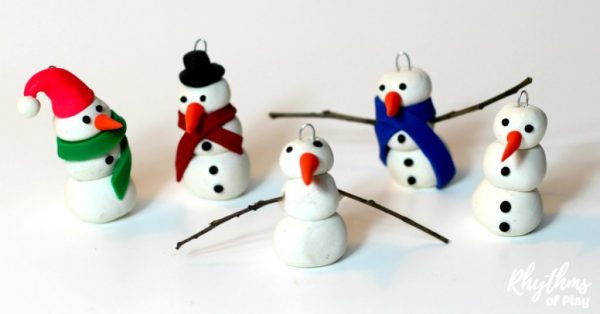
There are many ways to assemble these cute little clay snowman ornaments. We made them five different ways, but I bet you can think of more! The best part of making these polyform clay snowman crafts is seeing how they melt and change, but only slightly, when you put them in the oven, just like “Snowmen at Night!“
This post includes several ideas for making snowman ornaments with clay. We have included basic assembly directions for five different polymer clay snowman ornaments with complete step-by-step DIY project instructions for each type of snowman (and snowwoman) ornament craft idea shown in the photographs for this craft tutorial.
Please scroll down to see the different snowman Christmas ornament craft instructions and their various assembly instructions before deciding which DIY snowman ornaments you want to make. Each set of snowman craft instructions also includes a step-by-step photo tutorial to make putting these super cute Christmas crafts together easier. You might also enjoy these DIY Christmas Ornaments for kids or adults.
How to make polymer clay snowman ornaments and Figurine crafts: Step-by-Step Assembly Instructions:
First, read through the basic step-by-step instructions, and look at the snowman craft ideas in the next section to assemble clay snowman ornaments. Next, gather the supplies and materials for the snowman craft. Then, make your favorite DIY snowman ornaments with any of the ideas below. The craft ideas below can also be applied to other polymer clay works. You can also make these festive Acorn Marble Christmas ornaments.
1. Gather DIY snowman Christmas ornament craft supplies and materials:
- Polymer clay assorted colors & white
- Twigs (Optional: Encourage children to go on a nature hunt for small twigs, sticks, and other natural treasures they can use to make snowman crafts in the backyard or outside.)
- Galvanized wire
- Wire cutters
- Ornament hooks or baker’s twine
- Polymer clay tools (Optional.)
- Clay rolling pin (Optional; a rolling pin is also included in the clay tool set above.)
- Glass mat (Optional, but recommended to protect the work surface.)
- Parchment paper
- Baking sheet or tray
- Bake-and-bond polymer clay glaze pack (Optional for bonding, sealing, protecting, and repairing.)
2. Wash hands and clean workspace:
- Wash your hands and clean the surface on which you will be working.
- Polymer clay picks up every little speck of dirt, so this step is essential when working with white polymer clay to make snowman crafts.
- It’s also best to wash your hands after working with another color before working with white again.
- As I said, white polyform clay picks up everything, including the tiny bit of colored clay on your hands.
- Keep a damp washcloth or wipes nearby to clean your hands as you work.
3. Make polyform clay snowman Body Parts and accessories:
- First, make each piece you will use to assemble or build the polyform clay snowman ornaments: body, nose, eyes, buttons, arms, scarf, top hat or cap, twig arms, snowball legs, etc.
- Assemble the Snowman Body:
- Roll two or three sections of white polymer clay
 into balls.
 - Stack them one on top of the other, with the biggest clay snowball on the bottom and the smallest on the top.
- Roll two or three sections of white polymer clay
- Make a Carrot Nose:
- The easiest way to make a carrot nose is to roll some orange polymer clay into a small ball.
- Next, roll one side of the orange clay into a snake until it looks like a small carrot.
- Roll Coal Eyes and Buttons:
- Roll tiny sections of black clay into small balls to make coal eyes and buttons for the snowman’s face and body.
- Make Snowman Ornament Accessories (optional):
- In the next section, the tutorial for each DIY snowman ornament craft idea includes step-by-step instructions and a photo tutorial for making the remaining DIY snowman accessories, such as a scarf, snow cap, or top hat.
- Collect tiny twigs and sticks for arms (optional):
- Encourage children to go outside in nature to find small twigs and sticks to make snowman arms for their ornaments and crafts.
- Using nature’s treasures to create arms is a great way to give each ornament a unique expression, as shown in the photographs of snowman crafts with twig arms below.
- Assemble the Snowman Body:
 into balls.
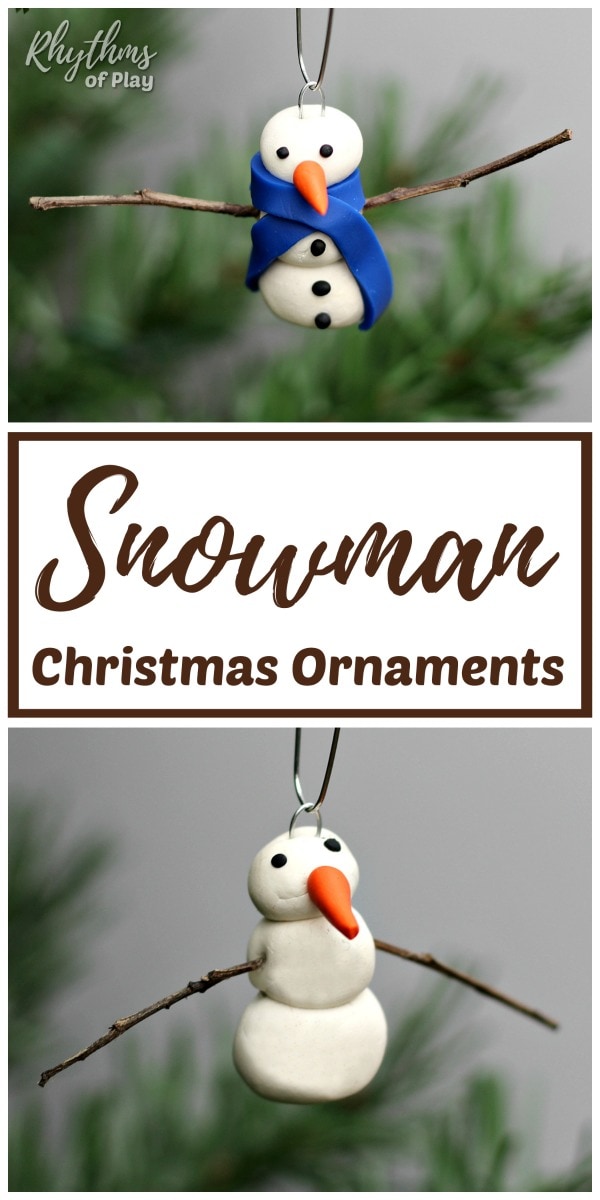
4. Build or assemble clay snowman ornaments:
- Assemble homemade snowman ornaments by sticking the pieces together in the following order:
- Start with the body.
- Next, add a scarf if using one.
- Step-by-step DIY instructions for making a clay scarf are in the next section.
- Then, add the nose and eyes.
- Putting the nose on your snowman crafts first makes it easier to know where the eyes go.
- Add buttons and any other hats and accessories you’d like to put on your snowman crafts to dress them in various creative ways.
- Finally, add twig arms or snowball legs (like Olaf’s) if desired.
5. Make a hanger Loop for the snowman ornament craft, or flatten the bottom to create a standing figurine:
- Use the wire cutters to cut 2-1/1/2 inches of galvanized wire.
- Bend the wire in half.
- Place the bent galvanized wire prongs down into the top of your ornament.
- This simple metal hook creates a small loop that will bake into the polymer clay and form a strong hanger at the top of the snowman ornament.
- In other words, this metal hanger loop makes it easy to hang DIY snowman ornaments on the Christmas tree with twine or ribbon.
- This simple metal hook creates a small loop that will bake into the polymer clay and form a strong hanger at the top of the snowman ornament.
- If you want to make a standing snowman figurine instead of an ornament, gently press the bottom of the clay snowman down on your workspace to create a nice flat bottom for the snowman craft to stand on.
6. Bake snowman ornament crafts:
- Place clay snowman crafts on a baking sheet lined with parchment paper, standing upright so they can gently lean and melt like snowmen at night.
- Bake according to the manufacturer’s directions for the polymer clay. We baked our polymer clay snowman ornaments at 275°F for 25 minutes.
- Let them sit for five to ten minutes, then carefully remove them from the baking sheet or tray and allow them to cool.
7. Make a hanger for each DIY snowman ornament (optional):
- Skip this step if you are making snowman figurines to add to your DIY holiday decorations.
- Cut a section of baker’s twine or Christmas ribbon six to ten inches long.
- Thread twine or ribbon through the metal hanger loop (made in step 4), then tie the ends together to finish the hanger.
- Alternatively, you can use an ornament hook.
8. Hang Snowman Ornaments on the Christmas tree, stand them in a winter display, or give them to someone special:
- Hang your homemade snowman ornament on the Christmas tree.
- Place them into a Christmas or winter display on a table, shelf, or windowsill.
- Add them to a winter nature table display.
- Use them as figurines in a winter fairy garden.
- Or give them to someone special as a DIY Christmas gift!
9. Fix and repair with bonding glue if needed:
- The cute snowman crafts in the photographs below, and several more that we have made since, have dangled sweetly on our Christmas tree for many years.
- After several years of constant abuse from toddlers, children, and cats, we have discovered that if the carrot nose, snowcap pom-poms, or coal buttons break off the ornament. They can be easily reattached with clay bonding glue.

8 Step-by-Step Clay DIY Snowman Ornament Ideas:
Here are step-by-step instructions for making snowman ornament crafts and accessories. Please choose your favorite snowman craft, or make them all!
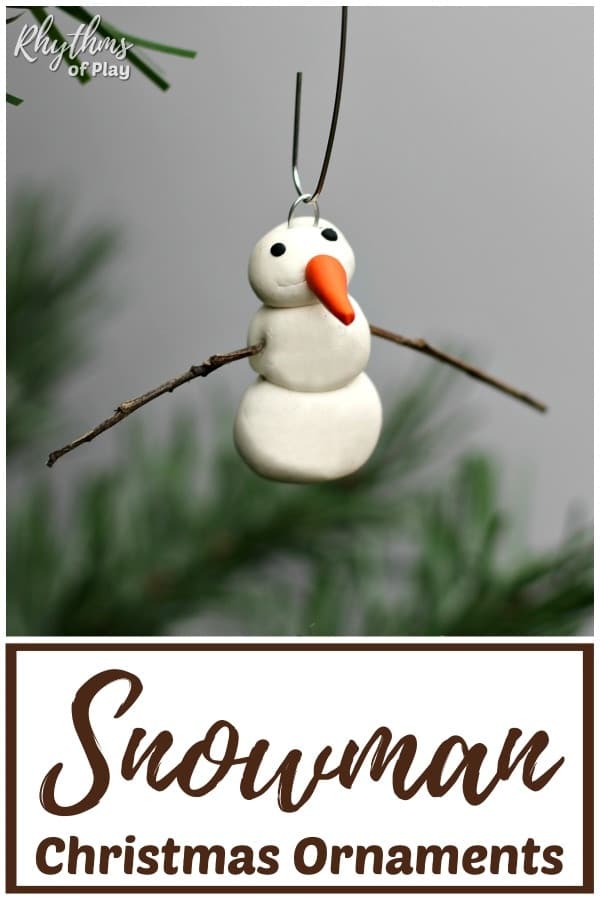
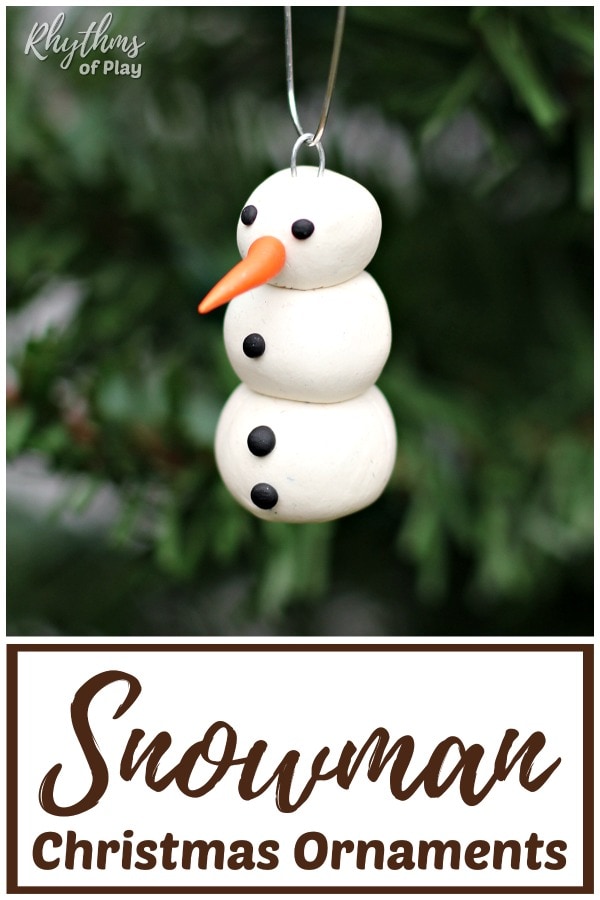
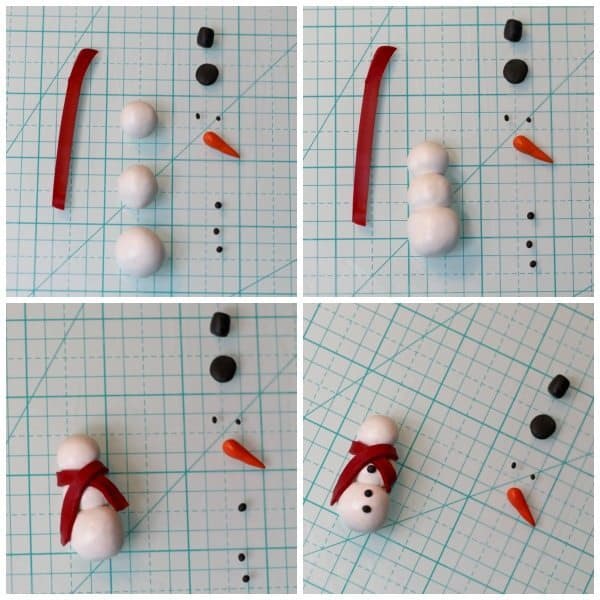
1. How to make simple snowman ornaments:
- Wash your hands and clean the work surface.
- Build a clay snowman by rolling two or three sections of white polymer clay into balls. Stack them on top of each other, with the most enormous clay snowball on the bottom, as shown in the photo tutorial below.
- Add a clay carrot nose to your snowman ornaments.
- Roll tiny sections of black clay into small balls to make coal eyes and buttons and use them to decorate the snowman ornament’s face and bodies, as shown in the photographs below.
- Make a wire hanger. Step-by-step directions are in the section above. (Optional, skip this step if you are making a standing snowman figurine.)
- Place on a parchment-lined baking sheet and bake according to the manufacturer’s directions for the polymer clay.
- Tie ribbon or baker’s twine on each clay snowman ornament to hang them on the Christmas tree, give them as homemade Christmas gifts, or use them to decorate mantles and windowsills.

 snowman by rolling two or three sections of
  into balls. Stack them on top of each other, with the most enormous clay snowball on the bottom, as shown in the photo tutorial below.
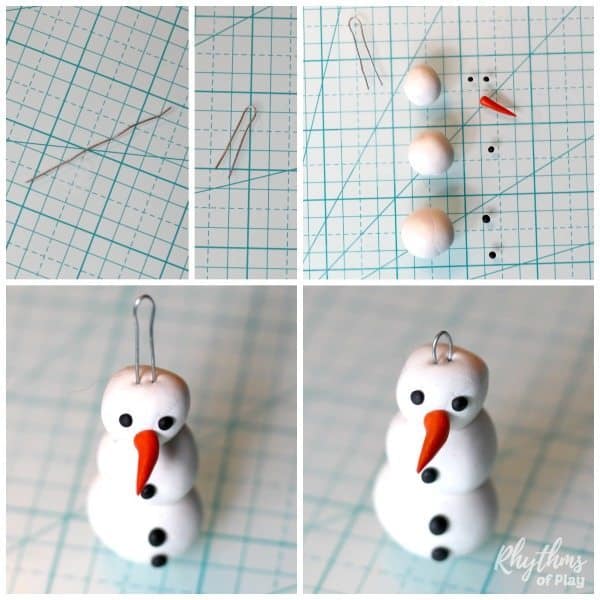
Related: Christmas Handprint, Footprint, and Fingerprint Art Card Ideas
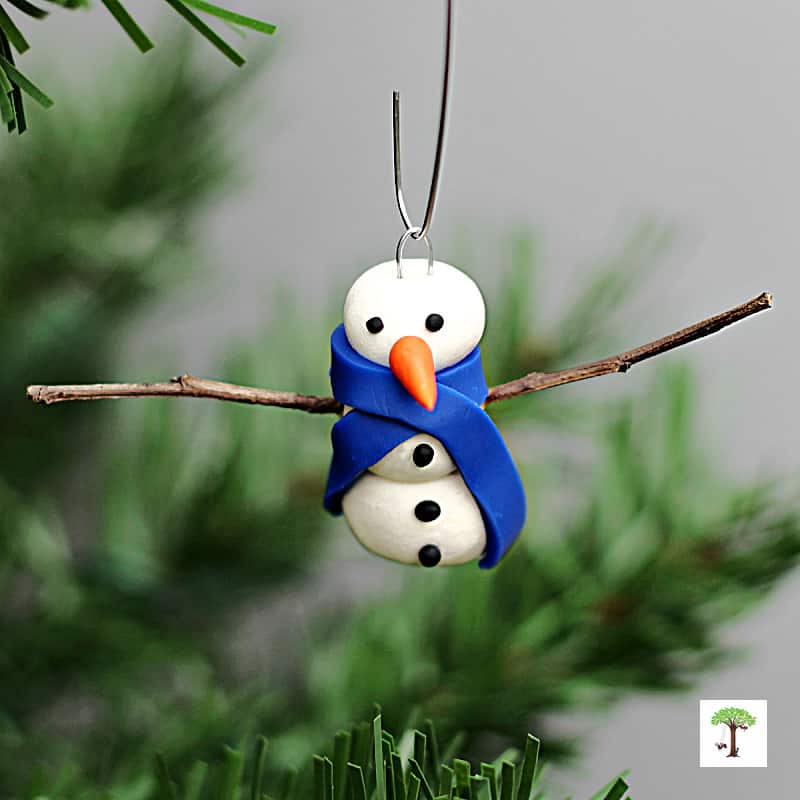
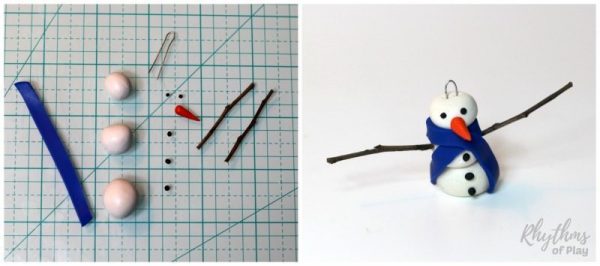
2. How to make clay snowmen crafts with twig arms:
- Wash your hands and clean the work surface.
- Build a clay snowman with rolled white polymer clay balls stacked on each other, with the smallest clay snowball on the top.
- Add a clay carrot nose to your snowman ornaments.
- Roll tiny sections of black clay into small balls to make coal eyes and stick them onto the snowman ornament’s face and body.
- Choose the twigs you want to use and insert them into each snowman ornament’s left and right sides.
- Make a wire hanger. Step-by-step directions are in the section above. (Skip this step if making a standing snowman figurine.)
- Place on a parchment-lined baking sheet and bake according to the manufacturer’s directions for the polymer clay.
- Tie ribbon or baker’s twine on each clay snowman ornament to hang them on the Christmas tree, give them as homemade Christmas gifts, or use them to decorate mantles and windowsills.
 snowman with rolled white polymer clay
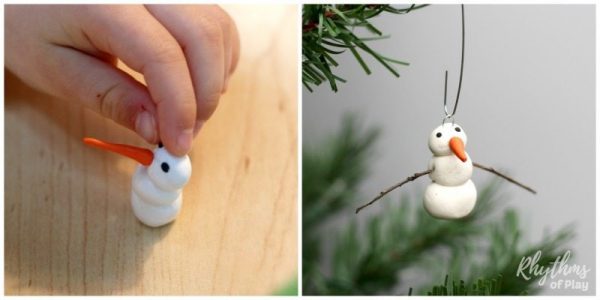
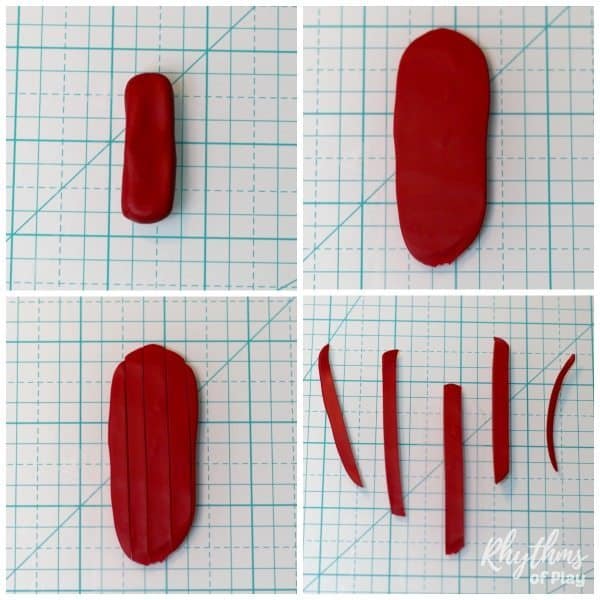
3. How to make a polymer clay scarf for a snowman craft:
We recommend using a glass cutting mat to make polyform clay snowman scarves. Most colors of polymer clay can stain, so you can see the red coming off slightly in the photos below. A glass cutting mat can protect your table from stains and cuts and allow you to pick up a small snowman scarf without tearing it.
- Wash your hands and clean the work surface.
- Use your fingers to form a small rectangle of polymer clay.
- Flatten the polyform clay rectangle with a rolling pin or jar on a glass cutting mat to protect your table.
- Use a precision knife or clay cutting tools to cut strips from the flattened clay, as shown in the photo tutorial below.
- Trim to the desired length with a clay-cutting tool or a precision knife.
- Pick up each clay strip and wrap it carefully around the neck of the snowman crafts.
- Pull gently on each side to make it longer if needed.
- Finally, press down slightly to gently secure the clay scarf to the snowman craft.
Related: How to Make Beaded Snowflake Ornaments
4. How to make a clay top hat for snowman crafts:
- To make the top hat, roll two balls of black polyform clay.
- As shown in the photo tutorial below, flatten one of the black clay balls to make the bottom of the top hat.
- Shape the other ball of clay into a cylinder and attach it to the top of the flat circle to complete the top hat.
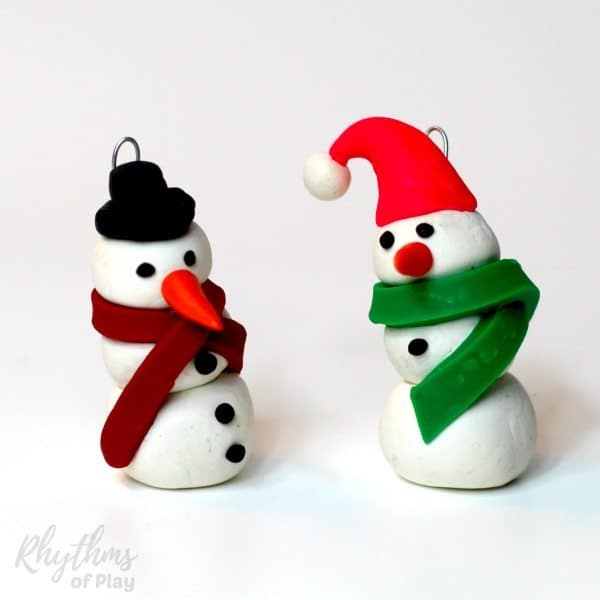
5. How to make a snowman ornament with a scarf, buttons, and a top hat:
- Wash your hands and clean the work surface.
- Build a snowman by rolling two or three sections of white polymer clay into balls. Stack the polymer clay snowballs on top of each other, with the biggest clay snowball on the bottom.
- Wrap a polyform clay scarf around the body of the snowman craft. If needed, gently tug on either side to lengthen it.
- Roll tiny sections of black clay into small balls to make coal buttons and place them onto the clay snowman ornament’s body.
- Place the top hat on the snowman ornament. (Step-by-step directions are directly above.)
- Add a carrot nose to your snowman ornament craft. The easiest way to make a carrot nose is to roll some orange polymer clay into a small ball. Next, roll one side of it like a snake until you have a small carrot. Putting the nose on your snowman first makes it easier to place the eyes.
- Roll tiny sections of black clay into small balls to make coal eyes and place them onto the snowman’s face ornaments between the hat and the carrot nose.
- Make a wire hanger for each ornament. Step-by-step directions are in the snowman ornament instructions at the beginning of this post. (Skip this step if making a standing snowman figurine.)
- Place on a parchment-lined baking sheet and bake according to the manufacturer’s directions for the polymer clay.
- Tie ribbon or baker’s twine on each clay snowman ornament to hang them on the Christmas tree, give them as homemade Christmas gifts, or use them to decorate mantles and windowsills.
 into balls. Stack the polymer clay snowballs on top of each other, with the biggest clay snowball on the bottom.
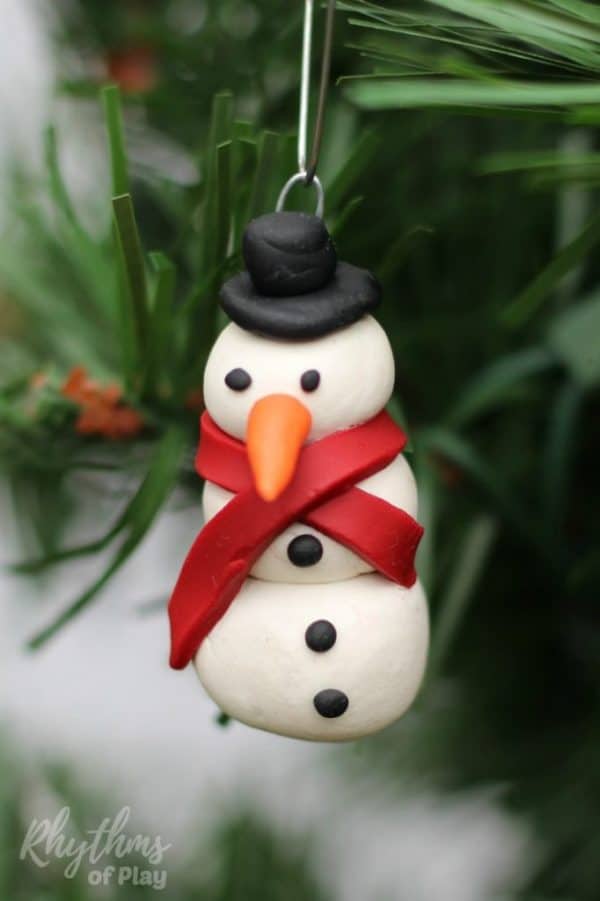
Related: Christmas Gifts Kids Can Make
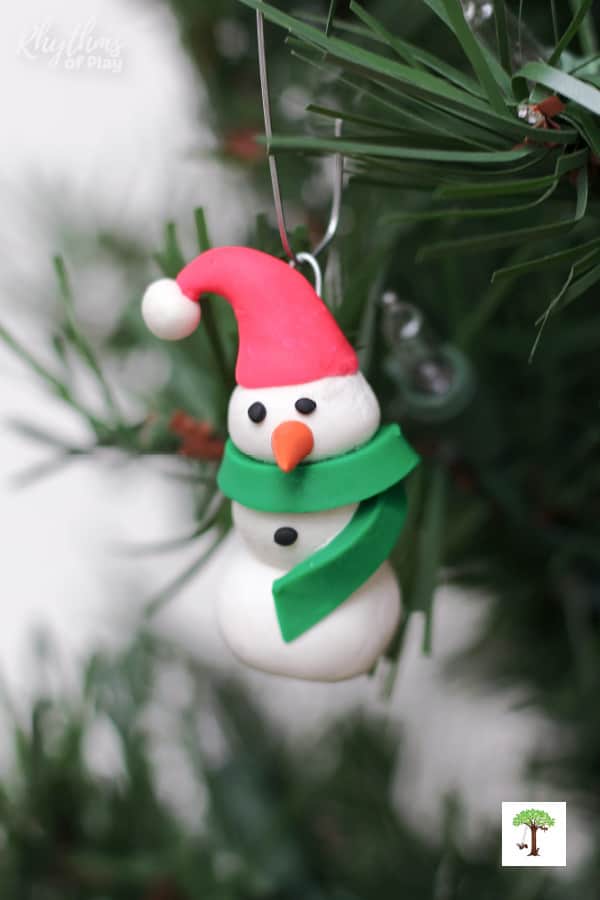
6. How to make a snowcap for snowman ornaments:
- Form a cap from a ball of clay by placing your thumb on one side to create the inner edge of the snowcap, beanie, or toque.
- Then, gently pull and form the rest of the clay into a cup shape with your thumb and forefinger of the other hand.
- We found that spinning it around while we worked was effective.
- When finished, attach a small white clay ball to the tip of the cap to make the pom-pom. (Use clay bond to attach it more securely if desired.)
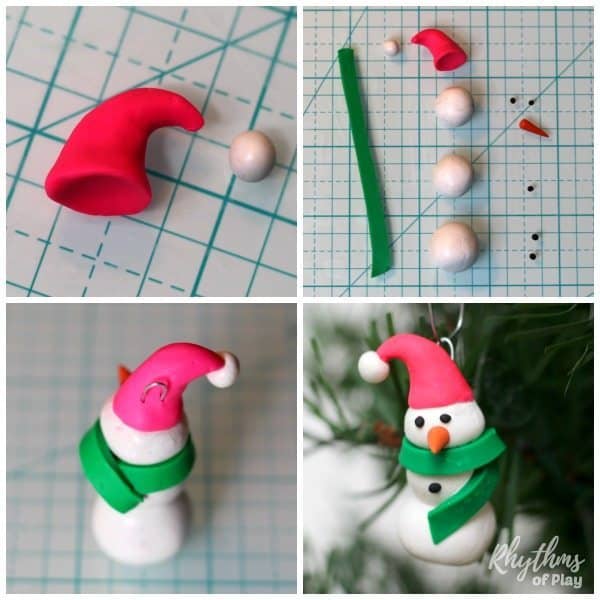
7. How to make snowman ornaments with a scarf, buttons, and Snowcap:
- Wash your hands and clean the work surface.
- Build a snowman by rolling two or three sections of white polymer clay into balls. Stack the clay snowballs one on top of the other, with the biggest clay snowball on the bottom.
- Make and add the snowcap. (Step-by-step directions are in the section directly above.)
- Wrap a polyform clay scarf around the body of the snowman ornament. As you can see in the photograph above, we wrapped the clay snowman scarf differently from the other ornaments. Again, gently pull the clay scarf to make it longer if needed.
- Add a carrot nose to your snowman ornament craft.
- Roll tiny sections of black clay into small balls to make coal eyes and place them onto the snowman’s face ornaments between the cap and the carrot nose.
- Roll tiny sections of black clay into small balls to make 1 to 5 coal buttons, and place them on the clay snowman ornament body, if desired. Depending on how you wrap the scarf, you may not have room for all the buttons. We used one button of the three I made for the snowman craft pictured above.
- Make a wire hanger. Step-by-step directions are in the section above. (Skip this step if making a standing snowman figurine.)
- Place on a parchment-lined baking sheet and bake according to the manufacturer’s directions for the polymer clay.
- Tie ribbon or baker’s twine on each clay snowman ornament to hang them on the Christmas tree, give them as homemade Christmas gifts, or use them to decorate mantles and windowsills.
 into balls. Stack the clay snowballs one on top of the other, with the biggest clay snowball on the bottom.
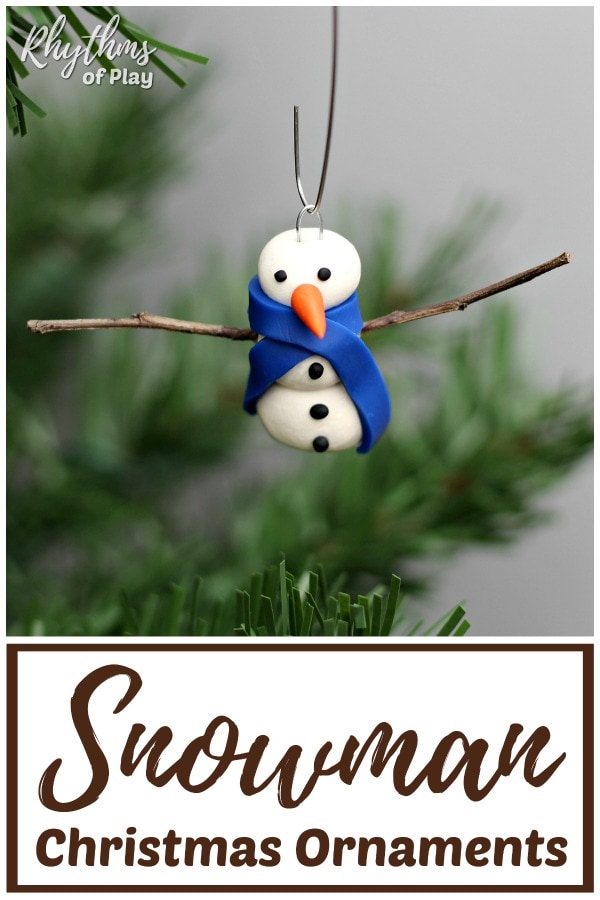
8. How to make a snowman Christmas ornament with a scarf, buttons, and twig arms:
- Wash your hands and clean the work surface.
- Roll two or three sections of white clay into balls to make a polymer clay snowman. Stack them with the biggest clay snowball on the bottom.
- Use the directions #3 above to make a polyform clay scarf.
- Wrap the scarf around the snowman craft, then gently pull on each side to make it longer, if desired. (Step-by-step directions to make a clay scarf are in snowman ornament craft idea number 3 above.)
- Add a clay carrot nose to your snowman ornaments.
- Roll tiny sections of black clay into small balls to make coal eyes and buttons to decorate the snowman ornament’s face and body.
- Choose the twigs you want to use and insert them into the snowman ornament’s left and right sides.
- Make a wire hanger and place its prongs down into the top of the snowman ornament. The main instructions at the beginning of this post contain step-by-step directions for making a wire hanger.
- Skip this step if you’re making a standing snowman figurine.
- Place the snowman ornament on a parchment-lined baking sheet and bake according to the manufacturer’s directions for the polymer clay.
- Tie ribbon or baker’s twine on each clay snowman ornament to make a hanger to hang it on the Christmas tree.
- These adorable snowmen also make sweet homemade Christmas gifts and DIY decor perfect for decorating mantles and windowsills for the holidays.
Here is the second snowman ornament craft my daughter made before she made Olaf over and over and over again. I cut the scarf for her, but she did everything else independently–isn’t it cute!?
DIY Snowman Christmas Ornaments
I’m sure you see where this is going. You can make handmade snowman ornaments with a scarf, top hat, cap, and twig arms with or without buttons. You can design a different type of cap, or you could have one holding a flower, snowflake, or gift. Or build Olaf, etc., etc. The possibilities are endless!
Making snowman ornaments with polymer clay is a simple winter craft for kids and adults. Handmade decorations like these cool snowmen ornaments are perfect for the Christmas tree and make an excellent gift idea. Or, make homemade snowman head ornaments! They also make beautiful handmade Christmas decorations and great kid-made gift ideas!
You might also enjoy these fun family Christmas traditions and this collection of Christmas art projects; both posts contain even more fun Christmas ideas!
If You Like Snowman Crafts, You May Also Like:
- Fingerprint Snowman Christmas Cards
- Best Winter Art Projects for Kids
- Christmas Handprint, Footprint, and Fingerprint Art Card Ideas
- Homemade Gifts Kids Can Make
More DIY Christmas Ornament Craft Ideas:
- Christmas Ornaments Kids Can Make
- Angel Ornaments
- Christmas Tree Twig Ornaments
- Elf Ornaments
- Acorn Marble Ornaments
- Half Walnut Shell Baby Jesus Ornament
- Alphabet Wood slice Ornaments
- Rhinestone Pinecone Ornaments
- Beaded Snowflake Ornaments


Leave a Comment