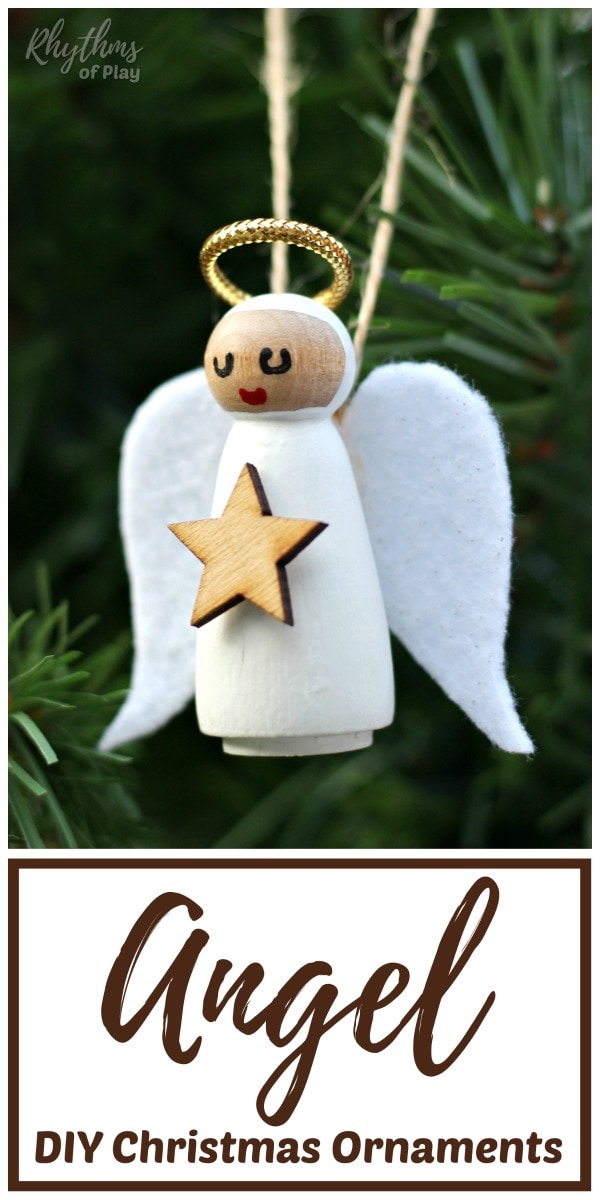
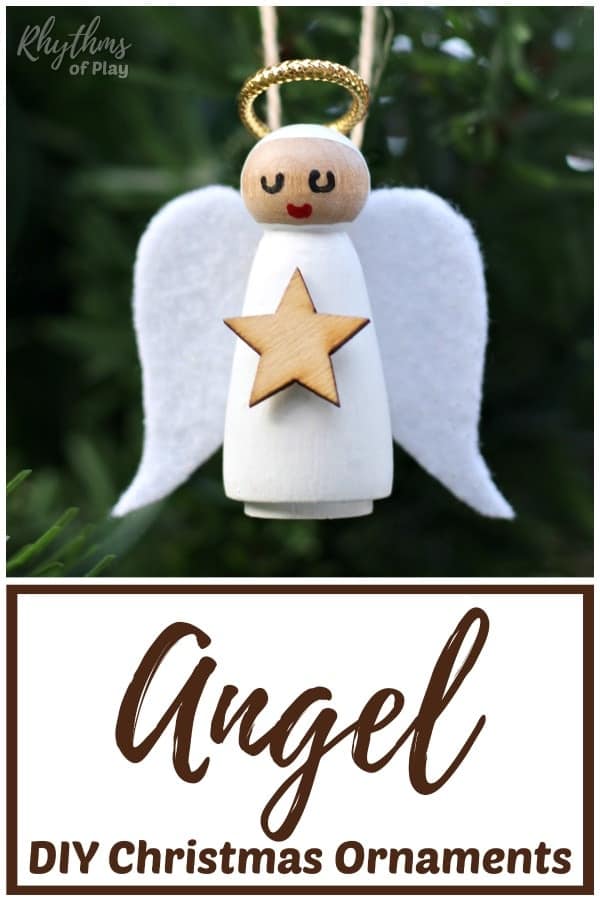
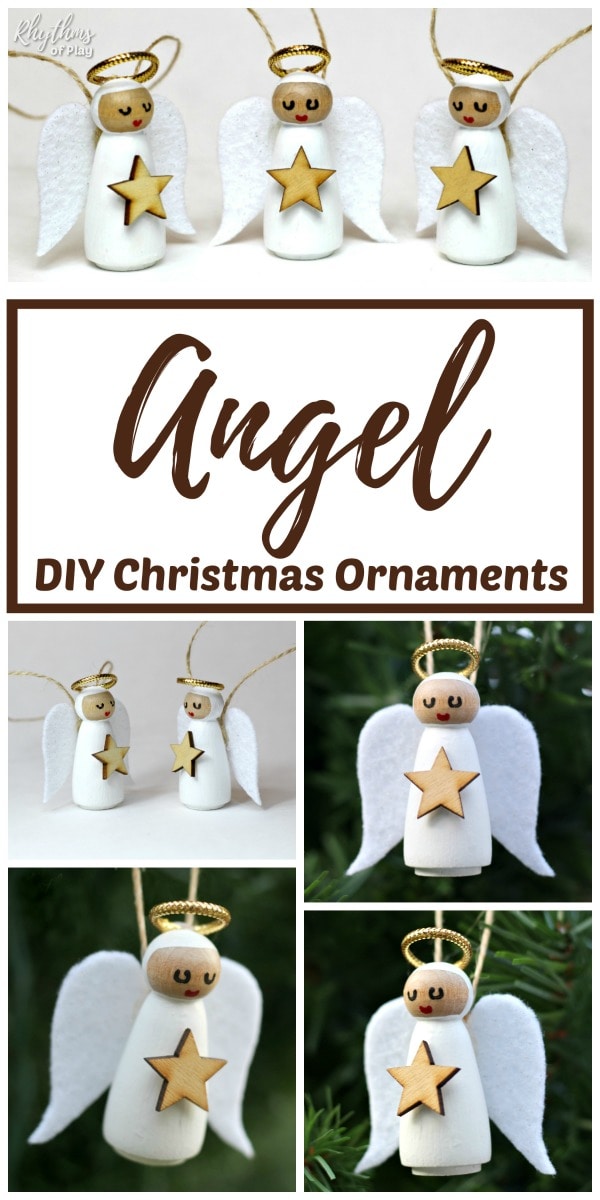
DIY Wooden peg doll angels make divine decorations for the Christmas tree and adorable figurines to add to your DIY Christmas decor.
Learn how to make handmade angel ornaments with a wooden peg doll with this fun Christmas craft tutorial for kids and adults. Homemade wooden angel ornaments are heavenly Yule or Christmas tree decorations, making them a great gift idea for friends and family. This Christmas craft project is perfect for families to create over the winter break, offering a delightful blend of simplicity and charm.
Making wooden Christmas angel ornaments is a delightful and creative way to add a personal touch to your holiday decor. My daughter gets excited to take out our angel ornaments from storage to hang on the Christmas tree every year. Even though my daughter and I made our peg doll angels several years ago, they still look as beautiful today as they did the day we made them. You might also enjoy these gorgeous DIY Christmas ornaments that kids or adults can make.
First published on December 18, 2016, this DIY peg doll angel craft tutorial has been updated to enhance the content. Scroll down for the step-by-step DIY project instructions for the divine angel ornament crafts shown in the photograph below.

Related: How to Make Tissue Paper Angel Ornaments
How to Make an Angel Ornament Christmas Craft:
Creating wooden angel ornaments using wooden peg dolls is a heartwarming and imaginative way to decorate your home for the Christmas season. This Christmas angel craft begins with selecting wooden peg dolls in various sizes as the base for your angels. The natural wood texture of these dolls creates a rustic and warm ambiance, perfect for a cozy and festive Christmas atmosphere.
To transform them into angels, paint the peg dolls in traditional white, as shown in the photographs. Or paint them in soft pastel hues in the colors of your choice. The angel wings are crafted from felt (or use another stiffened white, silver, or gold lace fabric). Use the printable angel wing outline template to cut the wings into the desired shape and size, and attach them to the back of the dolls.
The angels’ halos are made with non-stretch metallic cords. Alternatively, you can use pipe cleaners or thin wire to create a similar celestial sparkle. To finish these sweet Christmas ornaments, add a small loop of ribbon or string to each angel to make them easy to hang on the Christmas tree, in windows, etc. Alternatively, leave the hangers off and use them as part of a Nativity Scene Display, a Christmas countdown, or an Advent spiral.
This craft will help beautify your holiday decor and allow children or adults to engage in a fun and creative activity, building memories and traditions that can be passed down through generations. First, gather all the necessary craft supplies from the list below before beginning this heavenly Christmas ornament craft. Then, scroll past the materials list to learn how to make angel Christmas ornaments with wooden peg dolls. You might also enjoy this list of fun family Christmas Traditions.

DIY Christmas Angel Ornament Craft Supplies:
- Unfinished wooden angel dolls
 or assorted wooden peg dolls.
- My daughter and I used 2-inch wooden female peg dolls to make the angels in the photographs, but other peg doll size options are available to make smaller or larger ornaments and figurines.
- White acrylic paint
- Alternatively, paint wooden peg doll bodies with silver, gold, or soft pastel acrylic paint colors of your choice, such as blue, pink, or yellow, for angel crafts.
- Alternatively, paint wooden peg doll bodies with silver, gold, or soft pastel acrylic paint colors of your choice, such as blue, pink, or yellow, for angel crafts.
- Paintbrushes.
- Mod Podge or another sealant with foam brushes (optional).
- Printable angel wing template.
- This printable includes several angel wing size outline options to make it easy to create angel figurines and ornaments with different-sized peg dolls.
- Stiff white felt, white glitter felt, lace butterfly appliques (you will not need the angel wing template if you choose these), or another stiffened fabric of choice for angel wings.
- Sewing scissors.
- Fabric marking pen with disappearing ink or fabric chalk.
- Extra fine-tip paint pens (or an incredible nib with black and red acrylic paint)
- Christmas or Jute twine, or Christmas ribbon
- Use a 2mm tinsel, non-stretch gold or silver metallic cord. (We used the same metallic tinsel cord to make these DIY wand crafts.)
- Wooden stars (My daughter and I used 1-inch wooden stars with 2-inch unfinished wooden angel peg dolls to make the angel crafts shown in the photographs. However, you can use the larger or smaller stars in this pack of assorted wooden stars to make angel ornaments with smaller or larger wooden peg dolls.
- Hot glue or glue tape
- Painter’s tape (optional)
 or
or 


Please note: If you plan to use hot glue to create these DIY angel ornaments and will be working with children, provide guidance and supervision to ensure they understand how to use it safely before making this Christmas craft. It’s also best to read through the step-by-step instructions to ensure you have everything you need to complete your Christmas angel ornaments, ready to go before beginning, especially if you are making these crafts with children. You might also enjoy making these adorable Snowman Ornaments for the Christmas tree.
DIY Angel Ornaments Step-by-Step Instructions:
Make homemade angel Christmas ornaments with your children to decorate the Christmas tree. Invite children (or adults) to make divine decorations with the step-by-step DIY angel ornament instructions below. A photo tutorial is posted below the step-by-step instructions for these Christmas angel crafts, making it much easier to “see” how to make DIY wooden angel ornaments. You might also enjoy making Baby Jesus ornaments to complement your DIY angel ornaments.
There are several other craft tutorials with creative uses for peg dolls on Rhythms of Play. If you purchase the complete set of assorted peg dolls, you will also have enough figurines to make several other projects. For example, you can make adorable wooden Elf Ornaments and several other peg doll crafts, such as these rainbow peg doll toys for kids, along with these beautiful angel crafts. Peg doll toys painted in a rainbow of colors make a great homemade Christmas gift idea for children. You might also enjoy this list of homemade gifts kids can help make.
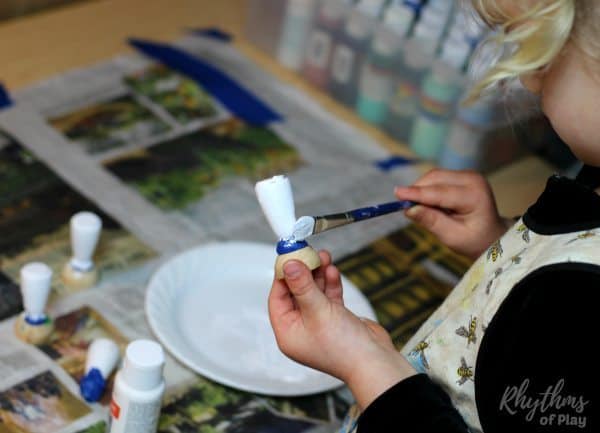
1. Paint wooden peg doll bodies:
- Use a paintbrush to paint the bodies of the wooden peg dolls white (or another pastel paint color of choice) from the neck down.
- Do not paint the heads yet. We will paint them in the next step.
- If you will be working with children, it’s a good idea to wrap painter’s tape around the heads of the wooden peg dolls.
- Taping the heads makes it easier for toddlers, preschoolers, and other young children to help paint these handmade angel ornaments.
- Kids can quickly help paint the body of the angel ornaments when the heads are protected, but it is optional and unnecessary for older children.
- Please allow the paint to dry before proceeding to the next step in this Christmas angel craft.
Related: Fingerprint Snowman Christmas Cards
2. Paint the head of each angel ornament craft:
- I painted the “heads” of our DIY angel ornaments using the technique described in detail in our DIY Fall Fairy Craft tutorial.
- I also created these adorable winter fairy peg doll crafts using the same painting technique.
- Learn how to paint the angel’s heads, as shown in the photographs, with the step-by-step instructions below:
- Look at the head of your peg doll and decide which part you want to be the face of the angel craft.
- Paint a line from shoulder to shoulder over the head. Don’t worry if this first line is messy. You will clean it up next.
- Paint the back of the peg doll head on the opposite side you choose for the face.
- Clean up the first line and square off the head by painting across the forehead of the wooden peg doll.
- Touch up and paint the neck of the peg doll and any other areas that need cleaning up around the fairy’s face.

3. Paint the faces of the peg doll angels:
- Once again, I painted the eyes of the angel figurines shown in the photographs using the same technique I used to make the U-shaped eyes for the fall fairy crafts.
- First, follow the steps below to make the eyes for each peg doll angel craft:
- Dip an Incredible Nib into black or brown acrylic paint to make the eyes, or use a black or brown extra fine-tip paint pen.
- Mark two sets of two dots with a brown or black paint pen to create the eyes of each of your angels.
- Connect each set of dots with a “U” to make the eyes of each angel doll.
- Add small lines for lashes, or leave them plain, as shown in the photographs.
- Alternatively, you can make simple dots for the eyes. Look at the step-by-step instructions for DIY Rainbow Peg Dolls to learn how to paint a slightly different face on your peg doll angel crafts.
- Dip an Incredible Nib
- Next, follow the steps below to paint the mouth of each peg doll angel ornament craft:


 to make the eyes, or use a black or brown extra fine-tip
 into
into  or grab a red extra fine-tip
Related: How to Make Beaded Snowflake Ornaments
4. Seal and protect handmade angel ornaments:
- Use a foam brush to paint Mod Podge (or another type of sealant) onto the wooden peg dolls to seal and protect them before moving on to the next step.
- Mod Podge is a selant and glue, so please don’t use a regular paintbrush to do this step unless you don’t mind throwing it away when you are finished.
 to paint
 (or another type of
 5. Print, trace, and cut angel wings for the DIY angel Christmas ornaments:
- Print the angel wing template out on cardstock and cut it out.
- Cardstock creates a stiff template for the angel wings that you can easily trace and use repeatedly.
- Since numerous sizes of wooden peg dolls are available today, the printable angel wing templates include several sizes of angel wings you can use to ensure you find a template size that fits the wooden peg doll figurines you’d like to make into Christmas ornaments.
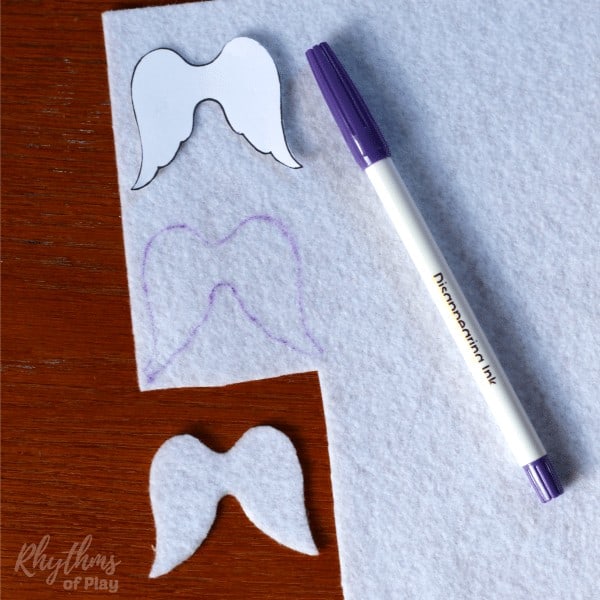
- Trace the angel wing template with a fabric marking pen with disappearing ink or fabric chalk onto the white glimmer or stiff white felt.
- Trace one set of angel wings for each DIY angel ornament you make.
- Disappearing ink will automatically disappear from the felt within 24 to 48 hours. It can also be washed off with water.
- Using disappearing ink will ensure that you do not have an ugly trace line visible along the edge of the angel wings. I’ve tested it to work perfectly — even on white felt!
- Cutting felt can be challenging, especially for young children. I recommend investing in a good pair of sewing scissors to make cutting the felt angel wings much easier.
- Cutting the scalloped edges of the angel wings is challenging for kids. So, I had my daughter trace and cut the inside edge of the angel wings with a straighter edge, which looks just as beautiful. You are welcome to do the same to make your angel ornaments.
- The step-by-step angel Christmas ornament DIY photo tutorial below shows you how to cut the wings for the peg doll angels:

 or fabric chalk onto the white
Related: Rhinestone Pinecone Ornaments
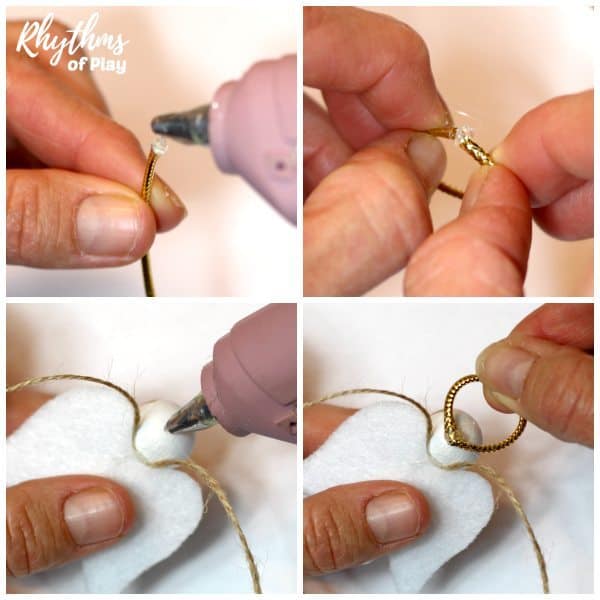
6. Glue angel wings and an ornament hanger to each wooden peg doll angel craft:
- For this step in the angel craft project, you will need one pair of felt angel wings and a 6-10-inch piece of twine or ribbon for each ornament craft you make.
- You do not need the twine hanger loop if you want this Christmas craft to be a standing angel figurine instead of a hanging ornament.
- First, arrange the twine or ribbon in a loop. Then, glue it between the angel wings and the wooden peg doll, as illustrated in the photo tutorial.
- If you don’t want to add the hanger, use hot glue or glue tape to attach the angel wings directly onto the back of the wooden peg doll without the loop.

7. Make a halo for each angel ornament craft and glue it to the back of each wooden peg doll head:
- First, cut a piece of non-stretch gold or silver tinsel cord, approximately 2 inches long, for each wooden peg doll angel ornament.
- Apply a small amount of hot glue to one end of the gold cord. Then, quickly insert the other end of the cord into the glue to attach both sides into a single ring for the halo before it dries, as shown in the photo tutorial below.
- Finally, place a dab of hot glue on the top of the head towards the back of each wooden angel ornament to attach a halo to each angel’s head.
- Ensure that each angle’s halo is tilted slightly upward.
- Note: This step may sound challenging, but attaching the cord to the wooden peg doll figurine to create the halo is easy with hot glue. Best of all, it holds beautifully with minimal effort. (Unless your toddler or cat gets a hold of it–lol!)
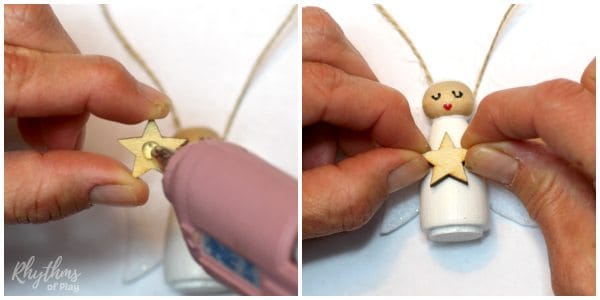
8. Glue wooden stars on the front of the DIY Angel Ornaments:
- First, place a dab of hot glue or a small piece of glue tape on the back of a wooden star.
- Next, attach the star to the front of the wooden peg doll angel ornament, as shown in the DIY angel ornaments photo tutorial below.
- (Use the same metallic tinsel cord to make these DIY wand crafts.)
Related: Christmas Ornaments Kids Can Make
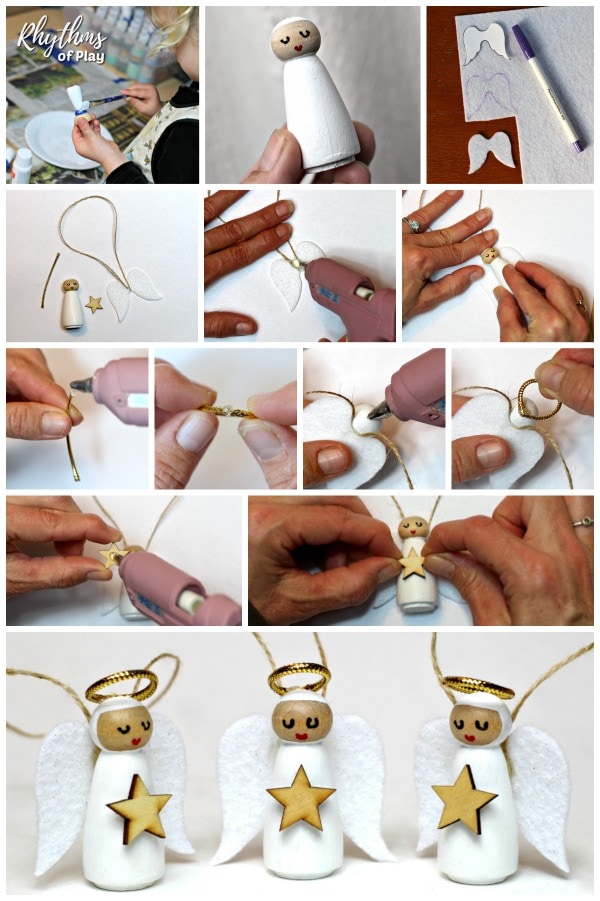
Angel Christmas Ornaments DIY Step-by-Step Photo Tutorial:
Here’s the angel craft photo tutorial to help you make these heavenly crafts. The photograph below illustrates each step described in the step-by-step instructions above at a glance. Happy Christmas crafting!
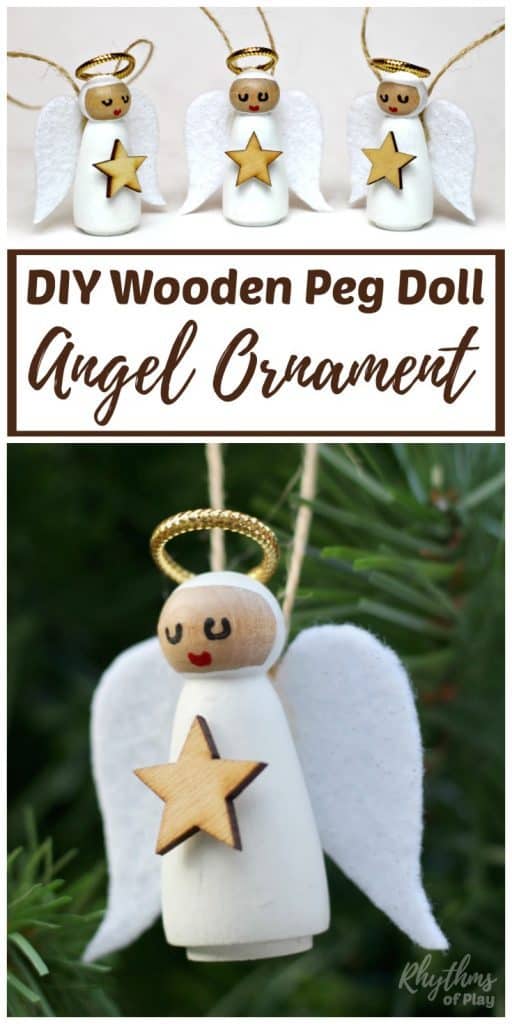
Homemade Christmas Angel Ornaments and Figurines:
DIY wooden angel Christmas ornaments make beautiful handmade holiday decorations. My daughter and I are thrilled with how gorgeous they look flying on our Christmas tree! We hung them on our tree near our walnut-shell manger ornaments so the angel ornaments fly above Baby Jesus. They look darling together!
You might also enjoy this list of Christmas Ornament Crafts that will look stunning on your Christmas tree, as well as this gift guide with DIY and ready-made ideas for the whole family! Alternatively, explore this extraordinary collection of homemade gifts kids can make and fun family Christmas traditions for a magical holiday season.
Learn more about Nell Regan Kartychok, author and photographer of this original peg doll angel ornament craft HERE, and Rhythms of Play HERE!
Wooden Peg Doll Crafts:
The set of wooden peg dolls needed to make DIY angel Christmas ornaments includes enough peg Dolls to make a few more wooden Christmas crafts and doll DIY toys for children. Try any of the peg doll craft ideas below!
- Elf Ornaments
- DIY Wooden Peg Doll Nativity Scene
- Craft Stick Peg Doll Boats
- Winter Fairy Peg Dolls
- Autumn Fairies
- Monarch Butterfly Peg Dolls
- DIY Rainbow Colored Peg Dolls
Christmas Crafts and Activities:
- Rustic Acorn Marble Ornaments
- Fingerprint Christmas Tree Card
- Christmas Gifts Kids Can Make
- Fun Family Christmas Traditions for a Magical Holiday
- Handprint, Footprint, and Fingerprint Christmas Card Ideas


Thank you so much for your awesome ideas. I try to find easy and creative projects for our non-crafty church folks to make as Holiday event favors. Your wood dowel angel is perfect for our Christmas project. Simple and adorable. Thanks again. Blessings.
Be someone’s miracle today.
Thank you for the sweet words of encouragement and vote of approval for these sweet DIY Christmas angel ornaments! You have been my miracle today, thank you!
I hope that you church group finds them as fun to put together as my daughter and I did. They look lovely on the Christmas tree with the baby Jesus ornaments we made in a walnut shell manger. Feel free to try that one, too… Enjoy!
Nell
Good morning
I work in the disability sector and would like to get our group to make the HOMEMADE CHRISTMAS ANGEL ORNAMENTS. unfortunately when I click on the link for the angel wings template this is not available. Can you help please.
Have a beautiful day
Kind regards Christine
Hello Christine! Thank you for letting me know that the angel wing printable template is not working. I will look into it ASAP, and should have it fixed and available by this weekend. I will comment here once again as soon as it is up and working again.
Nell
Hi Christine!
I just wanted to let you know that the printable angel wings template is working again, and it contains multiple sizes to fit many different peg doll sizes. Sorry that it took me so long to fix, but I’m glad that I made it better. 🙂
Nell