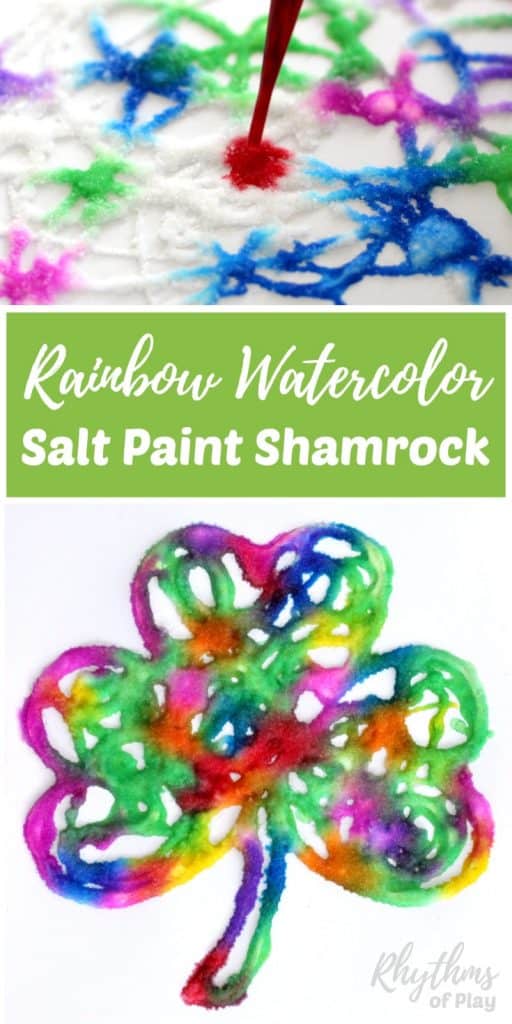
Try this easy shamrock art project in a rainbow of vibrant colors for Saint Patrick’s Day with kids or art students with the fun ideas below!
Here’s a rainbow shamrock salt painting idea that makes a great project for Saint Patrick’s Day that kids and adults can enjoy at home or in the art classroom. Invite kids of all ages to draw their own Shamrock to make raised salt art with the step-by-step instructions below. Or, use one of the printable shamrock templates recommended in the shamrock craft supplies. You might also enjoy making shamrocks and four-leaf clovers out of a cardboard toilet paper roll.
First published in February of 2017; this raised salt shamrock art post is regularly updated and republished to improve the content. For more shamrock art ideas, look at THIS excellent list of St. Patrick’s Day arts and crafts. (Click the link to see several more shamrock and four-leaf clover arts and crafts, and learn the difference between a clover and a shamrock!)
Younger kids such as preschoolers and kindergarteners will likely need the assistance of a parent, teacher, babysitter, grandparent, or another adult when creating their rainbow shamrock craft. While older kids, teens, and adults can paint a salt-paint shamrock in a rainbow of colors from start to finish on their own. You might also enjoy this list of Rainbow Arts, Crafts, and painting ideas for kids and adults.
What does a shamrock symbolize?
Today, the shamrock is a symbol commonly associated with Ireland and Saint Patrick, Ireland’s patron saint. In Druidry, the trefoil or shamrock holds symbolic significance during the Equinox, and this coincides with the celebration of St. Patrick’s Day on March 17th, near the Spring Equinox. Traditionally, the shamrock is worn on this day.
The shamrock represents the Holy Trinity in Christian symbolism. In other words, the three lobes, leaves, or petals of the shamrock represent the Father, the Son, and the Holy Spirit. This association comes from legends that claim Saint Patrick used the shamrock to explain the concept of the Trinity to Irish pagans during his mission to convert the island to Christianity in the 5th century.
However, the shamrock is associated with Druidic practices that predate this modern translation. So, it is more likely that the shamrock became Ireland’s natural emblem because of its earlier ties to Druidic traditions. Today the shamrock is a symbol of Ireland and Irish heritage worn with pride worldwide. Learn how to make a shamrock necklace for Saint Patrick’s Day–>HERE.
Today, shamrocks appear in various contexts including; official government symbols, clothing and accessories, fine jewelry, home decor, arts and crafts such as this salt paint shamrock, and St. Patrick’s Day celebrations worldwide. For more information, including the difference between a clover and a shamrock, have a look at these Saint Patrick’s Day art and craft ideas.
Raised Salt Painting Shamrock Craft Idea
Have you ever tried salt painting? All you need to do is dribble white glue on paper, sprinkle salt on top, shake it off, and then paint the salt remaining in the glue with watercolors before the glue dries to create gorgeous raised salt art.
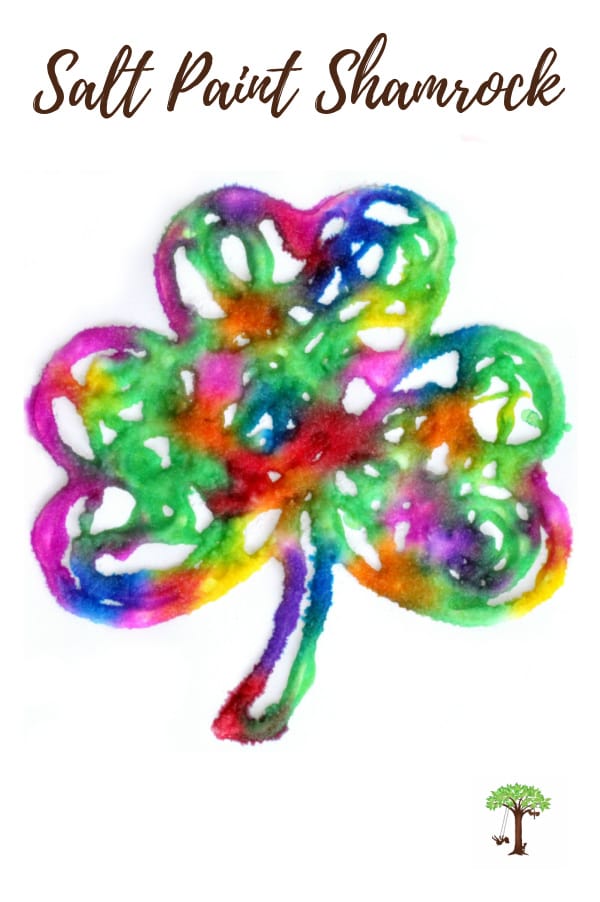
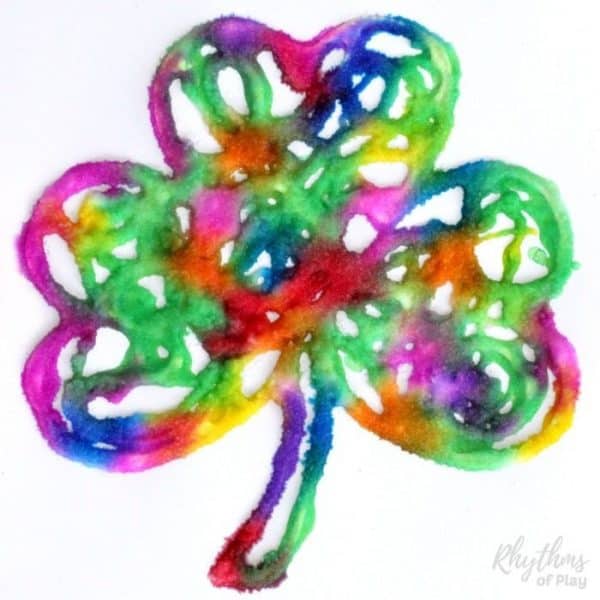
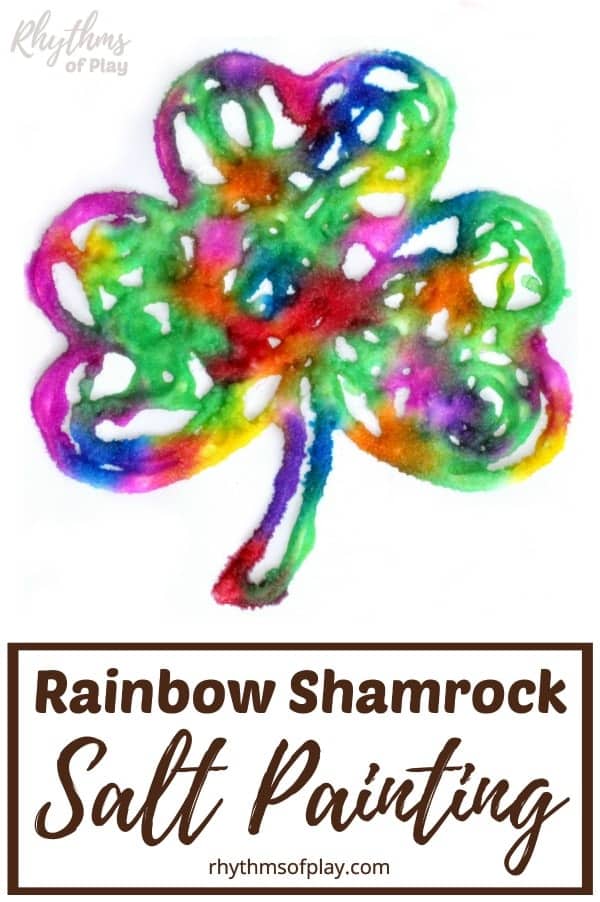
Yes, it’s that easy! It’s also really fun to watch the colors blend and mix as you create your shamrock salt painting masterpiece. Making raised salt art, such as the rainbow shamrock craft in the photo below, adds dimension and texture to shamrock crafts making it a fun craft that is much different than typical watercolor painting ideas.
Salt painting is also a fun process art activity for kids and adults. Artists of all ages will enjoy the creativity of making raised salt art. Unfortunately, it doesn’t last very long. The only way to ‘keep’ your raised salt painting is to make a video or take pictures of the process because salt art is difficult if not impossible to preserve.
However, this makes this rainbow shamrock painting watercolor painting idea a great process art activity. In other words, painting a raised salt shamrock can help children learn that art is more about the process than the product. You might also enjoy wet-on-wet watercolor painting.
Related: Lucky Four Leaf Clover Nature Collage
Shamrock Salt Painting Art Project Activity for St. Patrick’s Day Preparation Tips and Ideas
As mentioned above, there are a few different ways to paint a rainbow shamrock for Saint Patrick’s Day. Please read through the basic how-to tips below and the entire step-by-step directions in the section that follows before starting your salt art shamrock craft. It’s best to know the steps involved and what to expect before painting raised salt shamrock art. For more salt painting tips and photographs, look through some of our other raised salt painting projects and art activities:
Raised Salt Art Shamrock Project Supplies and Craft Materials:
Several types of art supplies can be used to make rainbow shamrock art for Saint Patrick’s Day. You can choose between liquid watercolors and pipettes or paintbrushes OR you can choose to use a solid watercolor pallet with a cup of water and a paintbrush. Both pipettes and paintbrushes are great for fine motor practice and hand-eye coordination. See the directions below for more information. Following are the recommended shamrock art supplies for the Saint Patrick’s Day raised salt art activity shown in the photographs:
- Shamrock printable art template (Optional; Instructions to draw a shamrock are included in the step-by-step shamrock art tutorial below).
- Baking tray or sheet to help keep the art area clean and collect salt for reuse.
- Bright white cardstock or watercolor paper. (Plain paper is too thin to handle the weight of the salt painting.)
- White glue.
- Table salt.
- Liquid watercolors, Stockmar paints, food coloring, or a watercolor paint pallet.
- Small glass bowls or ramekins, baby jars, an old muffin or ice cube tray, or other recycled containers to hold liquid watercolor paints or food coloring.
- Paintbrushes or pipettes to paint raised salt art.
- Art apron for adults or art smock or multi-purpose apron for kids to keep clothes clean for all ages.
- An old towel, newspaper, or paper towel to soak up any excess watercolor paint.
Watercolor Shamrock Art Salt Painting How-to Tips:
- If you are using liquid watercolors or food coloring you can choose to use paintbrushes or pipettes to create a raised salt art shamrock. However, a paintbrush must be used if you choose to paint your rainbow shamrock art with a watercolor paint pallet.
- Liquid watercolors and food coloring are concentrated so it is best to dilute them with 50% to 75% water before using them for salt painting projects like shamrock art. (It also helps your liquid watercolor paints last much longer.)
- Working on a baking sheet or cookie tray makes it easy to keep the salt from going all over the place, and gives you the ability to save and recycle the salt that you shake off to make another raised salt painting or salt dough craft!
- It’s also a good idea to put paper towels, newspaper, or an old towel under the shamrock art before painting the raised salt to soak up any excess watercolor paint.
- Please note that raised salt art and crafts aren’t made to last that long. They can crack and become a mess in a short time.
- In other words, creating rainbow shamrock salt art is a process art project that is more about the process than the product.
- With that said, painting raised salt art is worth the time and effort it takes to paint because it’s so much fun to watch the colors blend as you work, and helps children learn how to mix and blend colors to make a rainbow of colors.
Related: Rainbow Science and STEAM Activities
Raised Salt Painting with Pipettes Verses a Paintbrush:
- If you choose to work with liquid watercolors and pipettes, instead of a paintbrush to make raised shamrock art, two to four color choices create the best rainbow shamrock art. Too many colors or too much paint can turn your salt art brown or black. Less is more!
- If your children have never used a pipette before, give them a pipette and a cup of water to play with before offering it to them as an art supply. Children, especially toddlers, and preschoolers, can sometimes use too much paint on their shamrock artwork with pipettes. Use a paintbrush if your child has a heavy hand.
- Or teach children that a little squeeze of watercolor paint goes a long way before trying this heart art salt painting project with pipettes.
- We offered our daughter a cup of water and a pipette and asked her to water the house plants to practice using a pipette before offering raised salt art activities and projects such as the rainbow shamrock art shown below. Give it a try!
Benefits of raised salt art projects and activities:
- As shown in the photograph above, working with pipettes helped my daughter develop her fine motor skills, strengthen the muscles of her hand, and learn how to hold a paintbrush properly. However, using a paintbrush also helps build fine motor hand strength and dexterity. Both are valuable and beneficial tools for artistic development from beginners to advanced artists.
- Using pipettes for fun projects like this one made it possible for us to use the large supply of pipettes we have on hand for science and STEAM projects.
- Pipettes make it easier than a paintbrush to play with color mixing while painting because a lot of paint can be poured onto the raised salt art in a single squeeze. But don’t add too much, a slight squeeze of food coloring or liquid watercolor paint goes a long way!
Related: How to Paint Rocks: Rock Painting Ideas for Kids
How to Paint a Shamrock: Rainbow Watercolor Shamrock Art Salt Painting Project Step-By-Step Directions
Follow the step-by-step shamrock art directions below to make raised salt art. If you have ever wondered what the difference between a shamrock and a four-leaf clover is, click the link to find out!
1. Print a shamrock craft template or draw a shamrock outline:
- Choose your favorite printable shamrock template and print it on bright white heavyweight cardstock.
- We have several printable shamrock art and craft templates to choose from. Click the link above to see them, or use the step-by-step instructions to draw a shamrock in the next section.
- Cardstock is recommended for salt painting art projects, such as this shamrock art project, over regular paper because salt painting requires thick heavyweight paper so it does not fall apart.
- Alternatively, use a pencil and the step-by-step instructions below to sketch or draw a shamrock onto watercolor paper or cardstock. Or skip the pencil and draw a shamrock with white glue directly onto the watercolor paper or cardstock.
- Draw a verticle shamrock as shown in the photographs, or draw multiple shamrocks onto the cardstock.
- Step-by-step instructions to draw a shamrock are directly below.
How do you make or draw a perfect shamrock?
Drawing a shamrock is a simple art process. All you need to do is sketch, draw, or create three symmetrical leaves attached to a stem. Here’s a simple step-by-step guide to drawing a shamrock:
- Draw three heart shapes: Begin drawing your shamrock by lightly sketching three heart shapes in a circular pattern so that one heart is vertical while the other two lie on their sides with all points towards the center.
- Instead of creating points for each heart, use an eraser to rub out the sides of each heart so they are connected and open in the center.
- These three heart outlines create the three-lobed leaves or petals of the shamrock. In other words, each heart shape becomes a single double-lobed leaf of the shamrock.
- Do your best to make these heart shapes as symmetrical as possible for a more uniform look.
- Add a stem: Next, draw the stem coming from the point where all three heart shapes meet. Give it a slight curve to the left or the right for a more natural look.
2. Trace the shamrock outline with white glue:
- Use white glue to trace the shamrock, so the white glue covers the lines of the shamrock on the printable template or your hand-drawn shamrock art, as shown in the photo tutorial below.
- You can also see this step of the process in the salt paint art video tutorial below these step-by-step raised salt painting instructions.
- Simply substitute a shamrock for the heart shown in the salt paint heart video tutorial.
3. Add designs inside shamrock crafts (optional):
- Rainbow shamrock salt painting design ideas:
- Use white glue to create doodles and designs inside your shamrock art salt painting in any way that you wish.
- Write the word lucky, or a name, or any other words you want to write inside your shamrock art.
- Another option is to doodle little shamrocks inside of the bigger shamrock shape!
- Or, paint the shamrock outline as shown–>HERE.
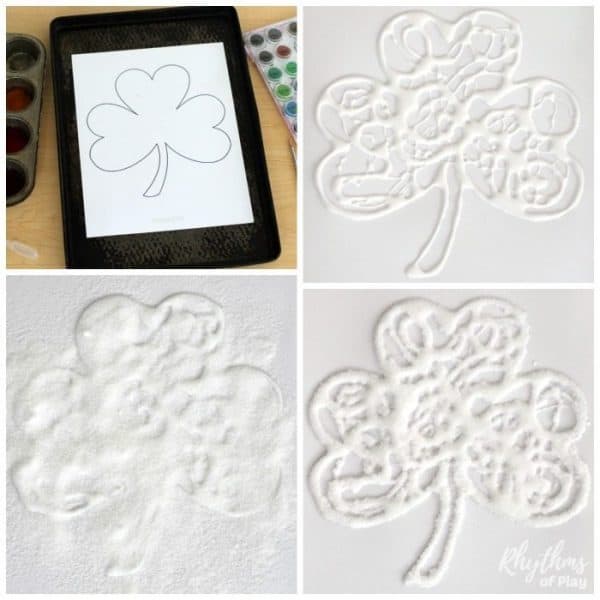
4. Sprinkle table salt on the shamrock art when the white glue is still wet:
- Place the cardstock with the white glue shamrock art onto a baking sheet or cookie tray.
- This step is optional but recommended because it makes it easy to recycle the salt and not make such a mess of things.
- Use a small dish, ramekin, or bowl to easily sprinkle salt to cover the white glue shamrock (or shamrocks) on the cardstock, or pour it directly out of the container it comes in.
- Ensure that the glue shamrock outline and any designs inside of it are completely covered with salt, as shown in the shamrock salt art photo tutorial above.
Related: Toilet Paper Roll Shamrock and Clover Crafts
5. Shake off the excess salt before painting the salt art shamrock craft:
- Shake the excess salt off the shamrock art and onto a baking sheet, cookie tray, or directly back into a bowl or another container to help make clean up easy.
- This step also makes it easy to recycle the salt you use for your next salt painting project!
- There is no need to waste the salt that didn’t stick to the glue. Just don’t use it for food or cooking. Instead, use the leftover salt to make more raised salt shamrock art, save it for your next salt painting art project, or use it to make salt dough crafts.
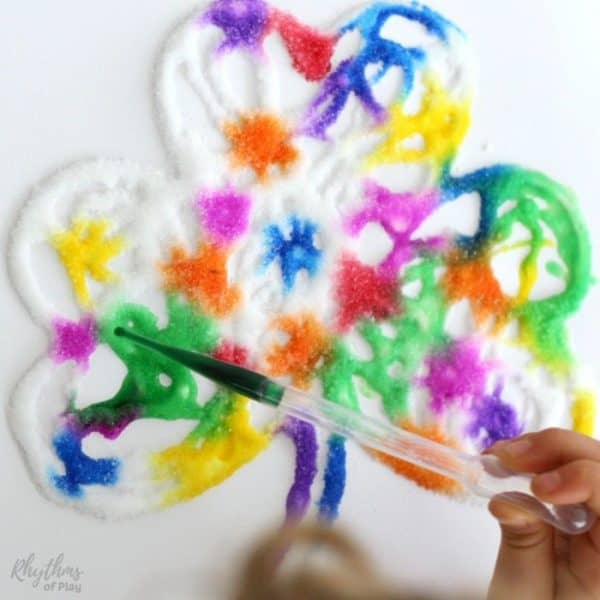
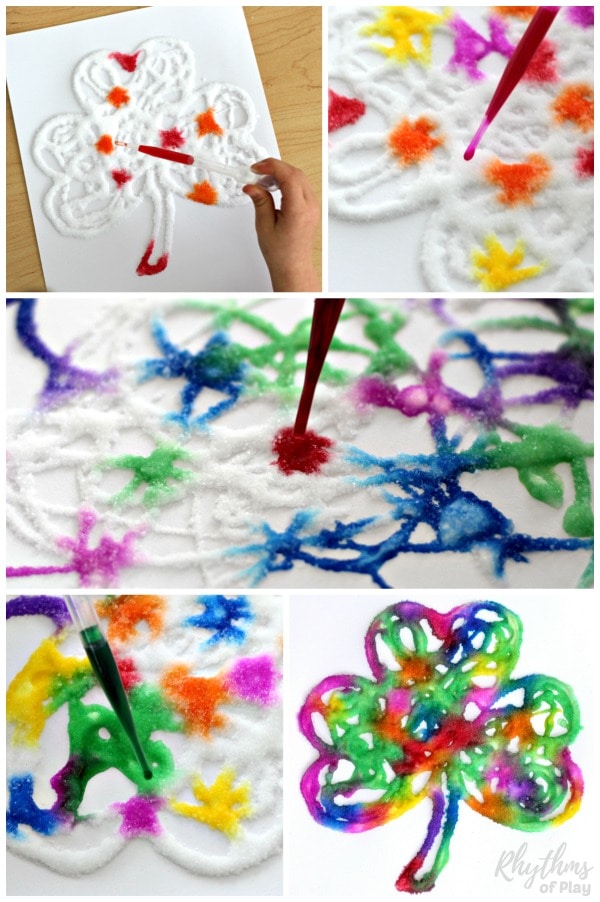
6. Paint the St Patrick’s Day rainbow shamrock craft while the glue is still wet.
- Before painting, put the raised salt shamrock on an old towel, newspaper, or paper towel so the colors don’t bleed into the white cardstock or onto the art table below.
- Step-by-step instructions and guidelines to make a rainbow shamrock salt painting follow:
How to Paint a Rainbow Shamrock Craft for Saint Patrick’s Day
- Use a paintbrush or pipette to paint the salt covering the glue with liquid watercolors, food coloring, or a watercolor pallet.
- Paint with complementary or contrasting watercolors to create gorgeous shamrock salt art.
- Or, invite children to apply a rainbow of colors to the raised salt shamrock using a pipette or a paintbrush.
- If you are working with children or students who have never tried salt painting before, begin by demonstrating how to use a pipette or a paintbrush to apply watercolor paint to the salt that is now stuck to the lines of glue.
- As mentioned above, either option, a pipette or paintbrush, provides a great fine motor activity to develop the hand.
- Remember that you will need a cup of water to rinse the paintbrush in between colors if you choose to use a paintbrush for this raised salt art method.
- When using a pipette to apply color to the raised salt shamrock, drop a small amount of color onto the raised salt.
- If using a watercolor pallet to create a raised salt art apply the paint by touching a paintbrush with watercolor paint on it to the raised salt art shamrock.
- As shown in the photo collage and raised salt painting video tutorial below, it’s fun to watch the colors travel down the line of salt and bleed into each other creating more colors, and adding more dimension, and texture to the rainbow shamrock art. It’s like magic!
- My daughter was so excited she was leaning over her salt paint shamrock squealing with excitement as she worked.
7. Place the raised shamrock salt craft on a paper towel to dry (optional).
- Gently take the shamrock saint paint craft off of the baking sheet.
- If needed, put more paper towels, newspaper, or an old dishtowel underneath the shamrock art and allow it to dry.
- Please remember: Raised salt arts and crafts don’t last that long. They crack and become a mess in a short time because as mentioned above, creating rainbow shamrock salt art is more about the process than the product. But it’s so much fun to watch the colors blend and mix!
Related: Best Flower Art Projects
Primary Color Mixing Rainbow Shamrock Art Salt Painting Project Option
Another option is to invite your children to mix and play with the primary colors to create rainbow shamrock art for some color-mixing fun! To try this option, only offer the primary colors (red, yellow, and blue) and watch how your children react when the secondary colors (green, orange, and purple) slowly begin to appear to create a rainbow shamrock.
We have found that pipettes make it easier for children to blend primary colors and make secondary colors when painting raised salt art. Invite children to play and have fun with the magic of color as they create rainbow shamrock art. This Saint Patrick’s Day art project is all about the process!
Related: The Best Art Supplies for Kids and Why Young Artists Should Use Them
Raised Salt Painting Step-by-Step Video Tutorial
The video below is of our daughter’s painting Raised Salt Heart Art with only the primary colors (red, yellow, and blue.) Notice how the secondary colors (orange, green, and purple) slowly begin to appear. It’s magic!
You can see how my daughter uses the pipettes and the primary colors to make rainbow heart art. Isn’t it mesmerizing to watch?! Creating rainbow shamrock art is pretty much the same. All you need to do is use a shamrock template instead of a heart template, or draw your own!
Related: Spring Bucket List Seasonal Activity Guide
Rainbow Shamrock Art Project for Kids and Adults
Painting a rainbow shamrock art project for Saint Patrick’s Day is an activity the kids will LOVE! Toddlers, preschoolers, kindergartners, and elementary kids and adults can all enjoy the painting technique used to create this fun rainbow shamrock craft.
For more salt painting tips and photographs, be sure you have a look at some of our other raised salt paint projects:
Another art project that kids will love is making a lucky four-leaf clover nature collage. Can’t find a lucky clover? Make one with this simple St Patrick’s Day craft idea!
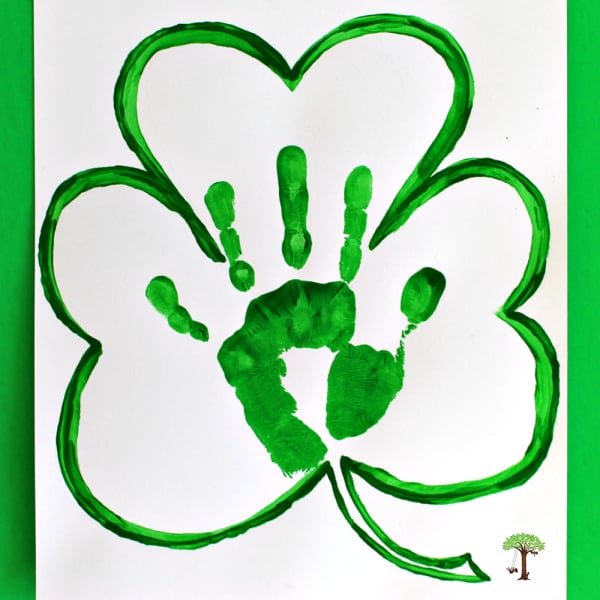
Or, make a handprint four-leaf clover, and shamrock handprint art with several different art template printables with with Saint Patrick’s Day poems! The photograph below shows just one of the many shamrock handprint craft options you can try.
For more Saint Patrick’s Day fun, have a look at this amazing list of Saint Patrick’s Day art and craft projects!
This bubble wrap shamrock man from Crafty Kids at Home looks fun too. You can also try this pot of gold scavenger hunt by Sunny Day Family or this Leprechaun Obstacle Course by Wunder-Mom.
You may also enjoy this awesome collection of easy rainbow art projects (and rainbow crafts, too!). A few rainbow arts and crafts are shown in the photograph below.
Learn more about Rhythms of Play HERE!


I loved doing this with our kiddos and they were fascinated but after it dried the salt and the color just flaked off. Any thoughts? What did we do wrong?
So glad you tried it and enjoyed this art project Lauren! You didn’t do anything wrong. We have played with different salt paint projects of various kinds and while they are fun to make, they don’t last very well. The salt chips off and the colors fade over time. I have considered trying various ways to preserve them. But have not experimented with it yet.
Try spraying with spray adhesive after it dries. Usually works on projects like this.
That is a brilliant idea, Gayle! Thank you for the recommendation. I try to stay away from the spray adhesives as much as possible, but saving a favorite art project is a good reason to give it a go.
Hi 🙂
I want to do this today! I only have a dry palette of water colors. Does the glue have to be dry before we touch a paint brush to the salt?
Thanks!
Hi Brianne! I’m sorry I did not log on to see this until now. No, you do not have to wait for it to dry. It is best if you do this art project while it is still wet. I will add that into the directions so it is not confusing for anyone else in the future.
Do you just pick it up off the paper/cardboard when you are done?
I don’t see any background splatter or marks – so you must have removed it from what you drew the shamrock on, correct?
Sorry Linda, no. I did not remove it from the original piece of cardstock that my daughter painted it on. She has been working with transferring water and paint in pipettes for a long time now so she has a steady hand. I often have her water the house plants with a cup of water and a pipette. Yes, the plants need more water than that… it’s just good practice that keeps her busy for a while 😉
Will eye droppers work?
Sure, Colleen! Eye droppers should work just fine. Give it a go!
I received the password, but the link to get the shamrock is not working? I would love to do this with my class this week.
I’m so sorry you have had trouble, Brooke! I assure you that the link is good. 🙂 Let’s try using a backdoor trick… do you see the search field at the top right of my blog in the header section? Have your password ready and search “Art Template Downloads.” When it pops up click on the title to open the download page then type your password in the box at the top of the page. This is how I usually access it. Crossing my fingers it works for you too!
Does the glue and salt portion need to dry completely before you being with the watercolors?
Hi Deanna, great question, but no. You do NOT need to wait. Raised Salt painting is done with the glue still wet. I’m sorry that I did not make that clear. 🙂
Have you tried this project on canvas?
No Sherry, I have not tried this project on canvas. I don’t think the salt painting would last, and canvas is not typically used for watercolor painting. Let me know how it goes if you give it a try!