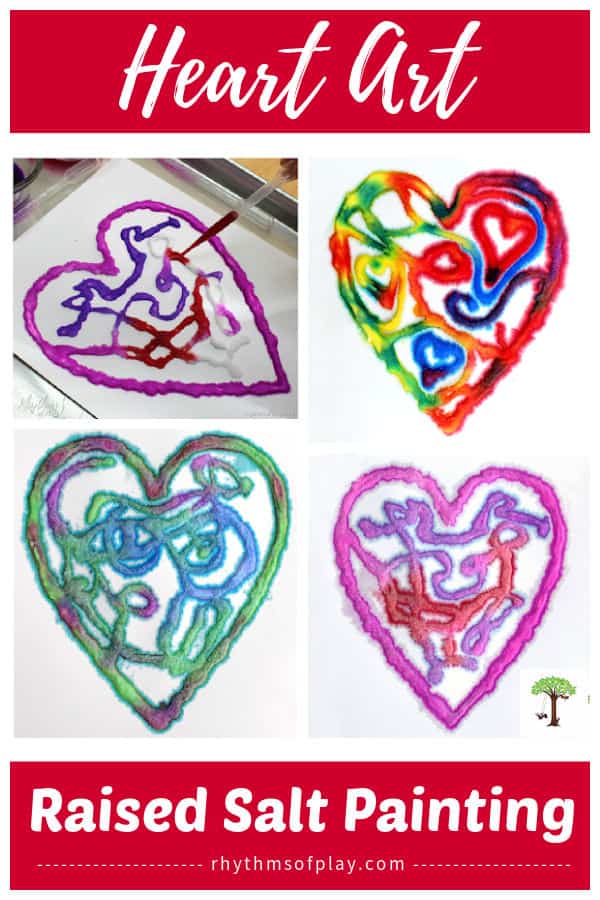
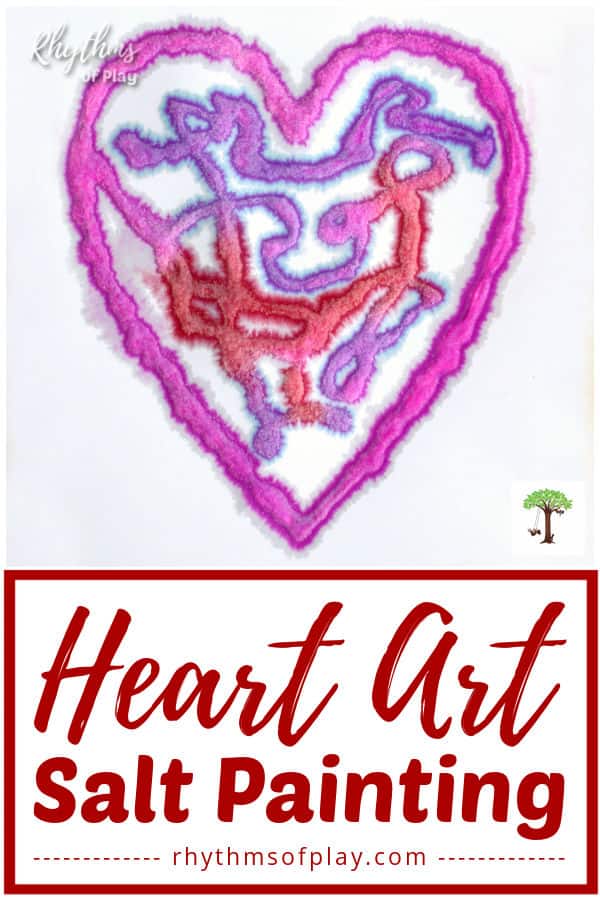
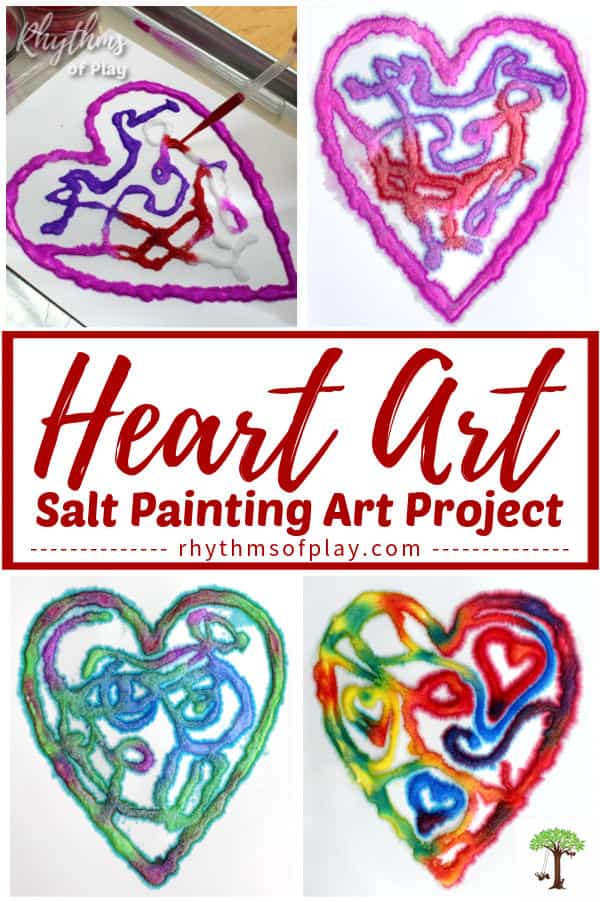
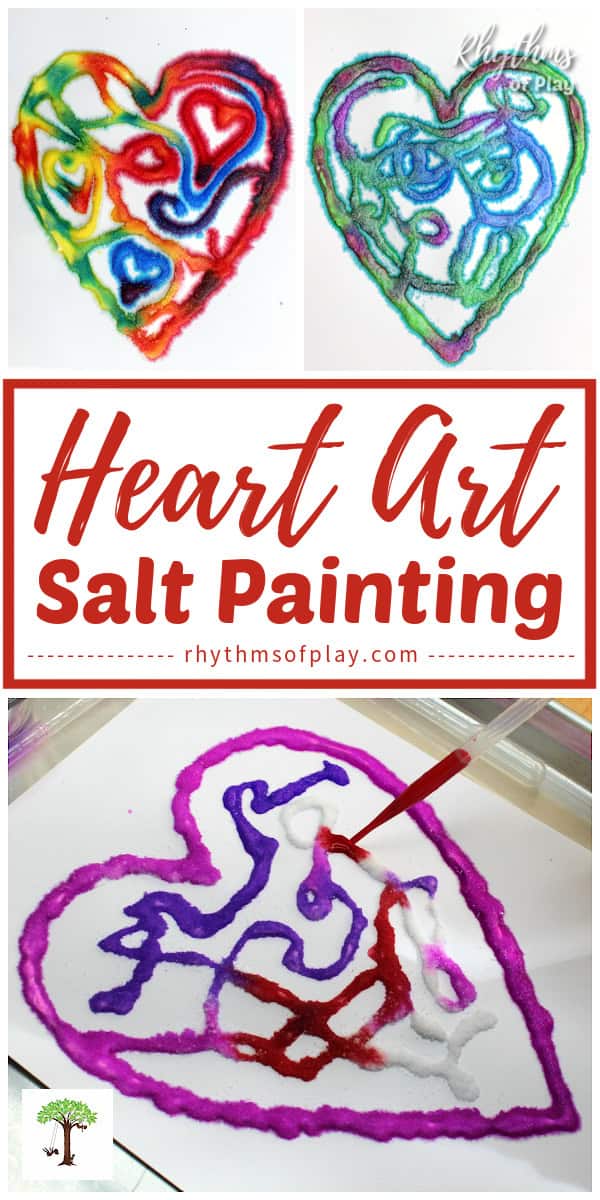
Salt painting is a fun process art technique for kids and adults that uses white glue, salt, and watercolor paints or food coloring to make magic happen right before your eyes. Try this heart art raised salt painting project for Valentine’s Day this year!
Here’s a fun raised-salt heart art project perfect for Valentine’s Day. Paint with watercolors on glue and salt to create this impressive textured art effect at home or in the classroom. Creating a heart-shaped raised salt painting is a fun process art activity for kids of all ages to do in late January or early February. Toddlers, preschoolers, and kindergarteners love making heart art with this unique raised salt art method!
Raised-salt painting is an engaging, three-dimensional art technique in which white glue is applied to sturdy paper, the paper is coated with salt, and then painted with watercolors or food coloring. The salt absorbs the paint (due to its hygroscopic tendency to absorb moisture) and causes the colors to move along the raised glue and salt lines, creating vibrantly colored crystalline designs. For several more inspirational heart art ideas, visit the painting activities: HERE. Or, look through this list of Valentine’s Day art projects.
Paint Raised Salt Heart Art for Valentine’s Day!
As shown in the photographs, this simple art activity is a watercolor painting idea that is fun to make with a multitude of colors. Children of all ages will love creating raised salt heart art with the step-by-step lesson plans below. Toddlers, preschoolers, elementary school-aged kids, older children, and teens will each enjoy this unique watercolor heart painting idea. You might also enjoy painting a raised salt Rainbow Shamrock. Scroll down for the step-by-step directions for this heart-shaped watercolor painting idea.
Related: Best Heart Art Projects (and Cute Heart Crafts, Too!)
Heart-Shaped Raised Salt Painting Process Art Project Activity:
This heart art salt painting is a fun, raised-salt painting idea for children of all ages. Paint a raised salt heart for Valentine’s Day, Mother’s Day, or any time of year. Have you ever tried salt painting? All you need to do is dribble white liquid glue onto heavyweight art paper or cardstock, sprinkle table salt on top, shake it off, and then paint the raised salt glue lines with watercolors or food coloring to create gorgeous raised salt art. Yes, this art activity is that easy!
Watching the colors blend and mix as you make a heart-shaped salt painting masterpiece makes this easy art lesson entertaining, satisfying, and educational for kids. Since salt is hygroscopic, which is a fancy term that means it absorbs moisture, it absorbs the watercolor paint. Art activities like this salt heart art painting are popular for helping children develop their artistic skills and for allowing adults to engage in art therapy, because salt painting is all about the process.
In other words, salt paintings usually don’t last very long. The only way to ‘keep’ your raised salt painting is to make a video or take pictures of this process art activity while you work, because salt art is difficult, if not impossible, to preserve. You can coat it with more glue to save it, but it’s not the most straightforward process. Fortunately, videos of the process are mesmerizing to watch. You can see my daughter painting a raised salt heart in the video below.
There are several educational benefits to learning and experimenting with this process art technique, including strengthening hand-eye coordination and fine motor skills. It’s also loads of fun. Best of all, salt painting is not only art; it’s science, too! It’s such a fun STEAM project. I guarantee your kids will love this raised-salt art activity, and learn something in the process, keepsake heart art or not.
Raised Salt Paint Heart Step-by-Step Video Tutorial
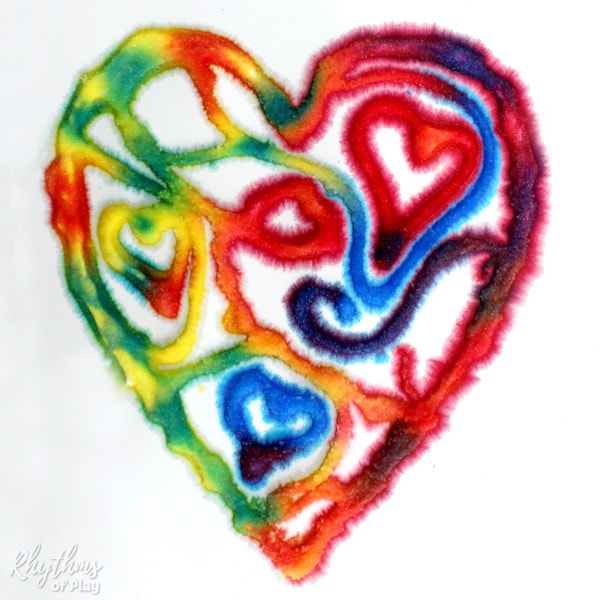
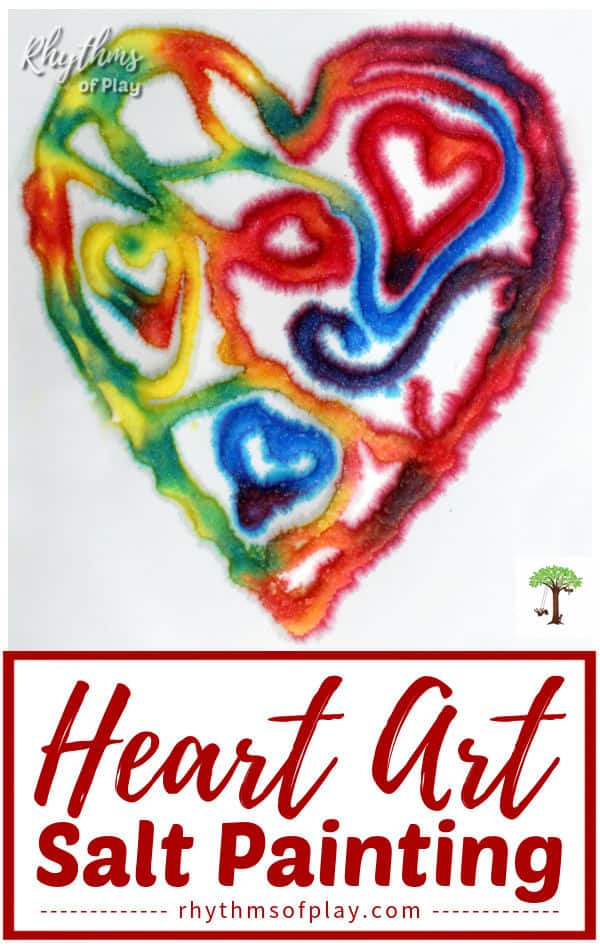
Only the primary colors (blue, yellow, and red) are used in the video to make the heart art in the photo above. Notice how the secondary colors (orange, green, and purple) magically appear — it’s mesmerizing to watch! Using pipettes to create a heart-shaped salt painting makes it easier for children to blend the primary colors to make green, purple, and orange, but of course, you can also use a paintbrush, which works just as well.
As you can see in the video tutorial, this art project is all about the process! Scroll down for art materials, activity tips, and the complete step-by-step written instructions for creating a raised salt heart with or without other creative doodles inside. Then, invite children to play and have fun with the magic of color with this creative heart art activity.
Raised Salt Painting Art Supplies:
Here are the art supplies and craft materials you need for salt painting:
- Printable heart templates (alternatively, you can draw your own heart outline.)
- Baking tray or shallow baking dish, large enough to fit watercolor paper
- Cardstock
- White glue
- Salt (table salt works great, but you can use other salts.)
- Glass bowls for holding paint and sprinkling salt (ramekins, or small recycled jars with lids, and baby food jars work great!)
- Watercolor paint (choose one of the following options):
- Stockmar watercolor paints
- Liquid watercolors
- Food coloring
- Watercolor paint palette (use a paintbrush, not a pipette, to apply paint to the salt line)
- Paintbrushes or pipettes
- Smock for kids or art apron for adults
- Paper towels (optional)
Salt painting is a fun process art technique for kids (or adults) that uses white glue, salt, and watercolor paints. Before starting, please review these raised-salt painting tips, the art materials list, and the step-by-step instructions below. Together, they will help you understand the process of creating raised salt paintings and how the art materials work, so you know which to choose and what to expect.
Raised Salt Painting Activity Tips:
- Since they are not liquid, you can only create raised salt art with a watercolor paint palette using a paintbrush.
- With liquid watercolors or food coloring mixed with a little water, you can use paintbrushes or pipettes to create raised salt art.
- Working with pipettes helps children develop their fine motor muscles and learn how to hold a paintbrush properly.
- However, children, especially toddlers and preschoolers, can use too much paint when using pipettes for their heart artwork. I recommend using a paintbrush if your child tends to overload the pipette.
- I have found through experience that two to three color choices create the best heart art when working with liquid watercolors.
- Liquid watercolors are concentrated, so it is best to dilute them with water before using them for salt painting projects (like heart art). This also helps liquid watercolor paints last longer.
- Pipettes make it easier to experiment with color mixing while painting, since you can pour lots of paint onto the raised salt-and-glue with a single squeeze.
- Teach children that a little squeeze of watercolor paint goes a long way before trying this heart art salt painting project with pipettes.
- If your children have never used a pipette before, give them a pipette and a cup of water to play with before offering one as an art supply.
- Watering the plants with a pipette is a great way to practice using one.
- Give children a cup of water with a pipette and invite them to water the plants.
- Watering the plants with a pipette is a great way to practice using one.
- Raised-salt paintings don’t typically last long. Usually, they crack and become a mess within a short time. For this reason, creating this type of textured artwork is more about the process than the product.
Related: Halloween Pumpkin Salt Painting
Related: Hanging Heart Prism Suncatcher
Heart Art Raised Salt Painting Project Step-By-Step Directions:
Follow the step-by-step instructions below to learn how to paint a heart with the raised salt painting technique.
Related: Thumbprint Heart Crafts and Gift Ideas
1. Print the heart outline and trace it with white glue, or draw a heart design onto art paper:
- Access the printable heart templates and print your favorite heart shape onto cardstock. Then trace the heart outline with white glue. Cardstock is recommended over regular printer paper because salt painting requires thicker paper to prevent it from falling apart.
- Alternatively, use white glue to draw a heart art directly onto a piece of cardstock. Draw a heart vertically or horizontally, or create multiple hearts with white glue.
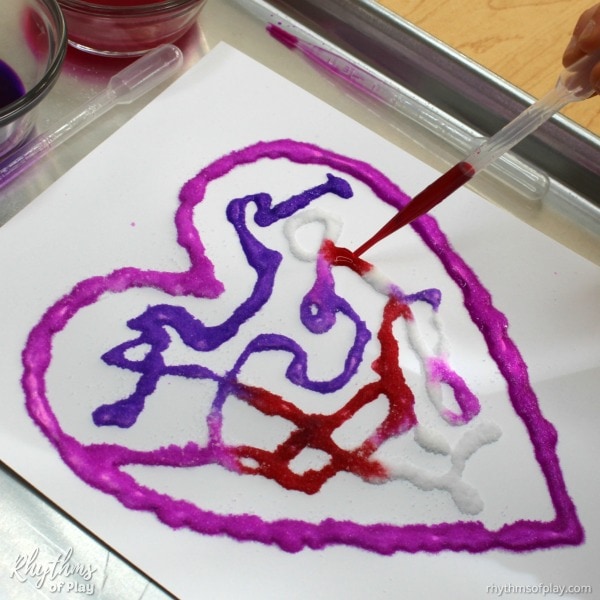
2. Create doodles, designs, shapes, or write words and phrases inside the heart with white glue (optional).
- Next, draw doodles, designs, shapes, or words inside the heart with white glue.
- See suggestions directly below for heart art design ideas.
- This step is optional, but it is shown in the video tutorial and the photographs in this instructional tutorial on raised salt painting.
Heart Art Salt Painting Design Ideas:
- Use white glue to create doodles and designs, such as more hearts, in your heart art salt painting.
- Write the word “Love,” your loved one’s first name or nickname, the phrase “I love you,” the name of your song, anniversary or wedding date, or any other words you want inside your heart.
- Draw little hearts, doodle Xs and O’s to represent kisses and hugs respectively, squiggles, and dots, or whatever else you can think of!
- My daughter enjoyed drawing doodles, but asked me to draw hearts and doodles with glue in her third raised salt painting because her hand got tired.
Related: Heart Candle Holder Craft
3. Sprinkle salt to cover the glue heart art:
- Place the cardstock with a white glue heart (or hearts) on a baking tray. (This is an optional, but recommended, step before or after tracing or drawing a heart or hearts with glue. The cookie tray makes clean-up and recycling the salt for your next salt painting project easier.)
- Fill a small dish or bowl with salt.
- Shake the dish gently back and forth over the heart glue outline to sprinkle salt on the white and glue to cover it completely. (You can see how to do this step in the video tutorial above these heart salt painting instructions.)
- Recycle the salt on the cookie sheet for more salt-art hearts, or save it for your next salt-painting project!
Related: Flower Art Projects for Kids
4. Shake off the excess salt from the salt-covered glue lines:
- Shake off the excess salt from the paper onto the baking tray. (Later, you can reuse this salt by placing it in a bowl or storage container for a future raised salt painting project or another art lesson that requires salt.)
- Recycle the leftover salt for your next salt painting project. Try any of the raised salt painting ideas below:
4. Paint the heart-shaped raised salt line with watercolors:
- Put an old dish towel (or a paper towel) underneath the art paper to help absorb any excess watercolor paint (optional).
- Liquid watercolors and food coloring are concentrated, so dilute them with 50% to 75% water before use.
- This step also helps them last longer!
- Invite children (or adults) to paint the raised salt (salt covering the glue) with liquid watercolors or a watercolor palette.
- Either use a pipette to drip paint or tap a paintbrush onto the salt lines to apply watercolor paint to the heart outline and doodles:
- To use a paintbrush: dip it into water to rinse, tap it onto a paper towel (or rag) to remove excess water, add the desired color, then paint the salt lines with that color.
- To use a pipette: dip it into the liquid watercolor or food coloring of choice, then gently drip it onto the raised glue salt lines to add color, as shown in the video tutorial above.
- Use complementary or contrasting watercolors to create gorgeous heart salt art, as shown in the photograph and video tutorial below.
- Two to three color choices create the best heart art when working with liquid watercolors.
5. Allow the heart salt painting to dry completely:
- Place your heart saint painting project on a paper towel (or an old towel) to dry so the colors don’t bleed too much into the cardstock. (The colors are likely to bleed into a towel, so something you don’t care about staining is recommended.)
- Notice how the colors change and the art looks different as the raised-salt heart dries.
- Take pictures! Salt art doesn’t last long before it starts to fall apart. But the photographs and videos of raised salt art activities, like those shown here, are gorgeous, fascinating to watch, and well worth the effort!
Related: Best Flower Art Projects
Primary Color Mixing Heart Art Raised Salt Painting:
Another option is to use the primary colors (red, yellow, and blue) and allow your children to play with color-mixing heart art. The video above the written step-by-step raised salt painting art lesson instructions shows my daughter painting the heart in the photograph below with only the primary colors red, blue, and yellow. As you can see in the photo and video tutorial, the secondary colors of orange, purple, and green appeared as she painted the raised salt heart outline and the doodles within it.
Related: Fingerprint Love Bug
The Science Behind Salt Painting:
Salt’s porous, crystal-like structure and water-attracting (hygroscopic) properties draw liquid watercolor into tiny spaces through capillary action. This is the science behind raised salt painting. Capillary action causes the colors to spread and move along the lines, creating textured, crystalline, and vibrant artistic designs. This art process is fun to participate in and exciting to watch, especially when more than one color is used.
Related: How to Paint Rocks: Rock Painting Ideas for Kids
Heart Raised Salt Art Project:
Heart art salt painting is a fun project for Valentine’s Day or any time of year. You might also enjoy painting surprise heart art.
Look at this collection of heart art projects or these Valentine’s Day painting ideas for even more heart-shaped painting ideas.
Or, learn how to make a rainbow shamrock or a harvest pumpkin using the same raised salt painting process.
For even more art ideas for kids and adults, check out this incredible collection of winter art ideas.
Learn more about Nell Regan Kartychok, author, photographer, and creator of this original heart art raised salt painting activity HERE, and Rhythms of Play HERE!
If You Liked Heart Art, You Might Also Like
- Watercolor Art STEAM Experiment
- Salt Dough Heart with Handprint and Footprint
- Thumbprint Heart Magnets
- Love Bug Craft for Valentine’s Day


I love this salt painting! I know kids of all ages would love this. Have you ever tried to save one? Maybe mod podge or some sort of adhesive spray? I may have to experiment!
Thanks, Erin! Raised salt paintings are really difficult to preserve because they immediately start to crack and crumble when they are dry. I don’t know if it would be possible to paint one with Mod Podge to preserve it because of the loose salt. Maybe a spray varnish world work, but you would have to apply a lot and hope it’s strong enough to hold the salt. If you try it let me know how it goes!
Great idea!!! Thank you!!!
Thank you, Anastasia! I’m so glad you like it. Enjoy the process, it’s so much fun to play with color!
Have you found a way to keep the salt on the paper to where it is not falling off?
No Becky, I have not found an easy way to preserve salt paintings, sorry!