
Create colorful harvest pumpkin art with watercolors. Draw your own pumpkin, or use the optional printable outlines of plain pumpkins, curling vines, and leaves.
This watercolor pumpkin painting idea is a fun art activity for kids and adults alike, offering an enjoyable project for artists of all skill levels, from beginner to advanced. Learn the raised-salt watercolor technique to paint a pumpkin that looks like it’s sitting in a harvest pumpkin patch.
Alternatively, you can skip the glue-and-salt outline and use the step-by-step instructions to paint the pumpkin with watercolors alone. Painting a pumpkin with watercolors is a magnificent way to celebrate the autumnal equinox, Halloween, Thanksgiving, and the fall harvest season.
Fall Harvest Watercolor Pumpkin Art For Kids
This simple fall painting idea is fun for kids from preschool age and up. Even older children, tweens, teens, and adults will enjoy the simple salt-painting process and making a raised salt-art pumpkin. This step-by-step art tutorial guides you through creating a raised salt art pumpkin outline, then painting it with watercolors to produce a gorgeous harvest pumpkin painting similar to the one shown in the photographs.
Sprinkling salt onto the glue before painting lets artists create intricate, raised crystalline textures that enhance the visual appeal of their pumpkin artwork. In other words, this unique raised salt art form lets the painter create textured, three-dimensional effects on the pumpkin’s surface, bringing the harvest gourd to life with unique patterns and contours, as shown in the photograph below. You might also enjoy these fall art projects and painting ideas.

Fall Harvest Pumpkin Art Activity for Kids
I love how this pumpkin painting art project turned out. However, it is not at all what I imagined it would look like. Instead, it turned out even better than I expected! Read about my daughter’s pumpkin painting below to find out what happened, or use the jump link below to skip to the step-by-step raised-salt pumpkin art tutorial and learn how to create your own watercolor pumpkin art.
Jump to Supplies & Instructions
My Daughter’s Pumpkin Watercolor Painting:
My daughter has been totally and utterly obsessed with pumpkins since early childhood. She was instantly enamored with them when they started showing up on neighbors’ doorsteps during our daily walks, which began in the fall before Halloween when she was a toddler. She loves everything about them, from spying on them on people’s porches to going to the pumpkin patch.
I even made her a pumpkin sensory bottle that she plays with all year, Halloween or not. I didn’t know this before starting this pumpkin art project, but unfortunately, she thinks all gourds must be orange. Let me explain: This pumpkin art originated as a simple salt painting, similar to the Halloween salt painting my daughter created with a jack-o’-lantern face.
However, for this pumpkin art project, I wanted to help my daughter paint a pumpkin with a stem and leaves instead of a jack-o’-lantern face. Neither of us realized how much we would learn about raised salt painting when we started this harvest pumpkin art activity.
I knew the green watercolor paint that she used to paint the leaves and stem would run into the orange a little, but since this was the first time my daughter had tried salt painting with pipettes, I didn’t know how heavy her hand would be or how much paint she would dump onto her pumpkin artwork.
Harvest Pumpkin Salt Painting Process:
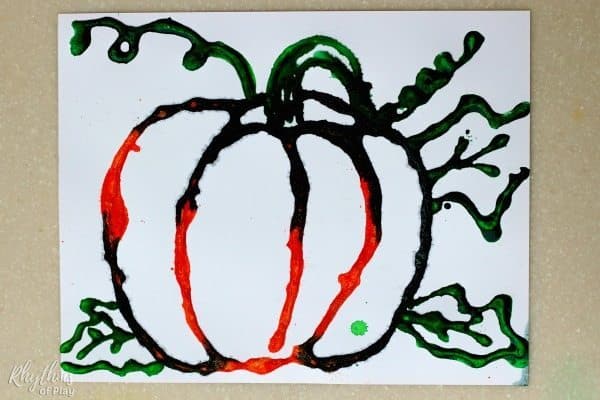
Of course, my daughter enjoyed using the pipettes and watching the colors mix. However, she was upset that the pumpkin wasn’t entirely orange when she finished. In other words, she threw a fit when parts of her harvest pumpkin painting turned green after she had painted the leaves and stem. You know how those toddlers and preschoolers can be.
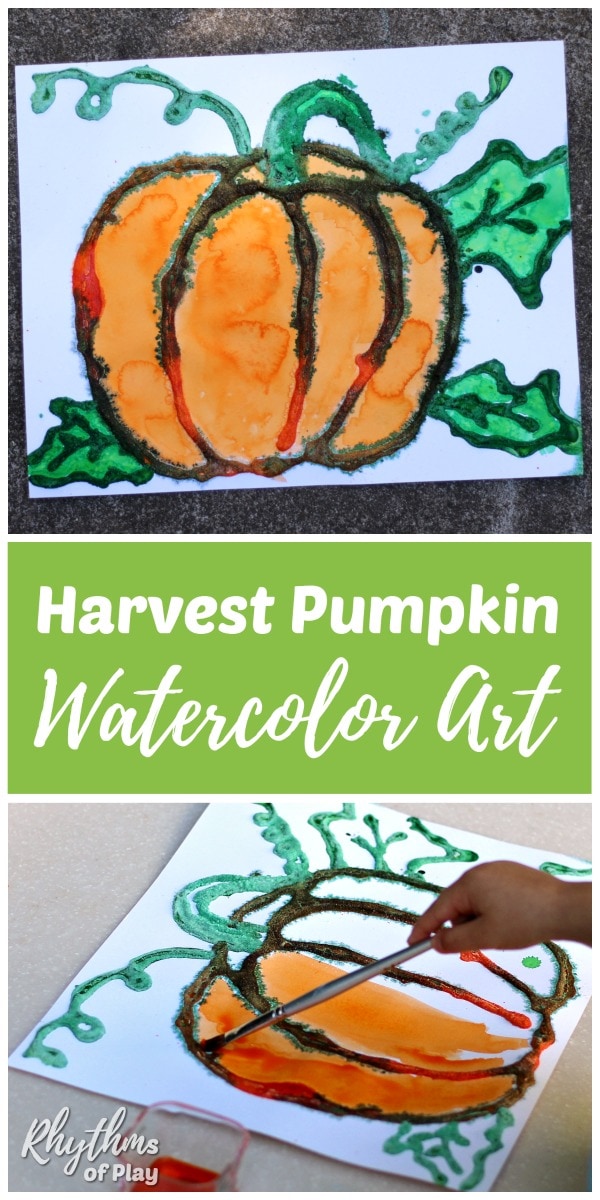
I did my best to convince her it looked great, like a gorgeous autumn gourd straight out of the pumpkin patch, but she kept complaining that it wasn’t orange like she wanted it to be. In the photo below, you can see how her harvest pumpkin painting looked once it was dry.
From Messy Pumpkin Art to Cinderella’s Perfect Pumpkin Painting:
As she kept whining and fussing, I suddenly had a fantastic idea. I put a flat-wash paintbrush and watercolors on the table next to the paint and asked her to paint the pumpkin between the raised salt lines. In other words, I told her to use watercolors to fill in the pumpkin outline and make the pumpkin orange again. She was resistant at first, but eventually decided to try it.
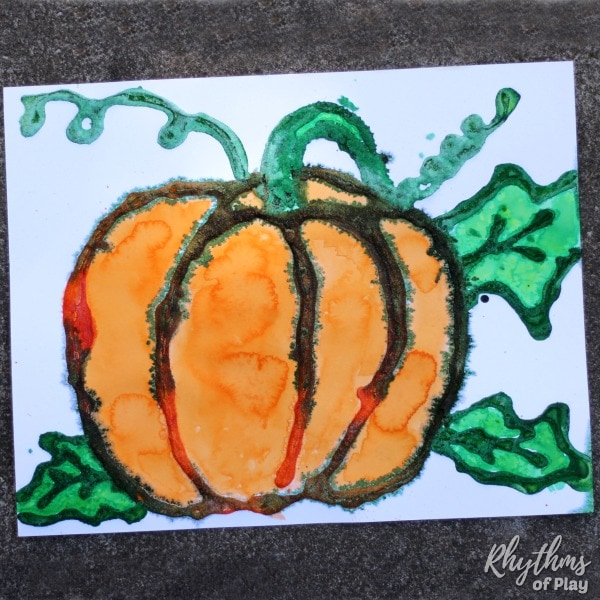
Once she finished painting it orange, she was thrilled, and we both LOVED how beautifully her raised-salt pumpkin watercolor art turned out. Even that little spot of green in the middle of the pumpkin she lamented disappeared, as you can see in the photograph of her finished pumpkin painting below. (She used a large flat watercolor brush to paint over it with orange watercolor, removing it.)
After she painted the pumpkin orange, she used green paint to color the leaves and stem. In the picture below, you can see my daughter Charlize’s gorgeous finished harvest pumpkin painting. You might also enjoy this list of fall painting ideas. As I mentioned earlier, it turned out better than I expected!
Watercolor Pumpkin Painting Beautiful Oops!
What a beautiful oops we created together! Beautiful Oops! is a children’s book that shows young readers that every mistake is an opportunity to create something beautiful. Creating pumpkin art and experimenting with a new watercolor method let my daughter experience her own beautiful oops.
It was lovely to watch her initial anger turn into utter joy as she painted the pumpkin orange. Ready to try this raised salt art process for gorgeous results? Use the pumpkin painting tutorial below to create a beautiful fall harvest pumpkin.
Related: The Best Anger Management Books for Toddlers to Teens
How to Paint a Pumpkin:
This pumpkin painting has two parts: Start by creating a raised salt outline of a pumpkin. Then, once the salt and glue outline is dry, paint the raised salt pumpkin with watercolors.
The tutorial below teaches how to make a pumpkin salt painting similar to the one in the photographs. It also offers a few alternative options if you don’t want to create a raised salt pumpkin outline.
In other words, you can skip the salt outline (steps 2-5) and paint your hand-drawn pumpkin with watercolors or one of the alternatives in the step-by-step instructions if you prefer.
Please read through the step-by-step instructions below before starting this harvest art project. This will help you understand the steps involved and make a more informed choice about the art supplies you will choose to paint a pumpkin from the list of options below:
Harvest Pumpkin Art Supplies
Optional: Fall Pumpkin Templates: Plain & Harvest Designs (paid download), or draw your own pumpkin using the instructions below.
- Watercolor paper or sturdy bright white cardstock: Use watercolor paper for a hand-drawn design or printer-compatible cardstock for the printable templates.
- Pencil: For sketching your pumpkin.
- White school glue: A squeeze bottle makes tracing the lines easier.
- Table salt
- Watercolor paint: Choose liquid watercolors
 , a solid watercolor palette, or watercolors prepared according to the manufacturer’s directions.
 - Paintbrush or pipette: A paintbrush works with any watercolor option. Use a pipette with liquid or prepared fluid watercolors.
- Cup of clean water: For preparing paint and rinsing your brush.
- Rimmed baking sheet or tray: Recommended to catch excess salt and contain drips.
- Paper towels: Recommended for soaking up any excess watercolor paint under the painting.
- Clean, dry container with a lid (optional): Save excess salt for another art project. Label it “craft salt” and keep it separate from salt used for food.
 , a solid
 Color-mixing idea: Use orange for the pumpkin and green for the stem, vines, and leaves—or experiment with your own colors. If your paint set contains primary colors, mix red and yellow to make orange, and blue and yellow to make green.
Related: The Best Art Supplies for Kids and Why Young Artists Should Use Them
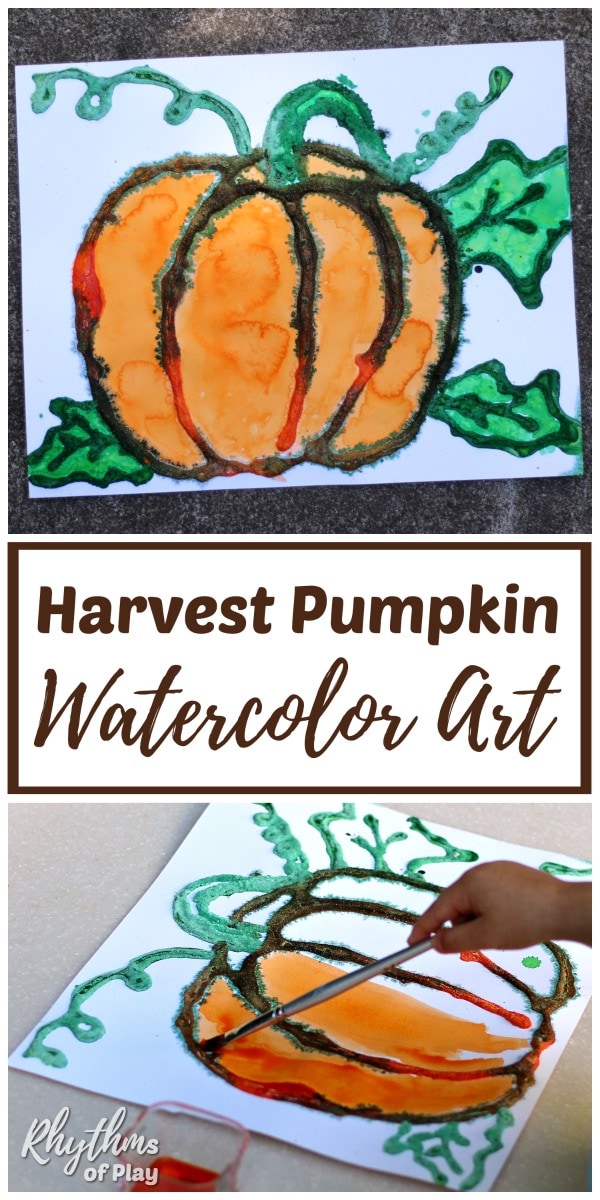
Watercolor Pumpkin Painting Step-by-Step Instructions:
Painting a harvest pumpkin is a perfect fall art project for kids of all ages. Preschoolers and younger elementary-aged children will need assistance creating pumpkin art, while older children and adults can complete this project independently. You might also enjoy using this same art technique to paint a Rainbow Shamrock.
1. Draw a harvest pumpkin:
- Use a pencil to draw or sketch a pumpkin on watercolor paper or heavyweight cardstock. It doesn’t need to be perfect because you will cover the pencil lines with white glue in the next step.
- Feel free to draw a pumpkin shape similar to the one in the photographs with a stem and leaves, using the step-by-step instructions below, or create your own unique pumpkin design.
Prefer to skip the drawing? Purchase our Fall Pumpkin Templates: Plain & Harvest Designs for four ready-to-print outlines. Choose a tall or wide plain pumpkin, or a harvest pumpkin with curling vines and leaves. All four designs are without faces. You can also follow the drawing instructions below to create your own.
How to Draw a Pumpkin with a Curly Stem and Leaves:
- Start by drawing a large oval in the middle of the paper; this will be the pumpkin’s front center.
- On each side of the oval, draw curved shapes (like vertical parentheses) or tall, skinny forward-and-backward “C” shapes to create the pumpkin’s ribbed sections on the left and right.
- Make the middle oval the widest, with the side shapes curving in to add volume.
- Leaving a small space for the stem at the top of the pumpkin, draw a wide, flat “M” shape, like a bird flying from one side of the front oval to the other.
- Then draw a line curving slightly right and down the middle of the oval (from the middle of the flat “M” shape) to complete the pumpkin sections.
- Draw a stem arching to the right and back down, emerging from the small section at the top of the pumpkin.
- Add a second, parallel arching line next to it, following the same path to complete the arching stem.
- At the end of the stem, add a curly vine going up and to the right, as shown in the photographs.
- Starting at the base of the stem, draw a thin, swirling line that curls upward and to the left to create the second curly vine.
- Draw leaves around the pumpkin. Pumpkin leaves are large and wide, with jagged edges. Use wavy, zigzag lines for the leaf edges and long veins to give it texture.
- The photographs show leaves on the bottom left and right of the pumpkin, plus one behind it, below the curly stem on the right.
2. Trace the outline of the pumpkin art with white glue or try an alternative:
- To create a raised salt outline, trace the pumpkin outline with white glue.
- Alternatively, trace the pumpkin outline with black oil pastel or crayon, then skip to step 6. Or, use orange oil pastel or crayon to trace the pumpkin outline, and green oil pastel or crayon to trace the leaves. Then, skip to step 6.
- If you’d rather skip these options, skip down to step 6 to paint the pumpkin with watercolor paints alone.
- Children may need help with this step in the raised salt painting process.
- Keep the glue lines separate if you don’t want the colors to run together and blend, as seen in the pumpkin art in the photographs.
- The photo collage tutorial below shows what happens when the salt and glue lines touch.
3. COVER The Lines of Glue (Pumpkin Outline) WITH SALT:
- Place the pumpkin art outline on a baking sheet or tray.
- Cover the glue lines with salt.
- Do not wait for the glue to dry before moving on to the next step.
4. Shake the excess salt off the Pumpkin Outline:
- Gently shake the salt off the pumpkin outline onto the baking tray.
- Pour the remaining salt into a small bowl, mason jar, or storage container to save for your next raised salt painting project.
- Place a few paper towels beneath the cardstock or watercolor paper to absorb any watercolor that runs onto the tray. Carefully lift the paper by its edges, keeping it supported and avoiding the wet glue-and-salt design.
5. Use a pipette or paintbrush to apply watercolor paint to the salt lines and glue:
- If you use liquid watercolors, you can use a pipette (as my daughter shows in the photos above and below) or a paintbrush.
- If you use a watercolor palette, gently apply the paint by touching the paintbrush to the raised salt lines. If you choose this option, you will need a cup of water to rinse your paintbrush.
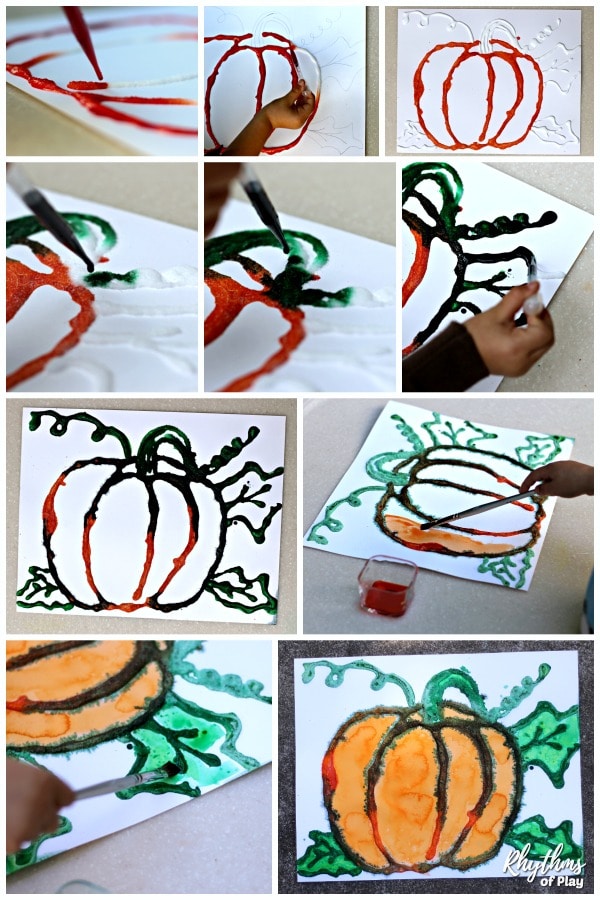
- Enjoy the transformation as the green runs into the orange. If you don’t want the colors to run, keep the different-colored salt and glue lines separate. The photo tutorial below shows the green bleeding into the orange lines as my daughter applies green to the raised salt pumpkin artwork.
6. Paint the fall harvest pumpkin with watercolors (optional):
- Once the salt paint outline is dry, paint your fall harvest pumpkin with a paintbrush using Stockmar watercolor paints, liquid watercolor paints, or a solid watercolor palette.
- Alternatively, you can skip creating the salt outline and just paint the pumpkin with watercolors.
- My daughter used orange watercolor paint to make her pumpkin orange and painted the leaves green, but it doesn’t have to be realistic. Use whatever color combinations you like.
- Add small splashes of yellow, red, or white watercolor paint to the pumpkin to add more dimension, if desired.
- If you are using only primary colors, combine yellow and red to make orange for the pumpkin, and yellow and blue to make green for the leaves.
- You can even paint the pumpkin patch background a soft light blue, purple, gold, or another color.
Related: Fall Leaves Watercolor Resist Art Project
Pumpkin Watercolor Art Salt Painting Step-by-Step Photo Tutorial:
The step-by-step photo tutorial below demonstrates how to create pumpkin art with watercolors, beginning with the raised salt painting method. In the photos, you can see that my daughter painted the pumpkin orange first, and then added green to the leaves and stem.
However, because she used a lot of paint and the salt and glue lines touched, the green bled into the orange. Once the pumpkin outline dried, my daughter used orange liquid watercolor paint to color the pumpkin and green to color the leaves, completing the project. The finished project looks like a harvest pumpkin or gourd sitting in a pumpkin patch.
More Salt Painting Projects to Try
For more photos that show the salt painting process in action, and to share more tips about this unique watercolor painting method, check out the step-by-step raised salt painting tutorials below:
- Halloween Pumpkin Salt Painting
- Heart Art Raised Salt Painting Project
- Saint Patrick’s Day Salt Paint Shamrock
- Rainbow Salt Paint Shamrock
Why Make Harvest Pumpkin Art?
Creating harvest pumpkin art gives children a fun way to explore autumn’s colors, shapes, and textures. It can also begin conversations about pumpkins, farms, seasonal foods, and the work that goes into growing and gathering a harvest. This art activity also complements a visit to the pumpkin patch.
The raised-salt technique adds a little art and science to the project. Children can watch liquid watercolor travel through the salt crystals and blend into nearby colors. Squeezing glue, sprinkling salt, and carefully adding paint also help strengthen fine motor skills and hand-eye coordination.
Most importantly, this fall process art activity leaves plenty of room for creativity. Children can choose their own colors, patterns, and details, making each pumpkin as unique as its artist. Display the finished artwork at home or in the classroom to celebrate the beauty and abundance of the fall harvest.
Paint a pumpkin that looks like it is sitting in a pumpkin patch with the step-by-step art tutorial instructions below. You might also enjoy using the same raised salt painting method to create a Halloween Pumpkin with a friendly (or spooky) Jack-o’-Lantern face. For more fall ideas, check out this list of autumn activities with a printable bucket list.
What do Pumpkins Symbolize?
Pumpkins are a traditional fall harvest symbol that represent prosperity, nourishment, and gratitude, reminding us to appreciate our hard work and share our blessings. Spiritually, pumpkins symbolize abundance and growth, tied to the harvest’s bounty and life’s blessings. Their transformation from seed to maturity symbolizes change and fulfillment.
Pumpkin seeds symbolize dreams and opportunities, while a pumpkin growing on a vine emphasizes the importance of friendship, family connection, and community. Because pumpkins ripen as autumn transitions into winter, they also represent nature’s cycles, especially death, dormancy, and rebirth, mirroring life’s rhythm.
Make Your Own Fall Harvest Pumpkin Art
Celebrate autumn colors and the fall harvest season with this fun pumpkin art activity for kids and adults. Draw your own pumpkin or start with a printable outline, then explore watercolor, raised texture, and unexpected color blends.
Preschoolers can join in with hands-on help, while older artists can experiment with their own designs. Keep creating with these fall nature crafts, or explore more fall activities and a printable bucket list for seasonal inspiration.
Learn more about Rhythms of Play on our About page, or meet the creator and author, Nell Regan Kartychok.
More pumpkin Ideas for Kids:
- Halloween Pumpkin Salt Painting
- Pumpkin Patch Field Trip Ideas (Includes our favorite pumpkin books!)
- Glow in the Dark Halloween Pumpkin Sensory Bottle
- Decorate Play-Doh Pumpkins
Halloween Ideas:
- Halloween Art Projects
- Top 10 DIY Halloween Lanterns
- Tissue Paper Ghost Craft
- 13 Healthy Treats and Fun Alternatives for Halloween
- DIY Halloween Porch Decorations
- Spider Egg Sac Halloween Decorations
- Giant DIY Spider Web
- Halloween Spider Door Decorations
- Spider Crafts


Tried this salt art with a group of 6-9 year olds. Enjoyed by all until it was time to pick up their projects to take home. Salt and glue flaked off everywhere! We were all saddened by the final results. this is a failure in my book!
Hi Bobby,
I’m so sorry that you consider this project to be a failure. As mentioned in many of our salt painting posts, salt paintings don’t last.
Creating them is about the process, not the product, and they can not be taken home or displayed. I apologize for not making that clear enough in this post.
Did children have fun creating pumpkin salt art? If yes, then I would say it was a success!