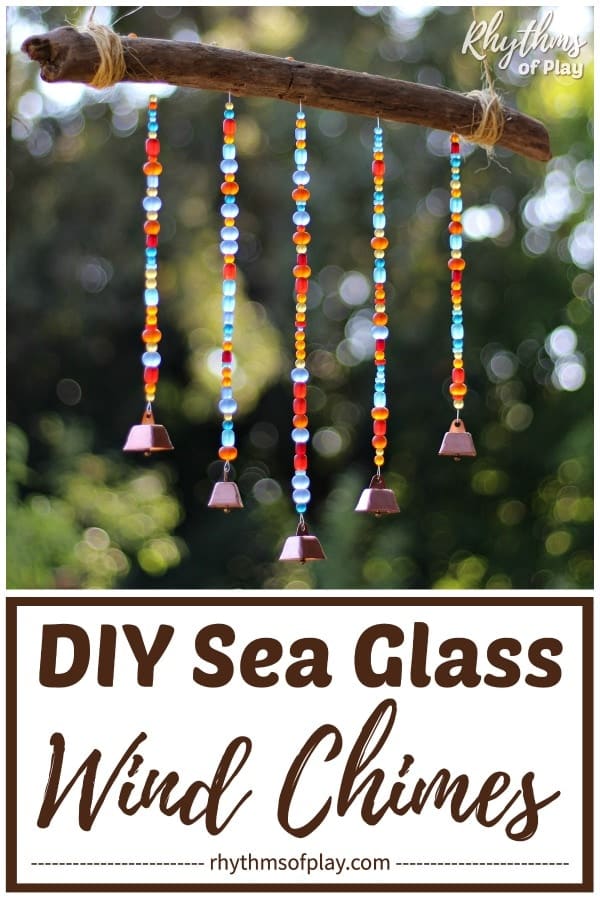
This beaded wind chime craft tutorial includes step-by-step instructions (and a photo tutorial) for making wind chimes with driftwood, sea glass beads (or another type of bead), and a pendant, charm, or another kind of ornament on the end (such as cowbells, jingle bells, sea glass pendants, or crystal prisms).
Make beautiful beaded garden art with this DIY sea glass wind chimes tutorial. Beaded wind chimes are a stunning addition to home decor, a fun garden craft, and an easy STEAM project suitable for both kids and adults. Sea glass beads and small cowbells make this simple beaded wind chime craft simple for kids of all ages to assemble. However, young children (preschoolers and kindergarteners) will need the help of a parent, caregiver, or teacher to make this beaded wind chime DIY. Older children, teens, and adults will be able to complete most steps of this craft with minimal guidance. You might also enjoy making beaded necklaces and bracelets.
Handmade sea glass wind chimes make lovely DIY garden decor and a gorgeous gift idea for kids or adults. Make beaded wind chimes at home, in the classroom, art school, or even at summer camp! Beaded wind chimes are perfect for sleepovers, homeschoolers, make-it-yourself craft nights with friends, or a handmade gift for someone special. Please refer to this list of homemade gifts kids can make for additional creative ideas.
The step-by-step DIY tutorial below explains how to make a seaglass wind chime with sea glass beads, a piece of driftwood, and cowbells. However, you can use several other types of wood, beads, bells, charms, or pendants to make these hand-beaded crafts. Feel free to substitute the other craft supplies recommended within the materials list and directions. First published on September 6, 2016, this beaded wind chime tutorial is regularly updated to improve the content. You may also enjoy this beaded sea glass craft tutorial.
Driftwood Sea Glass Wind Chimes DIY:
If you have ever wondered how to make DIY wind chimes or wind chimes with beads, you’ve found the answers you need. With this beaded wind chime DIY tutorial, you can create gorgeous outdoor hanging chimes for the garden, yard, patio, or schoolyard for yourself or someone special. They also look beautiful when hung indoors in a corner or by a window. Homemade wind chimes are a magnificent piece of DIY garden decor or home decor, and they make a lovely gift idea for Mother’s Day, Father’s Day, Grandparent’s Day, Christmas, a Birthday, a Wedding anniversary, or Teacher Appreciation Day.
Related: Rainbow Prism Suncatcher
Making Crafts with Sea Glass Beads:
When my daughter and I discovered these gorgeous sea glass beads , we wanted to use them to make several DIY beaded projects, including these wind chimes and a few hand-beaded bracelets. First, we used them to make these sea glass suncatchers because they are a more straightforward beaded project for beginners like my preschool daughter. Next, we created the beaded wind chime DIY shown in the photographs, as well as a few window and wall-hanging crafts. Once finished, we decided to share this fantastic DIY with you!
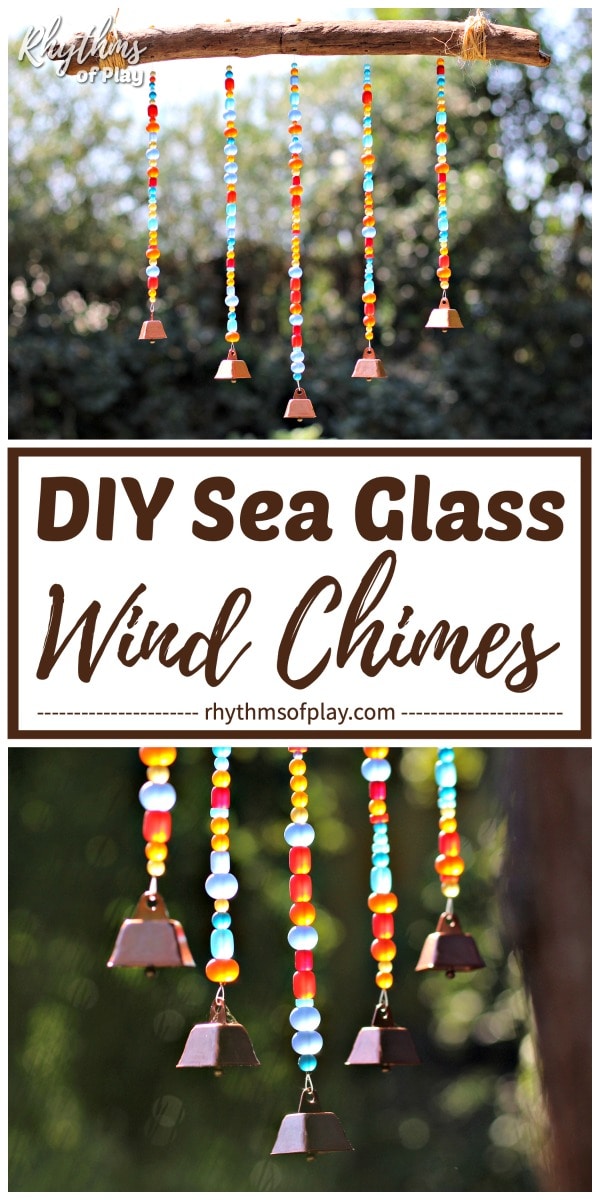
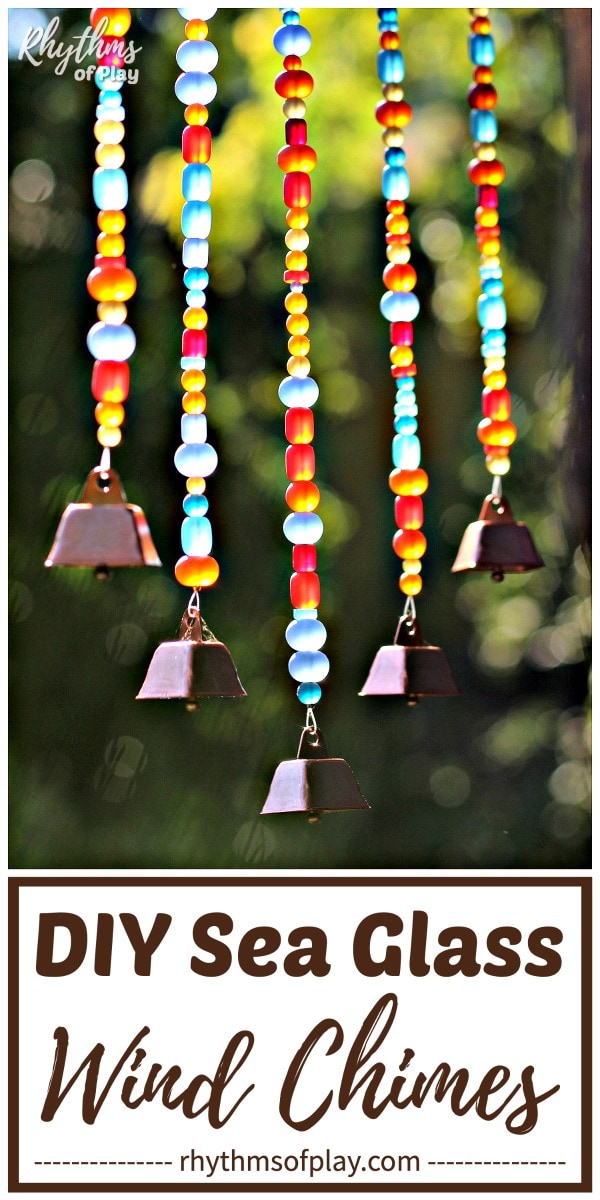
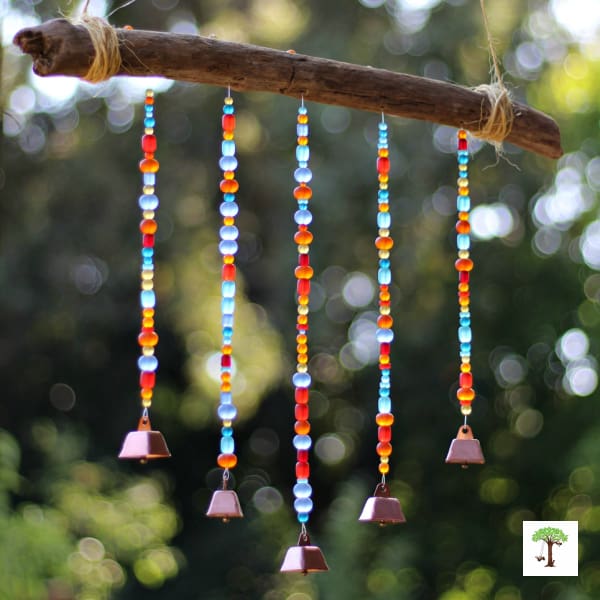
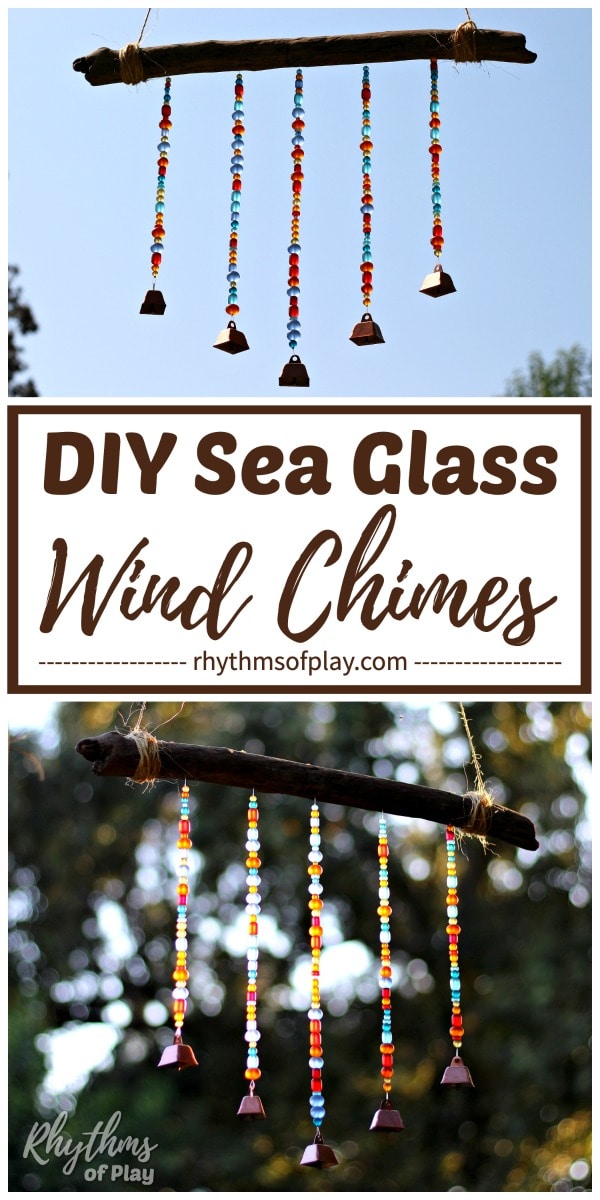
I love the fire and ice look that our beautiful beaded sea glass windchime brings to the patio, along with the subtle chime of the bells. Sea glass beads look stunning in any light, but are magical when the sun hits them. They look gorgeous hanging from a piece of driftwood in the garden on a sunny day. The soft clinking sound of the beads and cowbells, when the wind blows, is just as lovely.
Chrystal prisms also look fantastic as the base charm at the bottom of the strands for these suncatcher crafts, especially if you plan to hang it in a corner or window inside the home. It truly is a beautiful indoor or outdoor decoration, regardless of the supplies used or where it is hung. You can see examples of a single beaded suncatcher with a hanging heart prism or a teardrop prism, strung with translucent pony beads, in related DIY tutorials. These suncatcher crafts would look just as lovely hanging in multiple strands from a piece of driftwood or wooden dowel rod.
The Five-Strand Sea Glass Suncatcher in the Photos for this DIY Wind Chime project:
Update: The photograph below shows how our beaded sea glass wind chime with small cowbells looked hanging in my (late) mother’s backyard when my daughter and I first made it. (May she rest in peace.) In 2018, the beaded wind chime in the photographs was destroyed in one of the most devastating wildfires in California history (known as the #CampFire).
The Camp Fire burned the entire town of Paradise, CA, and took this beautiful DIY suncatcher, as well as my mother and brothers’ homes, with it. True story. The fire also burned the fairy garden my brother made in a tree stump. It was a sorrowful day because I also lost all my baby pictures, childhood artwork, and the family antiques. My mother passed away a few years later.

How to Make Beaded Wind Chimes:
Beaded sea glass wind chimes are a fun and engaging outdoor DIY project suitable for both kids and adults. Once finished, they are fun to hang on the patio, backyard, or garden outdoors. They also look lovely as DIY decor indoors when hung in a corner, against a wall, or by a window. First, read the instructions below to learn how to make beaded wind chimes with driftwood, sea glass beads, or any of the other recommended craft supplies. 
Knowing the steps involved and what to expect before starting any DIY project is always best, especially with a simple yet complicated beaded DIY project like this one. Reading the directions makes it simple, but not reading them before gathering materials makes it much more challenging and complex because there are so many options.
Related: How to Make a Fairy Garden
Start by choosing the supplies and size for the wind chime or suncatcher:
Before you begin, it’s essential to consider how you would like the wind chime to look before making this hand-beaded wind chime. Consider the following questions: How many sea glass strands with cowbells, jingle bells, or another charm, such as prisms, do you want to hang, and how long would you like them to hang down?
In other words, what pendant, charm, or ornament do you want to use, and how wide and long would you like it to be? Depending on your answers, you might need to trim the wood you plan to use to the appropriate size. Reading the step-by-step instructions for this project below can help you determine how you would like to proceed with making it.
For another example of how these crafts can be assembled, you can see a smaller, more recent, three-strand beaded wind chime with bells hanging in the corner of my bedroom, which my daughter made with minimal guidance from me when she was twelve years old (eight years after I first published this DIY tutorial), in the photo below.

The piece of driftwood for this DIY windchime is nine inches long, and the beaded strands are two and 1/2 inches apart. The middle beaded strand is eight and 1/2 inches long, while the two on the sides are six and 1/2 inches long. Instead of hand-beading a random pattern, as my daughter did for the five-strand wind chime in the other photographs, this hand-beaded craft features a distinct pattern with the two outside beaded strands matching and the inside slightly different.
Choose the Design and Pattern for the DIY wind chime or Suncatcher:
Another thing to consider before starting this DIY project is whether you will create a graduated sea glass wind chime, with the middle strand of beads hanging down longer than the rest (as shown in the photographs for this tutorial). Alternatively, you can make graduated sea glass wind chimes with beaded strands that hang in a slant to the left or the right. Or make sea glass wind chimes with each beaded strand hanging at the same length, or from multiple falling pieces of wood like a mobile if you prefer.
You will also need to decide whether you want to hand-bead a pattern as shown in the three-strand beaded wind chime in the photo above or place the beads in a random order, as shown in the five-strand beaded wind chime in the photo below. Of course, you can choose other colors and different types of beads than those shown in the pictures if you prefer. Several other options are included in the craft supplies and instructions below.
No matter your choice, the directions to make this beaded wind chime DIY are all basically the same, but you will more than likely need to do a bit of counting or math to complete this project. For this reason, making beaded sea glass wind chimes is a great STEAM project for homeschoolers. Scroll down to the bottom of the tutorial to learn why! You might also enjoy making a beaded Alphabet Necklace.
Sea Glass Wind Chimes Craft Supplies:
There are several craft supply options for this project. Please read through the instructions below before choosing materials to make a more informed choice about the craft supplies you will use to make sea glass garden wind chimes, wall hangings, or window suncatchers for this DIY project:
- A piece of driftwood, a bare branch, a stick, or a large wooden dowel rod with a foam brush and wood stain
- Hand saw, skill saw, or table saw. (These tools are optional for trimming wood if needed; please read the instructions below.)
- Measuring tape or ruler.
- Scissors
- Fishing line (comes with crimp tubes) or nylon beading thread.

- Small cowbells: Choose one of the following cowbell options or find an alternative at a hobby or craft store or Dollar Tree:
- A (gold and silver cowbells).
- B (rounded cowbells).
- C (small jingle bells).
- Alternatively, you can use another type of bell, such as a larger glass bead with a hole at the top that allows it to dangle, or another glass or metal charm, like a pendant or a prism. (The directions to attach each to the wind chime are the same, so the instructions below will make it easy to attach most pendants or charms in the place of the cowbells as instructed.)
- Sea glass beads; choose at least one of the following:
- Blue (ocean wave),
- Red/orange (burning sun),
- Green (seafoam),
- Yellow mix,
- Purple mix, or
- Rainbow frosted
- Alternatively, you can make beaded strands with pony beads, glass beads, or another type of bead.
- Crimp tube beads (these come with the fishing string above).
- Garden twine.
- Bead crimping pliers (an inexpensive and straightforward craft tool).
- Masking or painters’ tape (optional, see directions below).
- Marking pen or pencil
- Electric drill (optional, see instructions below).

 Alternatively, you can use another type of bell, such as a larger glass bead with a hole at the top that allows it to dangle, or another glass or metal charm, like a pendant or a
What’s the best wire, String, or cord for making wind chimes?
A fishing line or string is the best material for making wind chimes. Monofilament, commonly known as fishing line, is made of a single nylon strand, which enhances its durability and provides it with ultimate tensile strength. It’s a flexible, strong, and versatile material for hanging or suspending various objects, from beads and shells on suncatchers, mobiles, and wind chimes to decorative items like Easter and Christmas ornaments.
It is used to catch fish because it’s the best. Fishing string doesn’t break as easily as other nylon threads. However, with its remarkable strength, monofilament is not just for catching fish. It is the perfect craft supply for making wind chimes, as a strong gust of wind can put even strong types of string to shame. Fishing string also doesn’t tangle as easily as some strings can.
On the other hand, wire is strong but not as flexible as fishing line, so it is not the best for making wind chimes. Once again, imagine a strong gust of wind and visualize how a strong, thin, translucent line helps the light shine through the sea glass beads. The fishing string also allows the wind chime to sway in the wind, creating a melodious, gentle sound. This makes fishing line or string one of the best options for wind chimes and other crafts.
Beaded Sea Glass Wind Chimes with Cowbells DIY Step-by-Step Tutorial with Photographs:
Read the step-by-step instructions below to learn how to make a wind chime with sea glass beads, cowbells, another charm, a piece of driftwood, a bare branch, a stick, or a wooden dowel. There are several different ways to assemble a wind chime, mobile, or suncatcher using this DIY tutorial, so understanding the steps involved will help you decide how you want to construct it. You may also enjoy making sea glass suncatchers. A list of other hand-beaded and garden crafts you can make with kids is at the bottom of this post.
1. If needed, trim or cut the driftwood, bare branch, stick, or wooden dowel to size (optional):
- If needed, cut the piece of wood you are using to make a wind chime using a hand saw, skill saw, or table saw.
- To determine the size needed, consider the number of beaded sea glass strands you’d like to hang and the distance between them, and calculate how much you need to cut, if any.
- Wind chimes are generally six inches to three feet in width, but can be made slightly smaller or larger.
- Wooden dowels, as well as some bare branches and sticks, can be easily cut, while driftwood looks best when left uncut. Do your best to find an appropriate size for this project, or break it and weather it as best you can.
- The driftwood in the photographs was not cut before it was made into a wind chime with cowbells.
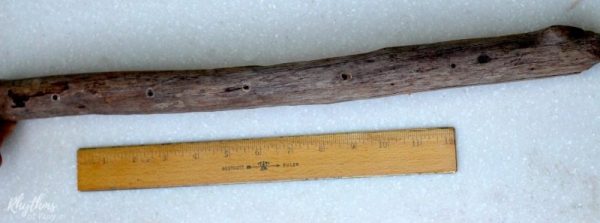
2. Drill holes into the driftwood, bare branch, or a large wooden dowel (optional but recommended):
- Use a measuring tape or ruler to measure the length of the driftwood or bare branch you are working with to determine where you would like each bead strand to hang.
- As mentioned above, you will need to take measurements and perform calculations to complete this DIY garden project.
- The distance between each beaded strand will depend on the driftwood, bare branch, or wooden dowel length and the number of beaded strands with cowbells (or prisms) you would like to hang on it.
- Wrap masking or painters’ tape around the wood where you want to drill the holes to protect it from cracking or splitting (optional).
- Use a marker to place a dot where you plan to drill into the wood.
- Drill 3 to 16 evenly spaced holes.
- The photographs for this sea glass wind chime show five holes drilled approximately three inches apart.
- The five holes are centered in the middle of the 19-inch piece of driftwood.
- Alternatively, you can skip drilling a hole in the wood for the beaded strand and wrap and tie the fishing line strands around the driftwood, dowel, or stick in Step 7 instead; however, the finished result may not look as professional.
3. Stain the wood (optional):
- If you use a wooden dowel rod to make this garden craft, staining and protecting the wood once it is cut (if needed) and the holes are drilled is optional but recommended.
- Apply a wood stain and sealer with a foam brush (or paintbrush) and allow it to dry before proceeding to the next step.
4. Cut a piece of fishing line for each beaded strand:
- Use scissors to cut three to twelve sections of monofilament or fishing line, fifteen to forty-eight inches long.
- You will need a piece of fishing line for each beaded sea glass strand you want to hang from the driftwood.
- You can copy the step-by-step example below, as shown in most of the photographs for this tutorial, or perform the math to make it any way you prefer.
- For the five-strand sea glass wind chime DIY project, my daughter and I started with five strands of monofilament line, each approximately 2 to 2.5 feet long.
- When finished, the sea glass bead strands for the DIY wind chimes in the photographs measured 12, 14, and 16 inches long.
- In other words, my preschool daughter beaded two 12-inch strands, two 14-inch strands, and one 16-inch strand to make the sea glass wind chimes shown in the photos.
- You can copy the step-by-step example below, as shown in most of the photographs for this tutorial, or perform the math to make it any way you prefer.
Related: Best Rainbow Suncatchers
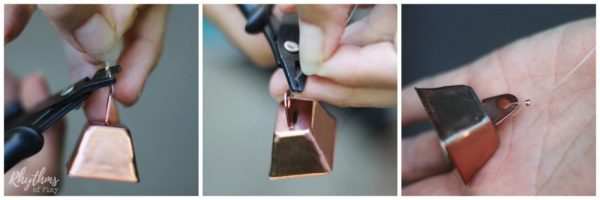
5. Attach cowbells, jingle bells, sea glass charms, prisms, or another type of charm or ornament to the end of each Beaded strand:
- Use a crimp bead (or tube) and a pair of crimping pliers to attach a small (or large) cowbell (or another glass pendant, crystal prism, or metal bell charm) to the end of each strand of the monofilament line cut in Step 2 according to the following directions:
- First, place a crimp tube (or bead) onto one end of the monofilament string or fishing line.
- Next, place a cowbell, prism, or another pendant, charm, or ornament on the end of each strand of fishing line.
- Then, thread the short end of the fishing line into the crimp tube by tucking it in next to the long end of the monofilament line, as shown in the photos below.
- Gently push the crimp tube towards the cowbell to decrease the diameter of the loop.
- Use crimping pliers to squeeze the crimp tube shut around both pieces of monofilament line, holding the cowbell, prism, or another pendant or ornament in place.
- Trim off the excess monofilament line and repeat the steps above until all sections of the fishing string have a cowbell, prism, or another pendant attached to one end.
- When each section of the monofilament line has cowbells or another charm on the end, move on to the next step.
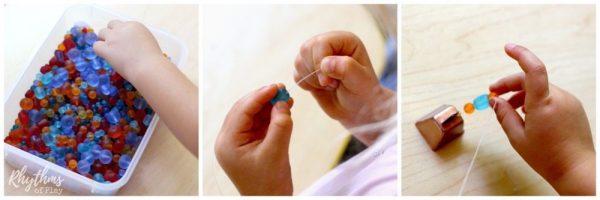
6. String the sea glass beads onto each strand of the fishing Line:
- String the sea glass beads directly onto the long end of the fishing line attached to each cowbell.
- Monofilament line, also known as fishing string, is sturdy enough to string beads without the need for a sewing needle.
- You can also use it to make gorgeous suncatchers and simple beaded necklaces and bracelets!
- Use blue, green, red, or any other color of frosted beads, glass beads, pony beads, etc. , in single or multiple color combinations.
- You can use one color, create a varied color pattern, or randomly string the sea glass beads onto each strand in any way you wish—like my preschool daughter did for this simple DIY garden project. The photographs below show her beading the sea glass strands for this homeschool STEAM project.
 , in single or multiple color combinations.
Related: How to Color Wooden Beads
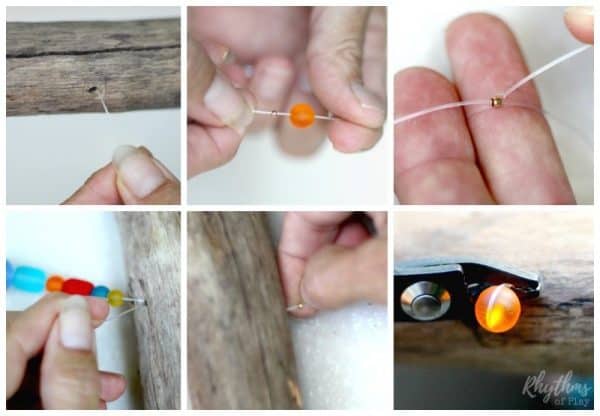
7. Attach the beaded wind chime strands to the driftwood, bare branch, stick, or wooden dowel rod:
- Lay the driftwood, branch, stick, or dowel on a work surface.
- Thread the top of each bead strand through one of the holes drilled into the piece of wood to attach each strand to the base of the wind chime.
- Pull the beaded section of the monofilament line up and through the driftwood until the sea glass beads are flush with the driftwood.
- Place a crimp bead onto the monofilament line (above the driftwood), followed by one last sea glass bead (or other type of bead large enough not to slip through the drilled hole).
- Wrap the monofilament line around the bead, tuck it into the crimp bead, and return it to or through the drilled hole in the driftwood, branch, stick, or dowel.
- Hold the crimp and sea glass bead as you pull on the end of the monofilament line to move the bead strand and top bead as close to the wood as possible.
- Use the crimping pliers to close or shut the crimp bead.
- Cut or trim off any excess monofilament line if needed.
- The sea glass bead on top of the driftwood will ensure that each beaded wind chime strand stays firmly in place. It also adds a pretty pop of color to the top edge of the driftwood, bare branch, or wooden dowel rod.
- Repeat the process above with each beaded strand.
- Look at the photo tutorial below to see how to complete each step of this process.
- Alternatively, if you choose not to use a drill to make a hole, wrap the end of the fishing line around it and tie it to the driftwood, stick, or dowel.
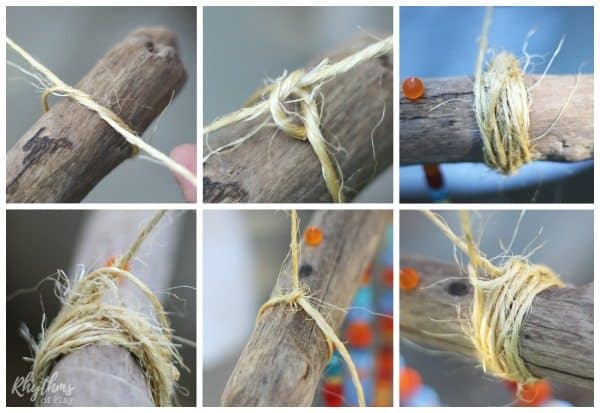
8. Make a hanger for the hand-beaded wind chime DIY:
- First, cut a long section of heavy-duty string, rope, or jute garden twine to make a hanger for the sea glass wind chime. You can also use fishing line for this purpose.
- Next, tie a square knot at one end to attach it to the driftwood (or bare branch).
- Continue wrapping the jute garden twine or string around the same end of the driftwood 6-12 times to cover the knot.
- Then, tie another square knot on top of it to secure the wrapped garden twine in place.
- Leave 2 – 5 feet of slack (depending on how long you would like your wind chime hanger to be) and tie a square knot on the other side of the driftwood.
- Then again, wrap the garden twine 6 to 12 times to cover the knot on the other side of the stick.
- Next, tie another square knot on the wrapped twine or string.
- Finally, cut the jute twine and tuck the loose end into the wrapped string or garden twine at the end of the twig or stick.
- Look at the photo tutorial below to see how to make a garden hanger for a wind chime.
Making Beaded Wind Chimes is a Great STEAM Project Idea for Homeschoolers
Just because young children shouldn’t be making DIY wind chimes alone doesn’t mean they can’t help! We are raising a self-sufficient kid, so we invite our daughter to help with household chores and simple DIY projects like this sea glass windchime.
Plus, making wind chimes is a great STEAM project for homeschoolers. Working on simple crafts like these hanging chimes means that we also get to sneak in a few homeschooling lessons as we work–due to the basic engineering, measuring, and math involved in the process. My daughter helped us decide on the basic design for our DIY wind chime, which required her to help me with some math, measuring, and counting.
Making Hand Beaded Art is an Excellent Way to Improve Hand Strength and Dexterity:
My daughter also created the beautiful beaded art shown in the photographs by stringing each sea glass bead onto each strand of the wind chimes. Stringing beads to make a beaded wind chime (or any other beaded project) is also a great way to develop hand-eye coordination and strengthen the fine motor muscles in the hands, thereby improving hand strength and dexterity. Counting and measuring the number of beads on each strand also helps improve math skills and spatial reasoning.
Projects like this can help build and strengthen the hand muscles necessary for writing and other handwork activities, such as sewing a pocket pet mouse. But don’t tell the kids they are learning or that it has anything to do with school. Or they might not want to help you make it. Let’s keep it our little secret. 😉
My husband and I drilled the holes in the driftwood for the wind chime and created the twine hanger the first time we made wind chimes. However, my daughter accomplished these tasks independently when she made the three-stranded version of this wind chime craft, as shown in the photo at the top of this DIY tutorial, when she was twelve years old. Today, she is so adept with her hands that she can create almost anything. Nimble fingers make nimble minds.
Sea Glass Wind Chime DIY
Garden crafts like this beaded wind chime are excellent STEAM projects for homeschoolers and make lovely handmade gifts. The beaded sea glass beads become a gorgeous suncatcher that adds a splash of color to any view, making them look stunning when hung outdoors in the garden, yard, or patio.
You may also like learning how to start a fairy garden. Click on the link for the step-by-step tutorial. Learn more about Nell Regan Kartychok, creator, author, and photographer of this original DIY wind chime or suncatcher craft project HERE, and Rhythms of Play HERE!
More Hand-Beaded Craft Ideas:
- How to Start and Finish a Beaded Necklace
- Prism and Ponybead Suncatcher
- Hanging Heart Suncatcher
- Mother-Daughter Necklace Set
- DIY Personalized Necklace
- Bead Bracelets Kids Can Make
- Wooden Bead Bunnies
DIY Garden Crafts, Projects, and Activities:
- How to Make a Fairy Garden
- Real Flower Suncatcher Crafts
- Composting At Home
- How to Grow a Sunflower House
- DIY Outdoor Chalkboard
- Painted Rock Fairy Houses
- How to Plant Flowers Organically
- Best Sandbox Ideas for Kids


Ive been trying to make a sea glass driftwood windchime. Ive used monofilament fishing line. I secured glass with hot glue and a knot but I could not get knot right and it just looked takey. So I decided to drill holes in my sea glass. Now I’m having troubel with the strands getting tangled. Can you give me some advice. Thanks
Hi Colleen, I’d be happy to help, but I’m a little confused. I used sea glass beads to make the sea glass windchime pictured, but you said that you had to drill holes in your sea glass. Can you explain how the strands are tangling so I can get a better idea of how to help?
Hi there. Do you sell this as kit? Or is there a link where I can get the supplies you used. (except the stick).
Thank you. this looks great.
Great question!
You can find the list with Amazon affiliate links to the supplies you need to make the windchimes shown here before the step-by-step tutorial. If you click to purchase, Rhythms of Play will earn a small commission at no cost to you. I hope that helps!
I have viewed countless tutorials, yours is the most complete and easy to follow. Thank you for sharing.
Thank you very much, Nancy! Comments like yours keep me going and make it all worth the while. I hope you enjoy creating beaded garden art as much as my daughter and I do. Happy crafting!