This step-by-step DIY tutorial will teach you how to make (and install) a large outdoor chalkboard at home, child-care centers, or schools.
Transform your backyard, patio, schoolyard, home daycare, shop, or restaurant with a large outdoor DIY Chalkboard! Backyard chalkboards are a great addition to an outdoor classroom or backyard play area, providing a fun, educational space where children can learn or create chalk art. Even adults will enjoy creating chalk art on a giant outdoor chalkboard. Below, we share how to make an outdoor chalkboard, with two simple methods to install it (complete with step-by-step DIY instructions and the tips and tricks we have learned over the years) that make building a giant outdoor chalkboard easy!
When our daughter was a baby, toddler, and preschooler, my husband and I ran a daycare in our home on a one-acre lot. So, we created several DIY outdoor play areas for kids to help them learn through play all day; winter, spring, summer, and fall. One of our favorite and most popular outdoor play spaces is a large outdoor chalkboard for yards, gardens, and patios. Follow the step-by-step instructions below to make one for your backyard, play yard, child care center, schoolyard, or outdoor classroom.
First published on June 4, 2015, this DIY outdoor project tutorial is updated and republished regularly to improve the content and keep it current. The step-by-step instructions below include photos of various chalkboards we’ve made outside, along with everything you need to make one for your backyard, patio, schoolyard, or home daycare. The tutorial also includes alternative options, tips, and simple hacks for making and installing them. You might also enjoy this list of outdoor learning activities for kids.
Outdoor Chalkboard DIY Project:
Because we owned and operated a daycare, my husband, mother, and I created fun outdoor play spaces for kids: water walls, sand-and-water tables, a backyard sandbox, fairy gardens, an outdoor art table, and a mud pie kitchen. Making these DIY projects turned our backyard into an oasis of play.
However, of all the backyard play areas we create, installing a DIY chalkboard is one of our favorite outdoor DIY projects for year-round use. A giant outdoor chalkboard can enhance the quality of your yard, garden, or school, and allow children to learn critical developmental skills, such as writing vertically.
Build a DIY Chalkboard for an Outdoor Classroom or Play Area:
A DIY chalkboard is perfect for outdoor use at home or learning centers. Building a chalkboard for your home, daycare, preschool, elementary, middle, or high school is a fun and versatile outdoor DIY project with numerous educational and recreational benefits.
Outdoor chalkboards create an open-air learning environment that encourages physical activity and exploration while offering refreshing visual aids for teachers to educate and students to learn. This makes outdoor chalkboards an excellent alternative to traditional indoor classrooms for children of all ages, from toddlers to teens.
An outdoor chalkboard can be utilized in various ways, transforming any backyard or outdoor area into an interactive classroom or play zone. Younger children can practice writing letters and numbers or drawing pictures, while older children, teens, and adults can use it for brainstorming, instruction (at home or school), or simply enjoying some creative chalk art.
The tactile nature of chalk fosters creativity, aids in developing fine motor skills, and effectively engages children in hands-on learning, which boosts cognitive development. Chalk can be removed with an eraser or washed off with a hose or a wet cloth for easy cleanup after every creative session. Use the step-by-step instructions below to learn how to construct and install a chalkboard.
How to Make an Outdoor Chalkboard:
A DIY outdoor chalkboard exposed to moisture or harsh conditions, such as rain, needs weatherproof materials or additional protective measures to prevent warping, moisture damage, and UV degradation. However, you can make one quickly and easily using recycled materials, such as a hollow wooden door, with the step-by-step instructions below, as long as you apply high-quality primer and chalkboard paint and keep the outdoor chalkboard as protected as possible.
To make it last longer and increase durability, consider implementing any of these protective measures for outdoor chalkboards:
- Use a hardwood (such as cedar), weather-treated wood (such as pressure-treated plywood), or Hardie Backer Board.
- Apply multiple coats of exterior primer before adding chalkboard paint.
- Apply multiple coats of outdoor chalkboard paint.
- Use a mat spray varnish as a topcoat to protect the chalkboard paint and increase its durability.
- Add a frame to increase durability and improve the outdoor chalkboard’s aesthetics, especially if it is made with treated plywood or Hardie Board Siding.
- Place the chalkboard in a protected area, away from harsh weather, excessive moisture, and direct sunlight (such as under a porch or overhang, or covered with a tarp).
Please read the step-by-step DIY outdoor chalkboard tutorial, the recommended materials, and the FAQs (Frequently Asked Questions) below to learn more. This will help you make a more informed choice about the materials you will use to build it. Then gather the materials from the project supplies list and follow the instructions to get started!
What is the best material for an outdoor chalkboard?
A large sheet of outdoor-grade pressure-treated plywood (such as CDX), Hardie Board, or weather-treated hardwood for exterior use is best for weathering the elements. However, a hollow-wood interior door is also a fantastic choice for its ease of construction and use. A hollow wooden door doesn’t require a frame to be built around it, making it much easier to create and install. Using a hollow door also makes the chalkboard lighter and more portable. Hardie Board Siding is lighter than Cement boards. However, Hardi Board, cement board, and pressure-treated plywood can be a little more complicated to install.
Either option must be painted with high-quality exterior, weather-resistant latex paint to further protect it before applying a coat (or several coats) of chalk paint. Depending on where you plan to put it, a hollow wooden door might need several coats of high-quality exterior latex paint to protect it from the elements. However, these extra coats may not be required if the area is protected, such as by an overhang or cover, preventing exposure to harsh weather and the elements.
Using a hollow wooden door to make a DIY Chalkboard:
As mentioned above, my family has made and used several outdoor chalkboards using a plain hollow interior wooden door without a doorknob hole. My husband, mother (may she rest in peace), and I like to make chalkboards using this easy option because it is lightweight, doesn’t need a frame, and comes in one piece—the perfect size for a chalkboard. However, you can also use the step-by-step instructions below to construct one with a large piece of outdoor plywood or cement board siding.
Hollow wooden doors also make great DIY chalkboards intended for interior use because they look finished without a frame and remain well protected from the elements indoors. My family likes using a hollow wooden door to make chalkboards for indoor and outdoor use because the edges are finished, and it has a much smoother surface than a sheet of plywood (or any other type of wood).
However, you can also use pressure-treated plywood, Hardi board, or cement board to make either type of chalkboard, for indoor or outdoor use. The good news is that you get to choose which you’d like to build it with. Scroll down and follow the step-by-step instructions to make a DIY outdoor chalkboard with your favorite supplies from the list below. You might also enjoy learning how to make a Fairy Garden.
Large Outdoor Chalkboard DIY Supplies and Materials:
Before starting this DIY project, please read through the instructions and choose a suitable outdoor spot for your chalkboard. Then choose your preferred supplies to make an outdoor chalkboard from the recommended options below:
Choose one of the following supplies as the base of the chalkboard:
- Weather-resistant Hardie Board (a durable, light, and easy to cut fire- and rot-resistant fiber-cement construction material mainly used as a high-quality, pre-finished exterior siding).
- Cement board (heavier and typically cheaper than Jardie board) is commonly used as a tile underlayment.
- Pressure-treated plywood (treated to resist rot, decay, and insects for direct ground contact or wet environments). Common types best for outdoor exposure include CDX (general exterior) and Marine Plywood (high-grade/waterproof).
- Hardwood such as cedar for exterior use. You can find exterior plywood, Hardie Board, and cement board at most home improvement centers.
- Hollow interior wooden door without a doorknob hole cut into it. (Inexpensive and easy to make, but less durable option.)
- My husband and I found the hollow wooden doors we used both times we made outdoor chalkboards at ReStore by Habitat for Humanity (not affiliated).
- Alternatively, you can purchase a new one at your local hardware or home improvement store.
Gather remaining materials to make an outdoor chalkboard from the recommendations below:
- Outdoor exterior primer.

- Chalkboard Paint.
- A tarp, drop cloth, or an old sheet.
- Smooth finish paint roller and brush set.
- Exterior timber or hardwood to make a frame for the outdoor chalboard if desired (optional).
- Exterior latex paint in the color of choice for the chalkboard frame, if needed (optional).
- Lag bolts, long wood screws, or exterior screws and anchors for stucco to hang the outdoor chalkboard (depending on the exterior surface it will be hung from), or cinderblocks to prop it against the side of a house, garage, or shed.
- Drill/Driver
 (optional, depending on installation method).
 ,
,  , or an old sheet.
 , or cinderblocks to prop it against the side of a house, garage, or shed.
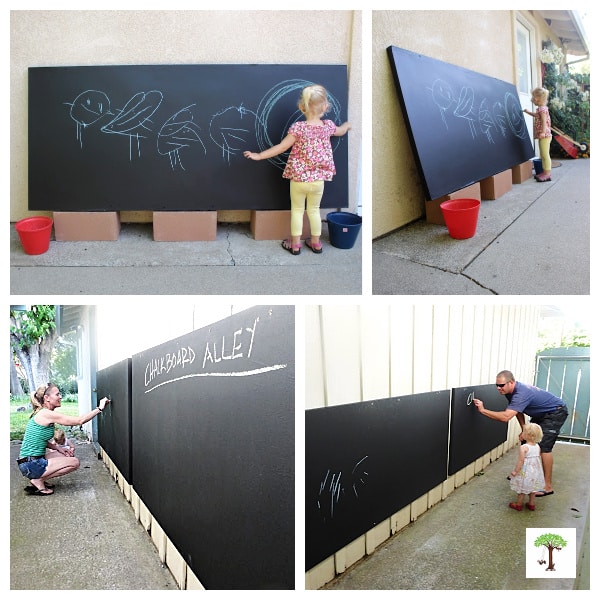
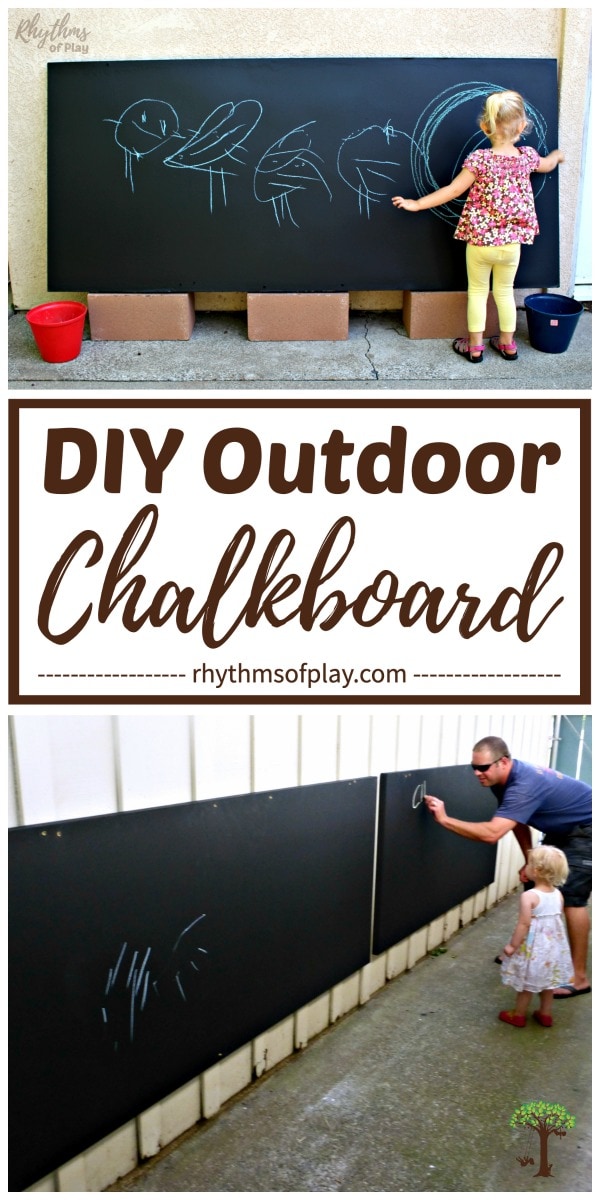
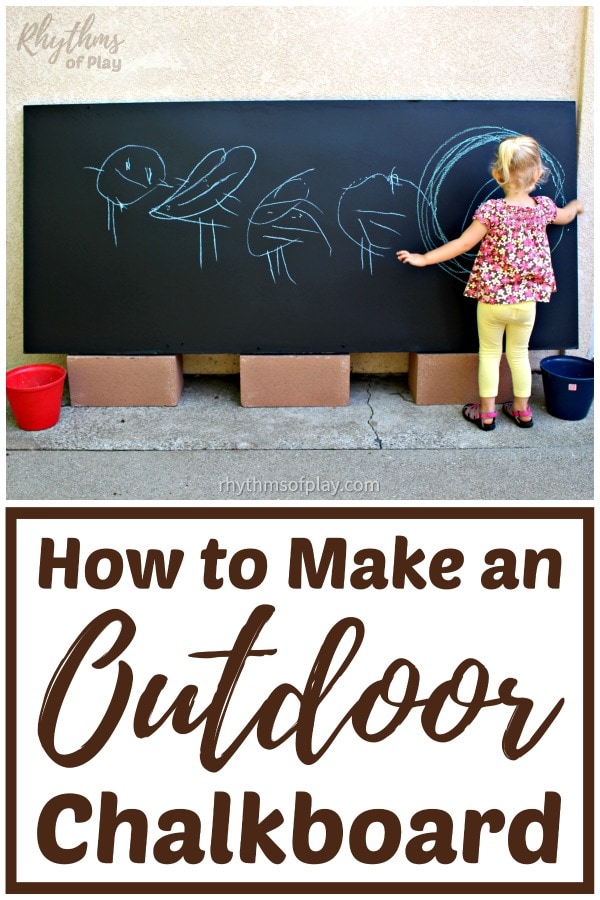
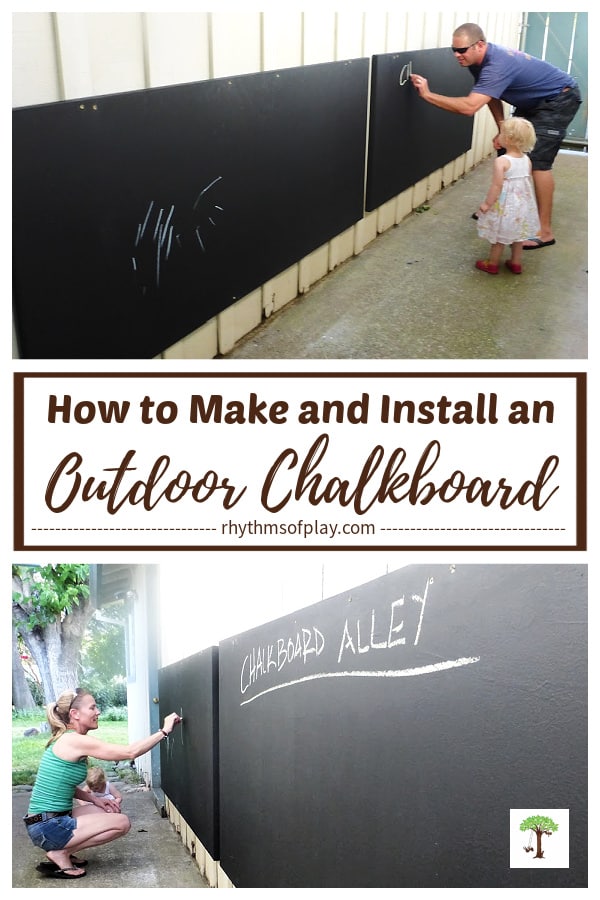
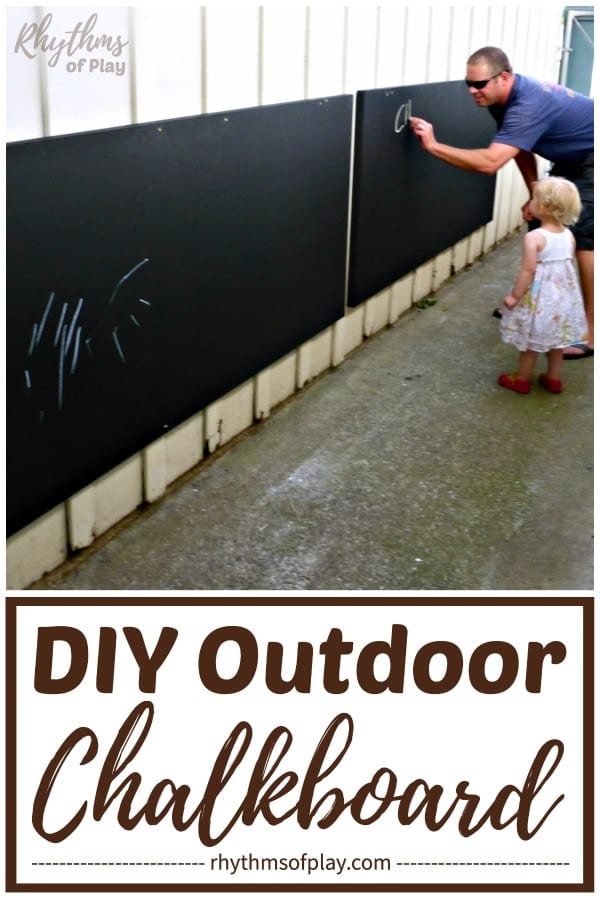
The two top photos in the collage above show my daughter drawing a family portrait on the outdoor chalkboard we created in 2016 to replace the first set of outdoor DIY chalkboards we made in 2012 shown in the bottom two photos. But because of an unexpected snafu, we needed to develop a new installation method for our exterior chalkboard. Learn several ways to make and install a DIY outdoor chalkboard with the step-by-step instructions below!
Related: How to Make Mud Pies
How to Build a DIY Chalkboard Step-by-Step Tutorial:
Follow the step-by-step directions below to make an extra-large exterior chalkboard for kids to put in your backyard, schoolyard, home daycare, or patio. Start by painting the hollow wooden door with an exterior primer and chalkboard paint
 . Next, hang it up or position it on your patio or backyard to install it. Then, scroll down to the bottom of this post to learn two easy ways to install a DIY chalkboard. You might also enjoy this outdoor Shadow Art STEAM project for kids.
1. Prepare an area to paint the DIY chalkboard:
- Find an area large enough to paint the hollow wooden door, MDF, cement board, or pressure-treated plywood or hardwood.
- Place a tarp or an old sheet underneath it to protect the area where you will paint the DIY chalkboard for kids.
2. Sand the wood to prepare it for painting (if needed):
- Sand the interior door or a large exterior plywood sheet to create a smooth surface.
- A hollow wooden interior door will likely need less sanding than a large exterior piece of plywood, if any sanding is needed at all.
- Hardie boards and cement boards do not need to be sanded before painting.
3. Paint the wood or board with an outdoor Exterior primer to seal it and provide durability:
- Next, apply a coat of exterior primer to cover the Hardi board, door, cement board, or plywood.
- Apply the exterior primer using a smooth-finish paint roller.
- Let the paint dry completely before proceeding to the next step.

4. Cover the primer with a coat or two of chalkboard paint:
- Paint a coat or two of chalkboard paint on top of the primer.
- Use long, smooth strokes and work quickly, as it can get tacky as it dries.
- Allow the chalkboard paint to dry completely between each coat.
- Scroll down to the next section to see the tutorial for installing an outdoor chalkboard.
 on top of the primer.
5. Seal chalkboard paint (optional):
- Spray matte varnish over the chalkboard surface to seal and protect, and increase durability.
6. Frame the DIY chalkboard (optional):
The optional step of framing the chalkboard, as instructed below, is recommended when using weather-treated wood or Hardi Board Siding to construct it. Building a frame around the outdoor chalkboard is also recommended if it will be fully exposed to the elements or sprinkler water. A frame can help protect outdoor chalkboards from damage due to inclement weather, such as rain and snow.
Follow the steps below to build a wooden frame to fit the perimeter of the chalkboard:
- Measure the perimeter of the outdoor chalkboard.
- Cut the boards to size. (Depending on the components you want to use to attach it, construct the frame to fit either outside or inside the perimeter of the panel side.)
- Paint the frame.
- Start with a coat of exterior primer.
- Paint the wood for the frame with a coat or two of a complementary or contrasting color of exterior latex paint.
- Mount the chalkboard securely to the DIY wooden frame.
- Alternatively, you can frame the DIY chalkboard by attaching the wooden sidewalls directly to it with nails, screws, or mounting hardware.
- Consider painting the wood first, and please ensure the paint is dry before framing the chalkboard if you choose this option.
7. Prime the surface of the DIY chalkboard:
- Before drawing or writing, prime the surface by rubbing a piece of chalk over the chalkboard.
- Next, wipe it off to prevent “ghosting” when drawing.
- Once primed and ready, your outdoor chalkboard is prepared for artistic expression. Use it to provide endless entertainment and creativity for children (and adults), as an outdoor artboard, or as a restaurant menu or shop display.
Our Many Homemade Chalkboards For Kids:
We found each of the hollow wooden doors that we used to make chalkboards at ReStore by Habitat for Humanity (not affiliated). But because this blog (Rhythms of Play) did not exist when we made our first two large outdoor chalkboards, I didn’t take any tutorial photos to share. So, I only have pictures of the next DIY chalkboard we made at our new home, years later.
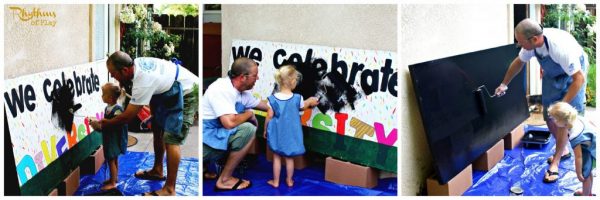
As you can see in the photo tutorial below, the previous owner of the third door we converted into an outdoor chalkboard painted an exterior sign on it that read “Diversity” and then donated it when they no longer needed it. My husband thought it would make a beautiful exterior chalkboard for our new patio because it was already painted with a few layers of outdoor paint and ready to go.
Because the wooden door we found had a few base coats of exterior paint, he opted not to use a primer on this chalkboard and instead started with one coat of chalkboard paint, as you can see in the photographs below.
Update After 15 Years of Making Outdoor DIY Chalkboards:
Update 2026: The original outdoor chalkboards we made lasted five years before we had to move. My husband gave them to a neighbor who was happy to take them off our hands to put them in his backyard for his kids, because we didn’t want to move them. They only became slightly warped along the top edge because of rain damage. The bubbling was so minimal that I barely noticed it, and I have OCD issues — lol!
My guess is we were able to maintain their appearance by keeping them under the slight overhang of our roof and applying fresh chalkboard paint to the front and sides (they did not have frames) every six months to a year. My husband applied fresh chalk paint every so often to keep the wood sealed and the paint fresh. Unfortunately, after we moved into our new home, our daughter wanted her chalkboards back. We didn’t want to ask our old neighbor to return them, nor did we want to go all the way back to get them, so as mentioned above, we made a new outdoor chalkboard for her instead.
Fortunately, the new one was just as quick and easy to make as the first chalkboards were, and it lasted even longer. However, because of an unexpected snafu, we needed to develop a new installation method for our exterior chalkboard. Learn both ways to install a DIY outdoor chalkboard below!
How to Install an Outdoor Chalkboard:
Over the years, we have experimented with two easy ways to install an outdoor chalkboard. As you can see in the photographs, we hung them low enough for toddlers and preschoolers to quickly and easily draw and write on them. Scroll down to learn more about each method. You might also enjoy Magnet Fishing for Kids.
My husband and I made our first set of outdoor chalkboard panels from hollow wooden interior doors to hang in a corridor between our garage and our house while we ran a childcare business out of our home when our daughter was a baby and a toddler. We hung it low enough for young children to reach and named it “Chalkboard Alley.” It soon became filled with chalk drawings on the chalkboards and along the concrete corridor floor made by the toddlers and preschoolers in our care. You can see our only pictures in the photos of my husband and our daughter, and the one of me drawing on them below.
How to Hang An Outdoor DIY Chalkboard:
Once the paint is completely dry, mount the chalkboard securely to a wall or fence using lag bolts, long screws (with anchors if installed on drywall or stucco), or other mounting hardware. As you can see in the photographs of my family above, my husband hung the first DIY chalkboard we made in a long corridor between our house and the garage.
The walls were board-and-batten, so he easily drilled long wood screws into the wood to hang it. It was so easy he didn’t even need anchors! You can drill lag screws into wooden fence posts just as easily to hang it. When we moved a few years later, he used the drill in reverse to unscrew them, and our neighbor happily came by to pick them up and take them home. Then he filled the holes with wood spackle, then added some touch-up paint, and the “Chalkboard Alley” walls looked good as new.
Hanging a Chalkboard on Different Surfaces:
Fortunately, you can drill into all surfaces, including drywall and stucco, if you use the correct screws and anchors to hang your outdoor chalkboard. Ask your local hardware or home improvement store for help finding the necessary components for the surface on which you are mounting the chalkboard, as well as the materials it is made of. They should be able to help you choose the right hardware and tools to hang your outdoor chalkboard anywhere you’d like, no matter what you use to construct it.
After hanging the two DIY chalkboards we made for our home daycare, we took the photos above and below. Over time, it became a beautiful alleyway with chalk art and writing all over the chalkboards and on the sidewalk below, where the kids in our care spent a lot of time creating, playing, and learning. They even made a hopscotch to enjoy! For more fun, check out these rock painting ideas for kids.
Installing an Outdoor Chalkboard Continued:
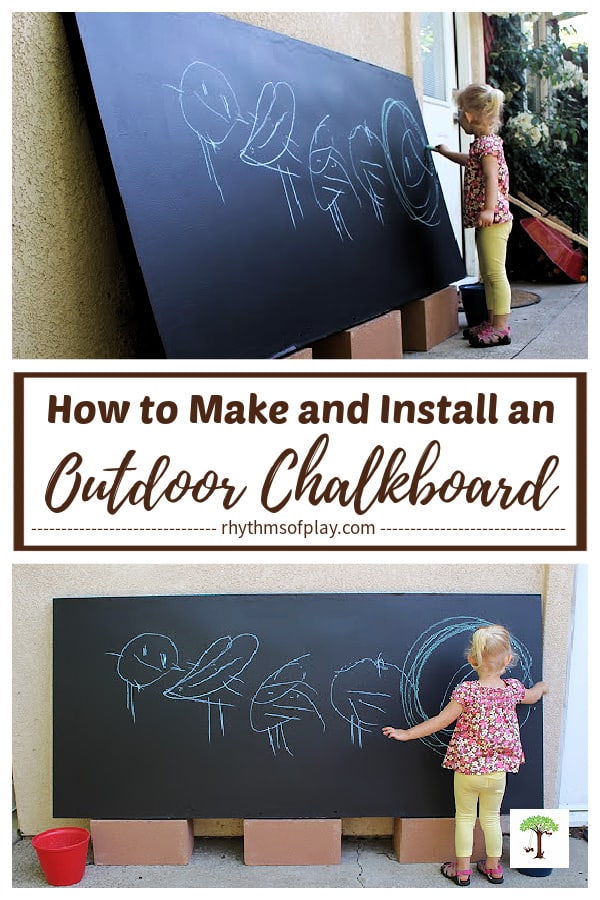
I wish I had taken more pictures of these first outdoor DIY chalkboards, but we made them long before starting this website, so I dug up the only old photos I could share, since I didn’t want to share pictures of the other children without their parents’ permission. But a few years later, we moved and found a new way to put up an outdoor chalkboard, which you can see in the photo below, with my daughter creating chalk artwork. Please scroll down to learn how we installed it without hanging it.
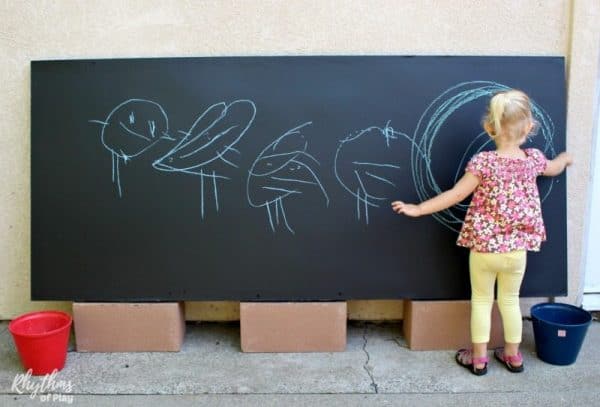
How to install an Outdoor Chalkboard Without Hanging It:
When we made our next DIY chalkboard, our landlord wouldn’t let us drill into the wall (or fence) to hang it. Bummer! At first, I thought this meant we could not have one, but then I came up with the brilliant idea of propping our outdoor chalkboard up on cinderblocks. No bolts, screws, anchors, or drills needed , and it works great!
Update: This DIY outdoor chalkboard was propped on cinderblocks for over eight years and never fell or posed a hazard. Our family home even had several children and animals running around over the years to test its sturdiness, and we never had a problem. Because it sat under the roof overhang, it had some protection from the elements, so it remained in relatively good condition, with a layer of new chalkboard paint added every year or so. You might also enjoy this list of DIY Backyard Pallet projects with complete step-by-step tutorials.
Outdoor DIY Chalkboard for Kids:
Transform your backyard or patio with a DIY Chalkboard! Large outdoor chalkboards are a great way to get creative, pass the time in the backyard, and support early literacy. Writing and creating chalk art on a vertical surface are great learning activities for kids.
Making an outdoor chalkboard for kids is relatively easy, and you don’t have to hang it to make it work. In our experience, propping up an exterior chalkboard on cinderblocks works well! For even more outdoor fun, check out this incredible collection of outdoor activities for kids.
Now that my daughter and her friends are in Junior High School, they also enjoy making homemade chalk paint to create sidewalk chalk art all over our driveway and around the block. Maybe you’ve seen some of her art walking by our house in Chico, CA?
I know some of you have because you have commented on how pretty it is. She is becoming quite an accomplished artist and an exceptional craft engineer, no matter what medium she chooses. She is also an exceptional homeschool student, and it all started with an outdoor chalkboard and simple arts-and-crafts projects at home.
Learn more about Nell Regan Kartychok, author, photographer, and creator of this original outdoor DIY chalkboard tutorial HERE, and Rhythms of Play HERE!


What fun! Does it hold up well to being outside in the weather all the time?
We’ve been using the same boards for a few years now – just repainted – but they can delaminate if subjected to extreme conditions, or after several years of use.
I also run a in-home child care, I’m very excited to try this Chalkboard, I will let you know how it turns out. Thank you for your wonderful ideas and Clear cut directions.
Hi Nancy!
It makes me so happy to know that you are, and maybe even already have, made this DIY outdoor chalkboard. I would LOVE to hear how it turns out! Thank you for the words of encouragement and praise. It brings a lot of light into my world right now. 🙂
With gratitude,
Nell