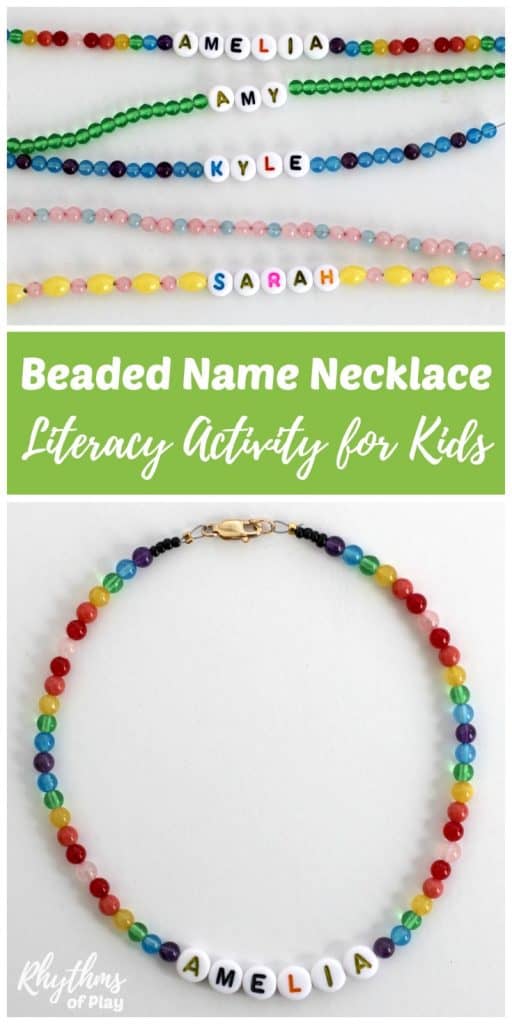
Here’s a step-by-step how-to DIY jewelry-making tutorial that teaches how to make a personalized name necklace or bracelet with a name, word, or phrase; that is also a fantastic literacy activity for kids.
Making a DIY hand-beaded personalized name necklace is a fun beginning jewelry-making project for kids and adults that also makes a great literacy activity for preschoolers and kindergarteners. (Find out how at the bottom of this post.) You can also use this tutorial to write an inspirational word or short phrase on a personalized necklace instead of a name.
Older children and teens who know how to read will have fun making personalized jewelry for their BFF, teammates, classmates, and other friends and family members with the easy step-by-step name necklace DIY tutorial below. Once finished, make a mom necklace or bracelet, and you will have a complete mother-daughter jewelry set. Or, make a matching necklace or bracelet for your BFF, classmates, teammates, lover, or any other friends and family members with the how-to instructions below.
Personalized Name Necklace DIY Jewelry Making Supplies
Before beginning this project, please read through the jewelry-making supply list and the step-by-step name necklace instructions below so you know the steps involved and what to expect. It will also make it easier to make a more informed choice about the hand-beaded craft materials you will use. (If you click to purchase any of the jewelry-making supplies on the list below, Rhythms of Play will earn a small commission at no additional cost.)
- Monofilament bead cord OR Flexible beading wire OR Stretch cord
- Crimp pliers AND Crimp beads OR Bent nose jewelry pliers AND Mixed metal clamshell knot covers
- Barrel clasps OR lobster clasps and jump rings OR toggle Clasps, ETC.
- Wire nippers OR scissors
- Beadboard (optional)
- Scroll down to look at several types of bead options to create a personalized name necklace and other hand-beaded wearable art.
Bead Options for Personalized Name Necklaces
We used the 8mm round gemstone beads listed in the next section to make our personalized name necklaces because we had them in our craft supplies, and they looked great with the alphabet beads we used. But 8mm round or faceted glass or wooden beads would work just as easily and look equally lovely. Scroll down to see several great options.
Gemstone Bead Options
You can use many more options besides the 8mm round gemstones on the list below. And most of these Amazon affiliate links have multiple gemstone options. Click through to see them all.
- Mixed Natural Gemstone Beads
- Multi-Colored Jade
- Rose Quartz Beads
- Natural Amethyst
- Natural Flourite
- Mixed Color Agate Beads
- Natural Multi-Color Amazonite
Larger Bead Options for Little Hands
Depending on age and experience, 10mm or larger gemstone, glass, wood, or pony beads may be better for children (toddlers, preschoolers, and kindergarteners) who have never strung beads. In this case, several of the gemstone bead options above also have 10mm and 12mm options. Or, try these multi-colored 10mm lava-rock gemstone beads.
For more bead options for little hands, look through the wooden and pony beads listed below to make homemade name necklaces. You can always make another one with gemstones once they have made a few necklaces and bracelets with these larger beads.
Wooden Bead Options
- Multi-colored wooden beads (8mm, 10mm, 12mm, and 14mm set with beading cord)
- Unfinished wooden beads (unfinished wooden beads can be painted or dyed to make them the color you want, click the link to learn how.)
Pony Bead Options
Stringing pony beads onto pipe cleaners is another fun way to practice strengthening the hand for more detailed work. So have your child make a few pipe cleaner name bracelets with pony beads before trying a necklace.
Alphabet Bead Options
There are several different kinds of alphabet beads you can use to make a DIY name necklace. So we have placed them in a few different categories below to make it easy to find the type of alphabet beads you’d like to use to make a personalized name necklace the way you want it to look for your friends and family.
Round Plastic Alphabet Bead Options:
- Multicolor on white (These are the alphabet beads we used)
- Black on white
- White on black
- Black on silver
- Translucent rainbow colored
- Black on gold
Square Plastic Alphabet Bead Options:
- Black on white
- White on black
- Multicolored on white
- White on multicolored
- Black on multicolored
- Multicolored on black
- Colorful
- Black on silver
Ceramic, Wood, and Sterling Silver Alphabet Bead Options:
- Wooden – black on white (These are 10mm beads and are a tad bigger than most. Perfect for little hands.)
- Ceramic – multicolor on white
- Sterling silver
How to make a personalized Name Necklace
There are three easy ways to make a hand-beaded personalized name necklace. All three DIY jewelry-making methods or techniques are described in detail in how to start and finish a necklace. So, click the link to learn how to make a necklace using infinity, crimp beads, pliers, or clamshell knot covers.
The materials listed above are also listed within each of the beginning jewelry-making tutorials. And a link back to this post is provided at the bottom of the article to make it easy to return here to learn how to turn your hand-beaded art into a personalized name necklace.
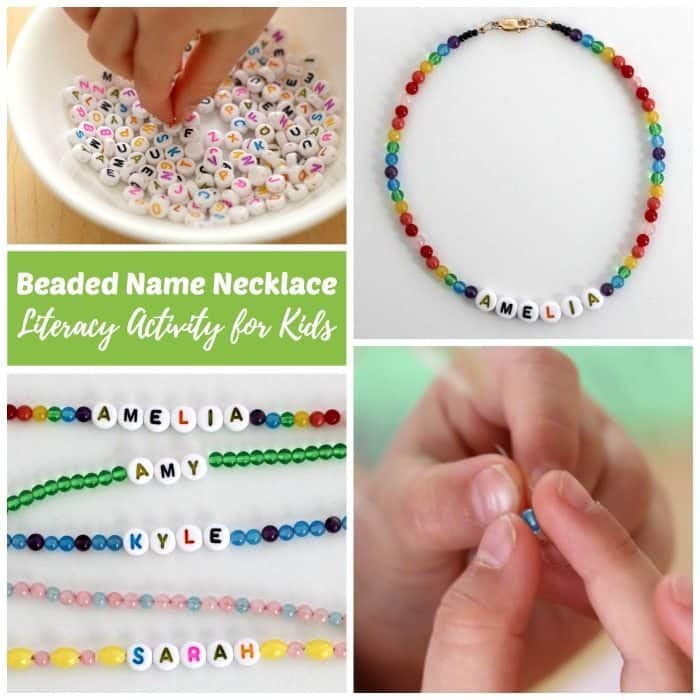
Young children will need help starting and finishing their name recognition necklace. When your child finishes their name necklace, make a necklace for mom so you have a mother-daughter necklace set!
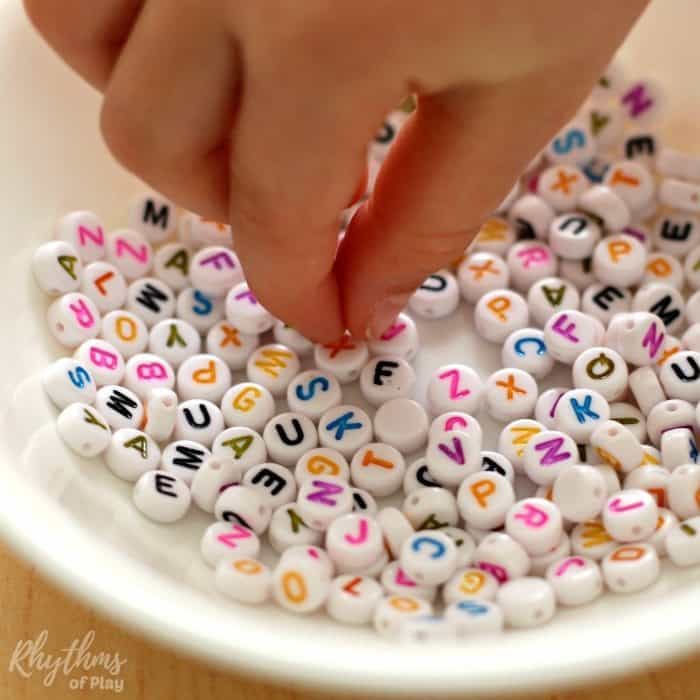
1. Find the letters you need for each name necklace you want to make.
- Place your favorite alphabet beads into a bowl or another container and look for the letters to make each name necklace.
- If you use this as a pre-literacy activity for kids, allow preschoolers and kindergarteners to search for the letters in their names and spell them out. If they need help with this, write their name(s) in capital letters on a separate sheet of paper and have them find all the letters on it.
2. Determine the bead pattern and the length of the name necklace before starting.
- Decide how long you would like the name necklace to be.
- Necklaces are typically 14, 16, 18, 20, 22, 24, and 26 inches long, depending on the person’s size and preference or style. In other words, make a smaller necklace for a child and a longer necklace for an adult. We have discovered that name necklaces look best when they are 14, 16, or 18 inches long. But if you are making a necklace for a toddler or preschooler with a small neck, 12 inches is a good length.
- If you use more than one type of bead (or color), you must decide on the pattern you will string unless you prefer to sting them randomly.
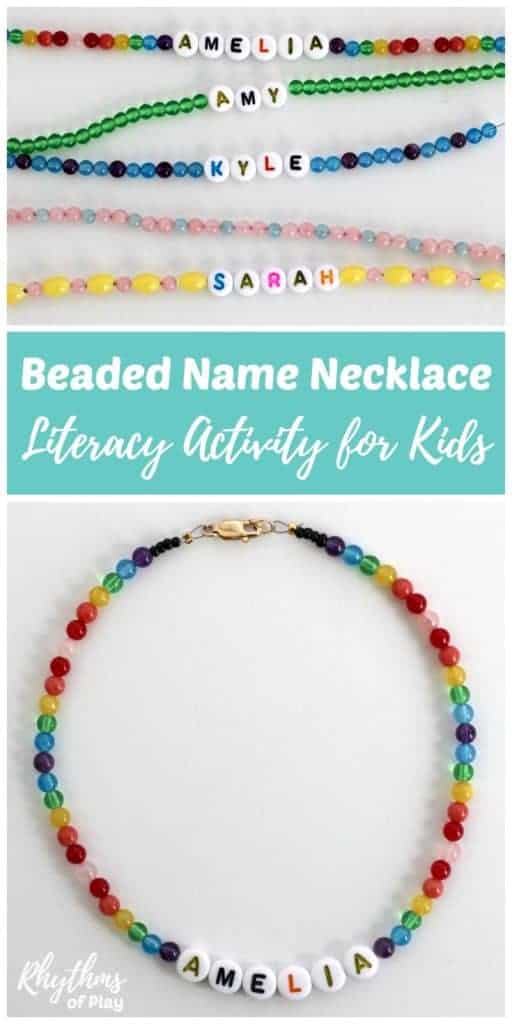
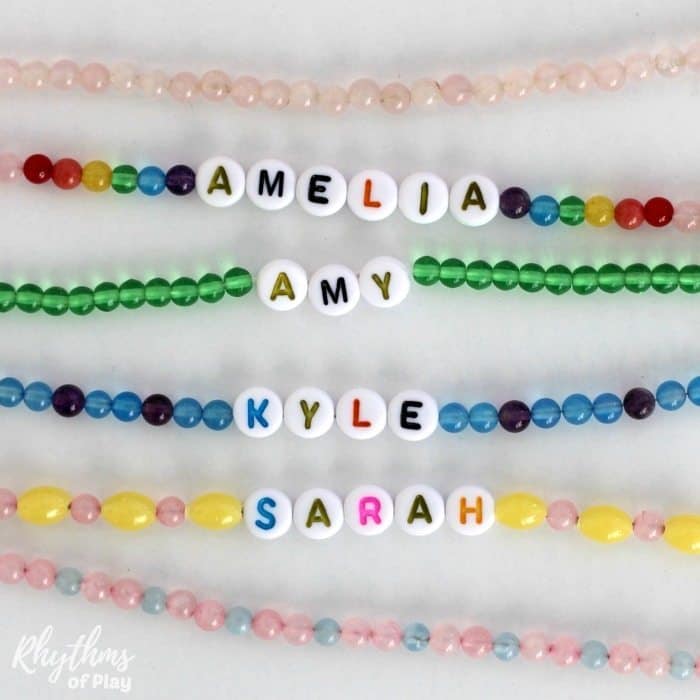
- Look at the photographs sprinkled throughout this beading tutorial to see a few ideas and ways to create a pattern with beads.
- Placing beads in patterns on a beadboard makes creating a specific hand-beaded pattern, such as a rainbow pattern, much easier.
3. Start the name necklace.
- There are three ways to start a hand-beaded necklace. So click the link to choose your favorite method or technique.
- If you assist children, help them start their name recognition necklace using any of THESE methods.
- If you are using pony beads, using the “infinity” method is the easiest.
4. Start stringing beads onto the name necklace.
- Begin stringing beads onto the necklace in the pattern determined in Step 2.
- Stop stringing beads when you are about halfway finished with the necklace.
- Use a beadboard to make this step easier.
- For example, If you make a 14-inch necklace, string their name onto it when it is about six and a half to seven inches long. Once again, using a beadboard makes this step easier.
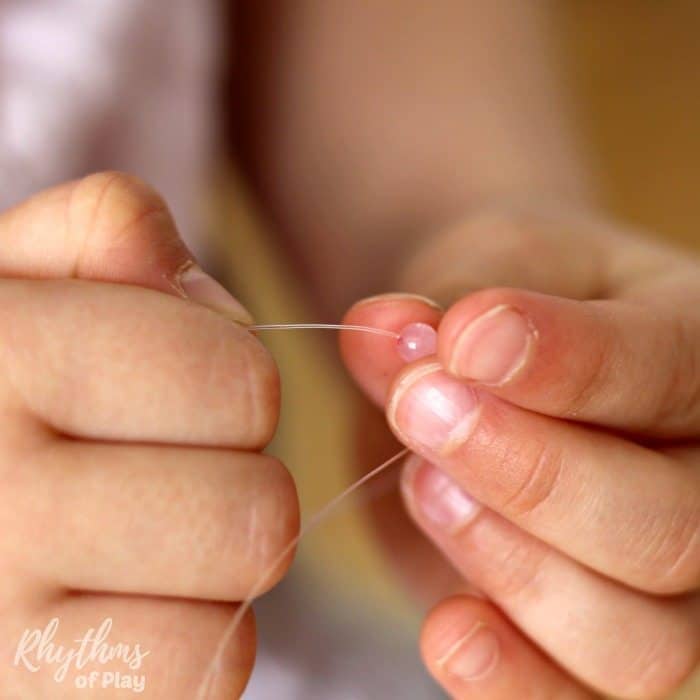
5. String alphabet beads onto the necklace to write the name.
- Use the alphabet beads you selected in step one to spell your name when you are about halfway finished with the necklace.
- When working with children, most kids will need help making sure the letters of their names are strung so they can be read correctly. This is another great early literacy activity. Ask children questions like the ones below and guide them as needed:
- “What letter is this?
- “Which way does it go?”
- “Where does it go in your name?”
- “Does any letter come before it?”
- “Does any letter come after it?
- “What comes next?’
6. string the Remaining beads onto the name necklace.
- Ensure your child strings the same pattern or number of beads you placed on the other side of their name, and you’re good to go.
- Using a beadboard or counting the number of beads on each side of the name, word, or phrase are easy ways to do this.
6. Finish the personalized necklace with a name, word, or phrase.
- Complete the necklace using the same method you started with. As a reminder, each of the DIY tutorials can be found HERE.
- Allow this activity to act as a springboard to learning to recognize the letters in their name. For example, my daughter spots print everywhere, calling out the letters in her name. “E” is in my name, “H” is in my name, and on and on it goes.
DIY Name Necklace Literacy Activity for Kids: Purpose and Benefits
Have your preschoolers and kindergarteners learn to recognize and spell their names while making beautiful jewelry they can wear! Learning to recognize, spell, and write their name is one of the first things children learning to read and write can do to start learning the alphabet.
This name activity will also help children strengthen the fine motor muscles of the hand in preparation for writing. And that makes it an excellent pre-literacy activity for preschoolers and kindergarteners. Another great literacy activity for kids is making an Alphabet Bead Necklace.
My daughter had so much fun with this activity. She also made a mom necklace for me and decided to make some personalized name necklaces for a few of her friends too. You can see the necklaces she made in the photographs sprinkled throughout this DIY jewelry-making tutorial.
The bonus of this name recognition and literacy activity is that your child will have a necklace they can wear to continue to learn their name. Because it’s easy to misunderstand a young child telling you their name, wearing a personalized name necklace makes it easier for everyone! So my daughter loves to wear her DIY name necklace as an easy way to correct the adults around her when they mishear her name by showing them her necklace.
How is Making a Name Necklace a Literacy Activity for Kids?
One of the first steps to literacy is name-learning. A child learns their name in three steps or stages; recognition, spelling, and writing. Making this necklace will help your child learn to recognize the letters in their name and learn to spell it.
Stringing beads is also a great way for kids to practice fine motor skills and develop the fine motor muscles in the hand. Fine motor activities like this are great for preparing little hands to write. Creating patterns, reciting the alphabet as they work, and counting out beads will create even more learning opportunities. You might also enjoy this Book-Inspired Alphabet Craft.
Personalized Name Necklace DIY Tutorial for Kids and Adults
Personalized name necklaces are a great gift for mom, grandma, your BFF, and other friends and family. You can also try this mom necklace gift idea or make a mother-daughter necklace gift set!
Making a DIY hand-beaded name necklace is also fun literacy activity for kids. Have your child learn to recognize and spell their name while making beautiful jewelry they can wear!
You may also like learning how to make an alphabet necklace, acorn marble necklaces, and wooden bead bracelets with our easy-to-follow step-by-step beginning jewelry-making tutorials.
And be sure to visit our Kids Activities page for even more fun ideas! Learn more about Rhythms of Play HERE!


this is so cool for the children and useful too!
Thank you! I agree 🙂 making them helped my daughter learn how to spell her name.