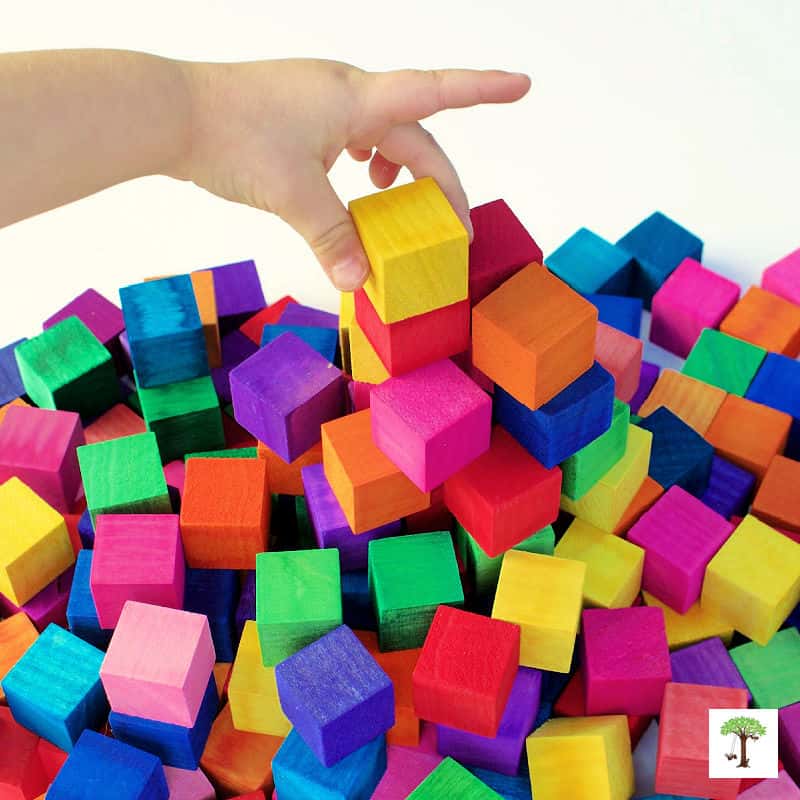
This step-by-step DIY tutorial shows how to color unfinished wooden blocks and other wood toys and pieces in a wide variety of shapes and sizes, such as eggs or peg dolls, in a rainbow of colors!
Coloring wooden building blocks and other handcrafted wooden toys is an easy way to transform unfinished raw wood into vibrant colors that add personality and visual charm to simple children’s toys, such as DIY blocks, and home decor displays. As a new mother, I can remember oogling the beautiful array of Grimm’s blocks and wondering how to create my own to reduce the expense of these colorful, natural wooden toys. Learning how to safely and effectively color unfinished wood not only made creating these rainbow wooden blocks possible but also unlocked countless other woodcrafting possibilities.
The simple techniques described in detail below not only make it possible to color wooden blocks to create rainbow-colored blocks, alphabet blocks, and other DIY blocks. It also allows you to color wooden beads, eggs, peg dolls, wooden canvases, rounds, wood slices, planks, and various unfinished wooden pieces, as well as kids’ toys, in a wide variety of shapes and sizes.
First published November 19, 2015, this DIY wood coloring tutorial is regularly updated to enhance the content based on what I have learned about coloring wood over the years. Initially, it included a simple tutorial for coloring wooden blocks in a vibrant array of beautiful colors, as shown in the photograph below. Today, it offers several more options, making it easy to color any unfinished wood safely and effectively. Scroll down to learn how to color wood using several different craft material options and wood coloring methods to choose from.

DIY Rainbow Colored Wooden Blocks and More!
In this tutorial, we’ll explore several kid-safe wood coloring options. Best of all, no special tools or advanced woodworking skills are needed to color unfinished blocks with these simple raw-wood coloring techniques. All you need is a little know-how and a few everyday materials used creatively.
The photographs for this tutorial show how to color wooden blocks, but raw wooden pieces of various sizes and shapes can be dyed or painted just as easily using the same easy wood coloring techniques. You might also enjoy these creative DIY building blocks for kids.
Color Wooden Blocks, Easter Eggs, Peg Dolls, and Other Unfinished Wood Pieces with these easy Wood Coloring Techniques:
The simple techniques outlined below will help you achieve bright, colorful, natural-looking finishes on wooden blocks and other unfinished wooden toys, such as eggs, peg dolls, and more! Use the step-by-step DIY raw wood coloring instructions in this comprehensive DIY woodcrafting tutorial to make DIY toys for your own children, give thoughtful homemade gifts, create handmade wooden pieces to sell, or add a splash of color to educational materials.
For example, you can use the step-by-step unfinished wood coloring instructions below to make an assortment of rainbow colored wooden blocks, as shown in the pictures. Alternatively, you can use the methods described here to make educational number or alphabet blocks for preschoolers, kindergartners, and young elementary school-aged children. Or use the step-by-step tutorials provided here to dye, paint, or color wooden eggs, peg dolls, and other raw, unfinished wood pieces into a vibrant array of DIY children’s toys and wooden home decor projects.
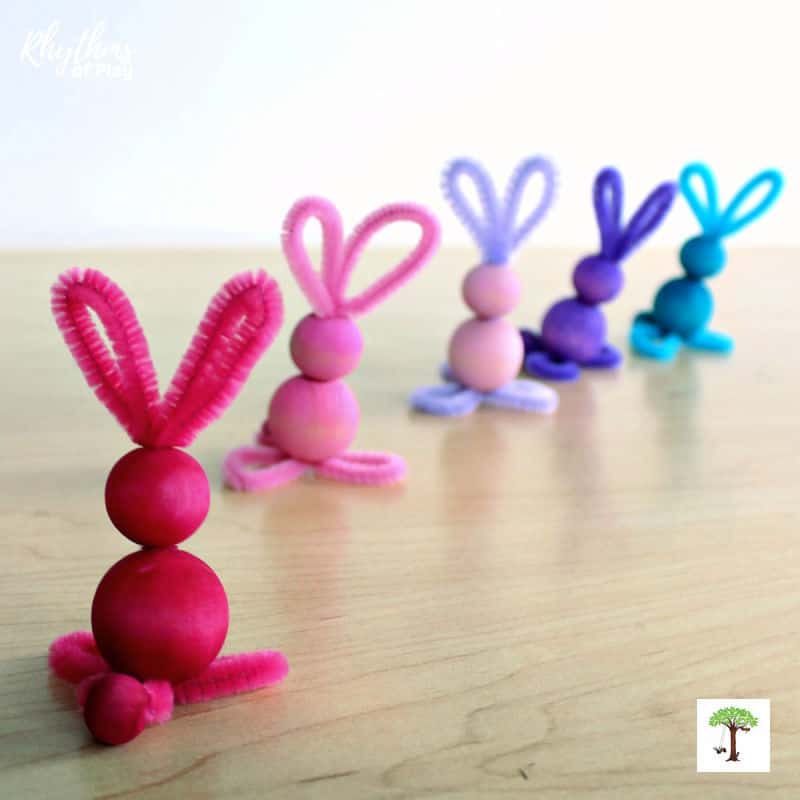
Making colored building blocks, wooden toys, and home decor with these methods makes it easy to create DIY toys and gifts for Christmas and birthdays that will provide years of educational play-based learning and enjoyment. For example, you may also enjoy making DIY Rainbow Peg Dolls (as shown in the photograph below) using one of the many wood-painting techniques described in the post or this step-by-step tutorial.

The wood painting methods and techniques described in this informative guide to coloring wood will enable you to create a wide variety of kids’ toys and seasonal home decor projects that you can enjoy for years to come. Scroll down to learn how to color wood using a variety of materials and painting techniques!
Make Wooden Blocks, Toys, and Other Unfinished Wood Pieces in a Variety of Colors!
Making your own rainbow colored wooden blocks, puzzles, toys, and coloring wood for other simple woodworking projects is fun and easy. While making the Waldorf Square shown in the photo below, I decided to make several more colored wooden blocks for my daughter to play with. The simple square Tetris-inspired puzzle I created for the Fireflies and Mudpies blog, and this 3D Tetris cube puzzle.
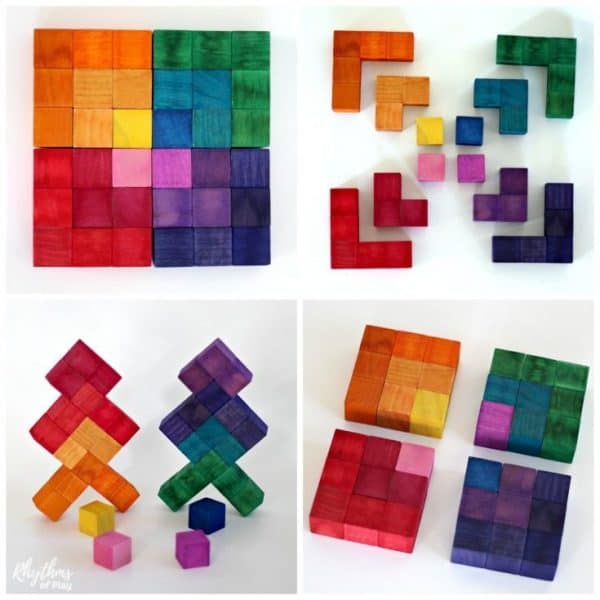
She loves to play with these simple rainbow-colored blocks, along with the other DIY wooden puzzles and toys I have made her over the past 10 years. The combination of colored blocks in various shapes and sizes allows her to stack and balance them to strengthen fine motor skills and improve hand-eye coordination, as well as create a wide variety of buildings and other creative designs. Today, at 13 years old, my daughter still uses many of these colored wooden pieces as puzzles and fidget toys that look beautiful displayed on her homeschool desk.
Whether used for open-ended building, sorting games, or decorative home decor displays. The ideas, methods, and painting techniques described in this informative DIY tutorial for coloring wooden blocks, toys, and other decorations offer artists and woodworking enthusiasts a wide range of color and design options.
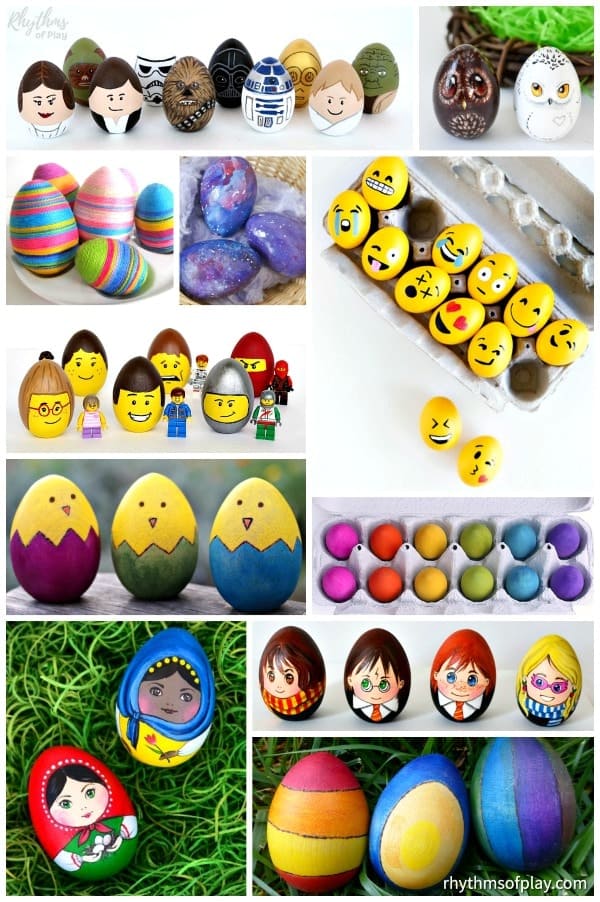
Scroll down to learn how to color wood to make rainbow-colored building blocks, alphabet blocks, colored Easter eggs, and many other types of wooden toys and seasonal decorations with these quick and easy raw wood coloring techniques. You might also enjoy learning how to color wooden beads (as shown in the photo of bead bunny crafts below) using similar methods and painting techniques described in this tutorial, with tips specific to round beads with bead holes. For more DIY building block ideas, look at this extensive collection of DIY blocks for kids.
How to Color Wooden Blocks and Other Toys:
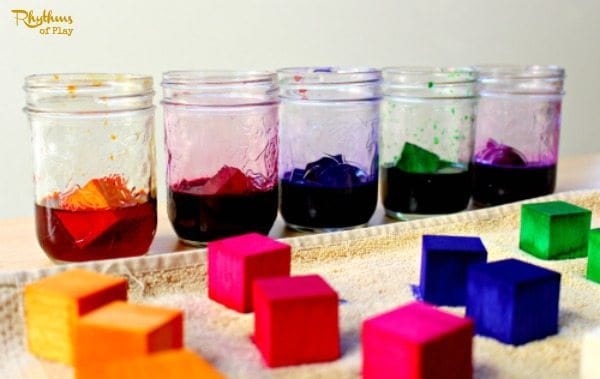
There are several ways to color wooden blocks and other wooden toys. The simplest and fastest way is to drop them into a container, such as a mason jar or canning jar, filled with liquid watercolor paint or food coloring mixed with water and vinegar as described in the first two wood coloring methods for this DIY tutorial.
Coloring building blocks and other wooden toys with liquid watercolor paints or food coloring is a simple way to give natural wood play materials a vibrant, translucent color. These methods are popular for making Waldorf and Montessori toys because they allow the wood to be colored with a subtle yet bright translucent tint that lets the grain show through.
Use more liquid watercolor paint (mixed with water or concentrated for a more vibrant color) in a larger container to dye larger blocks and toys, or paint them. Wooden blocks can also be painted with watercolors, acrylic paints, and paint pens, but these wood-painting techniques can take longer than the quick method described in detail below. With that said, simple DIY instructions for painting unfinished wooden blocks and toys with watercolors, acrylic paint, or paint pens are also provided in this informative guide to coloring wood.
Regardless of the type of paint used, many crafters work in an assembly-line style. To do so, they allow each layer to dry before adding more, and finish with one color before moving on to the next. For example, paint all the reds first, then oranges, yellows, greens, blues, and purples, before moving on to the next color.
Rainbow Colored Wooden Blocks DIY Materials and Supplies:
Please read through the safety tips for making children’s toys and step-by-step instructions for the wood coloring method or technique in the sections that follow to make a more informed choice before gathering supplies to color wood from the recommendations below:
DIY materials needed for each wood coloring method:
- Unfinished wooden blocks, eggs, or toys:
- For this tutorial, I used 1-inch Wood Blocks.
- Alternatively, you can color larger 1.5-inch, 2-inch, 3-inch, or 4-inch wooden blocks, rectangular, triangular, or circular wooden shapes, beads, wooden Easter eggs, and other raw, unfinished wooden pieces, including various types of toys and wooden animals and figurines, such as peg dolls, wood-carved blocks, and more.
- Most wooden pieces made of pine, maple, beech, birch, or poplar wood absorb dye well and can be easily colored.
- Small bowls, bags, or jars for mixing (optional):
- Depending on the wood coloring method you choose, you may need containers large enough to dip, submerge, roll, or flip the wood pieces in the paint.
- Use Mason jars, canning jars, plastic ziplock bags, or other water-tight containers that are large enough to fit the unfinished wooden blocks and other wooden pieces into to color them, or dip a paintbrush into.
- Recycled yogurt, sour cream, or cottage cheese containers also work well for this purpose.
- Fine-grit sandpaper.
- Paintbrushes (optional).
- Tongs (optional).
- Gloves (optional — protects hands from dye and paint stains).
- Old towel, parchment paper, drop cloth, paper towels for drying wood, and keeping the work surface clean.
- Microfiber dusting cloth and rags for wiping wood and cleaning up spills.
- Sealant (optional but recommended): Apply a non-toxic, toy-safe, clear-drying water-based polyurethane wood finish, Mod Podge with a foam brush, spray varnish, or non-toxic, food-safe wood polish with a polishing cloth.
- For durability, food safety, and child mouthing safety, seal with one of the following options:
- Food-safe Beeswax polish
- Wood finish or polish with a mix of beeswax + food-grade oil
- Plant-based wood finish, such as Tung oil or fractionated coconut oil
- Learn how to make your own DIY beeswax polish with the homemade wood finish recipe and instructions posted below the wood coloring methods in the next section.
- For durability, food safety, and child mouthing safety, seal with one of the following options:
If using liquid watercolors to color unfinished wood:
- Liquid watercolor paint:
- There are several brands to choose from, each with different color options, bottle counts, bottle sizes, and price ranges.
- Mix and blend colors for more variety if desired:
- Mix blue with yellow to make green, or yellow and red to make orange, or blue and green to create teal or aqua, etc.
- Or blend colors with a paintbrush before the paint dries to create ombre or gradient washes on wooden blocks and other DIY projects.
- Use at full strength for a rich, concentrated color, or dilute with water to create softer, more translucent shades.
- Choose one of the following recommended options or purchase at your favorite local hobby store:
- Colorations Liquid Watercolors.
- Color Splash Liquid Watercolor Paints.
- Sax Liquid Watercolor Paints.
- Watercolor spray bottles.
- Use water to dilute if desired, or use concentrated at full strength for vibrant color saturation.
- Alternatively, mix watercolors from a tube with water in a container to create a concentrated watercolor solution for dying wooden blocks and other wood pieces or parts.
- Experiment with using wax resist sticks to create designs on wood (optional):
- Rub wax onto the wood to repel liquid watercolor paint or food coloring dye from staining the wood beneath the wax design.
When using food coloring to dye wood:
- Food coloring gel or liquid.
- Water.
- Vinegar (optional — helps the color absorb).
If using acrylic paint to color wood:
- Consider priming the wood before painting with acrylics with a water-based primer or gesso for bright, opaque coverage (optional).
- This is especially useful for soft woods such as pine.
- Choose at least one of the following acrylic paint options:
- Acrylic paints.
- Acrylic paint pens to create various designs, stripes, dots, letters, numbers, etc. (optional).
- Spray paint (not eco-friendly, but quick)
- Masking or painters’ tape to cover wood and create design effects such as color blocking, stripes, etc. (optional).
- Cotton swabs or dotting tools (optional).
- Stencils (optional)
- Rubber stamps (optional)
- Mix with water (optional):
- Thin acrylic paint with water for a translucent wash similar to watercolors on wood.
- Start with a ratio of one to one:
- 1 part acrylic paint to 1 part water (1:1) and adjust as needed.
- Use sparingly and seal to protect.
Safety Tips for Making Children’s Building Blocks and Other Wooden Toys:
- Use non-toxic, water-based paints and finishes labeled “non-toxic,” “Ap Certified,” or “toy safe.”
- For baby toys and items that infants might mouth, use finishes labeled “food-safe” or specifically “safe for baby toys.” Use natural beeswax finishes or food-grade oils, and apply a wax only if the product explicitly states it is suitable for food and toys.
- For example, Mod Podge is a non-toxic, water-based sealant that can be used to seal wood and is safe for children to handle. However, it is not food safe, so it should not be used on toys that might go in a baby’s mouth.
- Please use a food-safe finish, such as the natural homemade wood sealant option posted below the instructions for each wood coloring technique, if infants and babies will handle the DIY blocks and toys.
- Avoid solvent-based finishes or paints when making DIY wooden children’s toys.
- Work in a well-ventilated area and wear gloves to protect your hands.
- Use and store paints and finishes as directed by the manufacturer, and don’t mix incompatible products.
- Keep colored wooden blocks and toys out of children’s reach until they are finished and have had plenty of time (usually several days) to cure.
Step-by-step DIY Instructions to Color Wooden Blocks and Other Unfinished Wood Pieces
Use the step-by-step directions below to color wooden blocks, eggs, peg dolls, toys, and other unfinished wood pieces. Start by preparing the wood with the instructions that follow. Then use the step-by-step instructions outlined for your preferred method, based on the materials or supplies you’d like to color, to complete the wood coloring or dying process.
Prepare Wood and Work Surface:
- Lightly sand the wood (optional but recommended):
- Sand the surfaces and edges of the blocks and other wooden pieces with a fine-grit sandpaper (220 grit) to prepare the wood and help the color absorb more evenly.
- Wipe away remaining dust:
- After sanding, use a dry or slightly damp cloth to remove sanding dust from the wood.
- Microfiber, furniture-polishing, and wood-dusting cloths work well for this purpose.
- Protect your work area:
- Liquid watercolors, food dyes, and acrylic paint can stain your work surface.
- Cover your table or work area with parchment paper, cardboard, a drop cloth, a tarp, or an old towel to protect it from damage.
Method 1: Coloring Unfinished Wood with Liquid Watercolors:
Coloring or dying wood with liquid watercolors produces bright, vibrant, translucent colors while keeping the wood grain visible. Please read the instructions before beginning this DIY woodcrafting project so you know the steps involved and can choose between wood coloring options before gathering supplies.

1. Mix and dilute colors or use full strength:
- Use liquid watercolors straight from the bottle or water color paint tubes for rich, concentrated color, or dilute with water for softer shades:
- Standard ratio of watercolor to water: 1 part watercolor to one part water (1:1)
- Adjust as needed.
- Test colors on wood before using (optional but recommended).
2. Apply color to Wood using one of the following techniques:
- For controlled coverage, use a paintbrush to apply the watercolor in long, smooth strokes, following the grain to avoid streaks.
- Use it straight from the tube for the richest and deepest color.
- Avoid drips and messes by not using too much paint at a time.
- Use a liquid watercolor spray bottle to apply color directly to wood.
- Mix watercolor in a spray bottle, or use watercolor spray.
- Use a bottle with a nozzle to spray liquid watercolor paint directly onto the wood.
- This wood coloring technique can be done without a paintbrush or container, but it offers less control than a paintbrush.
- Use a rag to mop up any drips.
- Dip or drop the wood directly into the liquid watercolor mixture for quick, even saturation, as shown in the photograph below.
- Drop a block in each color and swirl it around, or use a gloved finger, tongs, or a spoon to flip the piece over, until the wood is saturated with color.
- Alternatively, dip it to color a portion of the wood piece, such as wooden peg dolls up to their neck, or dip half of a wooden egg or block into the watercolor paint to dye it.
- To dye the wooden blocks in the photographs, I put watercolors in canning jars, but other bowls, plastic bags, and water-safe containers, the appropriate size and shape for the wood you are coloring, also work well.
- Glass is non-porous and safe for re-use, even for food, once washed after using with non-toxic watercolor paints.
- Recycled baby food jars, jelly jars, yogurt, cottage cheese, and sour cream containers also work great for this purpose, and can be discarded after use or washed and reused for watercolor paints for art and DIY projects.

3. Allow the color to soak in:
- Let the watercolor soak into the wood for 10-60 seconds per block before removing them from undiluted liquid watercolors.
- Unfinished wood can be removed from the liquid watercolors once it is completely colored.
- You can soak them longer for deeper colors, but I found this unnecessary.
- Soaking for too long can raise the grain or swell the wood, which will likely require sanding and repainting to smooth the grain.
- The wooden pieces saturated with watercolor paint would also require a longer drying time to cure completely.
4. Remove wood from watercolors and wipe off the excess:
- Use tongs, a gloved hand, or a spoon to remove blocks from the color and place them on parchment paper, a drop cloth, or an old towel to dry.
- If using more than one color at a time, as I did, please ensure you have another rag or towel to wipe the color off the tongs, spoon, or your gloved hand before dipping them into the next color to avoid color contamination.
- If creating gradients and ombre effects, use a sponge or paintbrush to mix and blend colors while they are still wet.
5. Repeat steps above until all blocks or wooden pieces are colored:
- Continue with the steps above until all wooden blocks, Easter eggs, peg dolls, or other wood pieces are colored or dyed.
- When finished, cover the watercolor mixture with a lid or plastic wrap.
- After coloring the wood, the liquid watercolors will contain wood dust and small wooden pieces, but can be used later, if needed, to add a bit more color to the dyed wooden pieces with a paintbrush.
- Used watercolors can be stored for several months when covered and placed in a cool, dry place, such as the refrigerator. Please discard the paint if it grows mold or becomes otherwise contaminated.
6. Allow the wood to dry completely:
- Let the wooden blocks and other wooden toys air dry for several hours.
- Overnight is best.
- If the blocks were soaked, they may need a few days to dry completely.
- Flip the blocks, eggs, peg dolls, and other colored wooden pieces over as they dry to ensure even drying.
- Wood may feel rough after coloring; this is normal.
7. Lightly sand colored wood again (optional):
- If the wood has any rough spots once it is dry, gently sand with sandpaper (220-400 grit) and wipe clean with a microfiber cloth.
- Use a spray bottle or a paintbrush to lightly apply the same watercolor paint color to any area that needs it after sanding.
8. Consider adding letters, numbers, Symbols, and other designs to colored wood (optional):
- Paint blocks solid colors or gradients, as described above, or try the following optional painting methods listed here, or in the “Masking, Patterns, and Painting Ideas” and “Creative Ideas and Finishes” below:
- Use paint pens or acrylic paint with stencils to add letters, numbers, and other symbols and designs to wood before sealing.
- This wood-painting technique makes it easy to create unique-looking DIY number or alphabet blocks and dice with translucent color beneath opaque letters, numbers, or dots.
- Add acrylic paint stripes, dots, logos, names, dates, locations, and simple drawings with paint pens, dotting tools, or a paintbrush, with or without stencils.
9. Seal and protect the wood (optional but recommended):
- It’s best to seal wooden blocks, Easter eggs, peg dolls, and other wooden toys to protect them from moisture, prevent staining, warping, and cracking, and ensure they are hygienic.
- Sealing the wood can also deepen its color and make it feel smooth to the touch.
- Sealing colored wood with Mod Podge or a sealant and a foam brush, a spray varnish (not eco-friendly), or beeswax polish with a cloth creates a protective barrier that keeps out water and bacteria, helping the wood last longer and making it easier to clean.
- For durability, food safety, and child mouthing safety, seal with one of the following options:
- Food-safe beeswax polish
- Wood finish or polish with a mix of beeswax + oil
- Plant-based wood finish, such as Tung oil or fractionated coconut oil
- Learn how to make homemade beeswax polish with the DIY recipe posted below each of these wood coloring method options.

Method 2: Coloring Wood with Food Coloring:
Food coloring is an inexpensive, non-toxic technique for coloring wood that creates soft to medium-bright transparent colors.
1. Mix food coloring dye using the following recipe:
- 1/2 cup of warm water
- 5-15 drops of food coloring gel or liquid
- Use less water or more food coloring for slightly deeper colors
- 1 tsp vinegar (optional–helps color absorb but can raise wood grain).
2. Test the color on wood:
- Use a scrap piece of unfinished wood to check the shade.
- Adjust color as needed.
3. Apply the food coloring dye solution to the wood:
- Brush it on with a paintbrush or a foam brush.
- Dip the wood into the food coloring dye.
- Roll small pieces in a shallow dish or drop into containers such as jelly or canning jars, or recycled containers filled with the food coloring mixture.
- Food coloring tends to go on lighter than liquid watercolors. Therefore, it is best to allow the wood to absorb the color before removing the food coloring.
4. Remove wood from food coloring and wipe away excess moisture:
- Use tongs, a gloved hand, or a spoon to remove wooden blocks and other wooden pieces from the food coloring dye.
- Wipe away any excess moisture with a cloth or a rag.
- Place on a parchment paper, a drop cloth, paper towels, or an old towel to dry.
5. Let the wood dry completely:
- Allow the wood to dry for several hours; overnight is best.
- Ensure there is no moisture remaining in the wood before proceeding to the next step.
6. Seal and protect the wood:
- Wood blocks should be sealed to protect them from moisture and prevent warping, cracking, and staining.
- Sealing the wood creates a protective barrier that prevents water and bacteria from entering.
- Applying a wood sealer or varnish such as Mod Podge with a foam brush, a spray varnish (not eco-friendly), or beeswax polish with a cloth can also help the wood last longer and make it easier to clean.
- For durability, food safety, and child mouthing safety, seal with one of the following options:
- Beeswax polish
- Wood finish or polish with a mix of beeswax + food-safe oil
- Plant-based wood finish, such as Tung oil or fractionated coconut oil
- Learn how to make homemade beeswax polish with the DIY recipe posted below.
Method 3: Coloring Wood with Acrylic Paint:
Using acrylic paint to color wood is best for creating bright, opaque colors; soft, opaque pastel colors; and for stenciling numbers, letters, dots, strips, and other designs on wooden blocks and other wooden projects.
1. Decide whether to prime the wood before painting with acrylics:
- Use a thin coat of water-based primer such as gesso for bright, opaque paint coverage.
- This is especially useful for soft woods such as pine.
- Priming creates a smooth, even surface for painting and helps prevent acrylic paint from flaking, peeling, or chipping.
- Don’t prime for stains and dyes — primed blocks stain poorly.
2. Apply thin coats of paint to the wood:
- For best results, apply thin coats of paint with a paintbrush — don’t overload the brush.
- Use a sponge to create texture if desired.
- Try dry brushing if you’d like to allow the wood grain to show through.
- Experiment with stenciling or rubber stamps to add letters, numbers, shapes, symbols, and other designs to wood blocks and other woodworking projects.
- Let each coat of paint dry for 15-30 minutes, ensuring that it is dry to the touch before adding another coat.
- Two thin coats of acrylic paint will look better than one thick coat.
3. Sand lightly between coats for a smooth finish (optional):
- For best results, sand with fine-grit sandpaper (220) between coats.
- Sanding between coats will give the colored wood an ultra-smooth finish and a professional look.
4. Experiment with different painting techniques (optional):
- Paint blocks solid colors, or try the following optional painting methods listed here, or in the “Masking, Patterns, and Painting Ideas” and “Creative Ideas and Finishes” below:
- Paint the sides of the blocks 2-6 complementary or contrasting colors.
- Create stripes with painter’s tape or paint pens.
- Experiment with taping off sections of the wood to create various designs and patterns with different colors and paint types.
- Use paint pens or dotting tools to create dots on unfinished, dyed, colored, or painted wood.
- Add letters, numbers, symbols, names, dates, locations, teams, logos, and more to unfinished or colored wood with paint pens or a paintbrush and acrylic paint.
- Either freehand designs or use a stencil.
- For example, paint letters on 1-inch, 2-inch, or 3-inch wooden cubes to make DIY alphabet or number blocks.
5. Seal and protect wood:
- Apply a non-toxic, clear-drying water-based polyurethane or Mod Podge with a foam brush, or use spray varnish, to seal and protect wood colored with acrylic paint.
- Use a gloss finish for more shine, or a satin or matte finish for less.
- Beeswax and other natural, food-grade oils can also be used to seal and protect wood painted with acrylics, but may require a longer drying or curing time and will likely need reapplication.
Wood Coloring Tips for Best Results:
- Choose absorbent unfinished woods: Pine, maple, beech, birch, and poplar all absorb dyes well and make excellent choices for coloring.
- Test colors first: Testing colors on a scrap or hidden area before committing to it is recommended.
- Avoid over-saturating the wood: Too much liquid can raise the wood grain, requiring resanding. Apply color evenly and wipe promptly for best results.
- Allow wood to thoroughly dry before sealing: The color can lift and smear when the sealant is applied before the wood is completely dry.
- For bold colors: Either let the wood sit in undiluted liquid color for a bit longer, or use acrylic paint to create bright, opaque colors.
- For pastel colors: Dilute liquid watercolors or food coloring heavily with water, or do a quick dip instead of a short soak. Alternatively, add white acrylic paint to acrylic paint colors to create softer colors. Adding more white will further soften the color. Add water to the acrylic paint mixture for translucent pastel colors, or leave it full-strength for concentrated opaque pastel colors.
- Colors can intensify when sealed: The final shade can deepen a bit and become a richer color once a sealant, beeswax, or oil is applied. The color variation will depend on the coloring method used and the type of sealant that is applied. Test on colored wood to see how each color will change, if at all.
Masking, Patterns, and Painting Special Effects on Wood:
Try the creative ways to color and decorate wood below:
1. Sharp stripes and color blocking patterns:
- Use painters’ tape to cover and protect the wood from the paint color for creating bold stripes and other color-blocking patterns.
- Press the edge down firmly to reduce the possibility of paint bleeding under the tape.
- Paint the exposed wood.
- Remove tape before the paint is completely dry, when it is slightly tacky for crisp edges.
2. Gradients and ombre paint:
- Use a sponge or paintbrush to blend colors on the surface of the wood while the paint is still wet, creating gradients and ombre effects on wooden projects, if desired.
3. Dots and eyes:
- Use the back of a wooden paintbrush, a cotton swab, or specialized dot-painting tools to make dots on painted or unpainted wood.
- Dotting tools make it easy to create consistent dots for DIY wooden dice and number blocks.
4. Stencils:
- Tape a stencil to the wood with painters’ tape to hold the pattern down firmly.
- Use a stencil brush or a sponge with a pounding motion to prevent bleeding under the stencil.
5. Markers, inks, and paint pens:
- Fine-tipped paint markers are great for numbers, letters, doll faces, and other fine-line designs.
- Use permanent markers (Sharpies) for porous surfaces or paint pens for opaque lines.
- Either option allows artists to create a wide variety of custom effects on wood.
6. Wax resist techniques:
- Wax-resist sticks can be used to resist dyes, such as liquid watercolor paint or food coloring, to create interesting patterns on wood if desired.
Other Creative Ideas and Finishes for DIY Wooden Building Blocks and Home Decor Projects:
1. Rainbow building block set:
- Paint each block a different color to make a beautiful set of rainbow building blocks like those shown in the photographs.
2. Number and Alphabet blocks:
- Label the sides of wooden blocks with numbers, letters, or colors for learning play.
- Use rubber stamps or stencils with acrylic paint and a stencil paint brush, or freehand designs with paint pens, to add numbers and letters to the faces of painted, dyed, or uncolored wooden blocks to make learning blocks for educational purposes.
3. Mixed media effects:
- Color, dye, or stain the wood first for a subtle base tone, then paint specific faces or details.
- First, stain the wooden faces of blocks and other home decor projects with watercolor paint or food coloring.
- Then use acrylic paint to create letters, numbers, symbols, icons, names, dates, locations, and other mixed media designs.
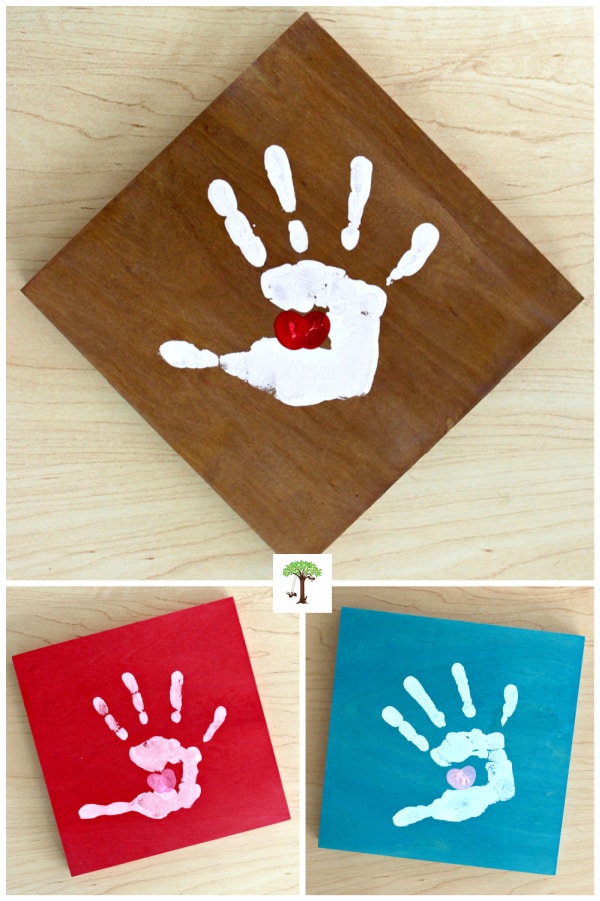
- Here’s an example of a mixed-media design you can create using this wood coloring technique: Handprint Keepsake Craft. (The video included in this woodcraft tutorial shows how easy it is to paint and color wood with liquid watercolor paints for multiple types of woodworking projects.)
4. Painting and staining combinations:
- First, color, dye, stain, or paint the block or wood piece.
- Then sand the wood lightly to distress and reveal as much of the wood grain beneath the color, paint, dye, or stain, on the face and edges as desired.
5. Natural look and feel:
- Rub a natural wood finish, such as the DIY beeswax polish above, into colored and uncolored wooden blocks and other wooden toys to give them a smooth and natural feel.
6. Chalkboard blocks:
- Paint one or more faces of each block with chalkboard paint so kids can draw and erase on the DIY blocks.
- Use a primer or gesso to prime the wood before painting with chalkboard paint if choosing this DIY building block option.
- Alternatively, make a DIY chalkboard!
Optional Wood Finish: Homemade Beeswax Polish DIY Recipe and Instructions:
When finishing and sealing wooden toys that might be mouthed by infants or chewed on by toddlers and other young children, avoid traditional natural wood polishes that contain linseed oil or mineral oil. These wood finishes are “toy safe” and therefore safe for older children who no longer mouth objects, but they are not food-safe for babies.
If infants and babies will be exposed to the wooden toys, opt for food-grade wood options that won’t go rancid, such as my favorite go-to, fractionated coconut oil. Use the following recipe and step-by-step wood polish instructions to make a safe and natural finish for children’s wooden toys and other wood pieces:
DIY Beeswax Polish Recipe Ingredients:
- 1 part Beexwax pellets
- 3-4 parts carrier oil (fractionated coconut oil)
Step-by-Step Instructions for Homemade Beeswax Polish:
- Melt beeswax pellets and fractionated coconut oil together in a double boiler.
- Pour mixture into a heat-safe (tempered) glass canning jar and let cool.
- Use a soft polishing cloth to rub onto wood and buff to a subtle shine.
- Buff after polishing and reapply if desired.
- This natural beeswax finish is water-repellent but not waterproof and will require reapplication, especially if exposed to high levels of moisture.
- Clean the wood surface and reapply a fresh coat every 6 months to 1 year for best results.
- Natural wax finishes, like this one, can attract dust to the wood they treat over time.
- If dust collects or if liquid no longer beads on the surface of the wood, it is a good indicator that it is time to reapply.
Coloring Unfinished Wood for DIY Blocks, Toys, Decor, and Other Raw Wooden Projects:
As you can see, making your own rainbow-colored blocks, alphabet blocks, wooden toys for kids, seasonal DIY decorations, and more becomes simple when you apply the tips and techniques described above. Once you understand how to color unfinished wood, add creative designs, and apply finishes correctly, customizing wooden blocks, toys, and other wooden DIY projects becomes simple for makers of all skill levels.
The wood coloring techniques covered in this tutorial give you the flexibility to create wooden blocks, toys, and wooden projects that are as beautiful as they are safe, durable, and long-lasting. Whether you prefer bright, bold colors or soft, natural tones, the final results will always be uniquely yours.
For example, you can make other toys and puzzles with the rainbow-colored DIY blocks shown in the photographs. Use them to make a DIY Waldorf Square and this Tetris-inspired Puzzle Cube! Visit the DIY tutorials to learn how! Asia Citro, over at Fun at Home with Kids, has also made some “Grimm Style Blocks” like those in the photographs, which you can see HERE.
Learn more about Nell Regan Kartychok, author and photographer of these wood coloring and painting techniques for DIY blocks, Easter eggs, toys, and home decor projects HERE, and Rhythms of Play HERE!
You may also like:
- DIY Rainbow Peg Dolls
- How to Color Wooden Beads
- All-Season Hand and Fingerprint Tree
- Beautiful Gifts Kids Can Make
- DIY Waldorf Square
- Tetris Cube Puzzle
- How to Color Wooden Easter Eggs


These are beautiful! I’m going to have to give these a try!
I’m excited to make these! Curious – did you do anything to seal the paint color onto the blocks? As these are watercolor paints I’m wondering if the paint would come off of the blocks if the kids have wet fingers or if they are left outside in the rain, etc…?
Hi Jillian! Good questions!
No, we did not seal the blocks and yes, the watercolor paint might wash out a bit if they got wet. You can seal them with a white PVC glue like Mod Podge or use a beeswax polish, but we never really found the need. The Grimm rainbow blocks are left raw to keep the sensory nature of the wood intact for young fingers with developing sensory systems. The long answer is, you don’t need to protect them but if you want to make sure that they are sealed use Mod Podge or a Beeswax polish.
Can’t wait to make these! I have everything but the liquid watercolors! Great post.
Thanks for the vote of approval Melissa!
They are super easy to make and turn out so beautifully!! I wrote this “How to” post so long ago it is in need of an update, and I hope to get to it soon. You can also use food coloring instead of liquid watercolors. It’s easy enough to mix them to make new colors, too. I hope that you enjoy making these rainbow-colored building blocks for your children!
Hi there,
I see that you don’t seal them, and that it works out okay for you.
I’m making something for a younger kid who is still very much in the oral stage of play. I worry about the ink coming off on/in their mouth.
Any thoughts/have you had any experience with this?
Hi Lacy, great question. This post needs an update to share what I have learned since we first made DIY rainbow building blocks. If you are concerned about young ones mouthing wooden blocks, use food coloring to dye them! Give it a try; it works great!