

This step-by-step tutorial teaches how to make a fairy garden out of a tree stump by building an adobe-like container near or around it with river or garden stones.
An old tree stump doesn’t have to be an eyesore. With a little imagination, it can become the doorway to another world. A tree stump turned into a cute fairy garden feature invites children to slow down, wonder, explore, notice tiny details, imagine, create nature-inspired stories, and learn through play. They provide the same benefits for adults willing to take a closer look.
This step-by-step DIY garden tutorial shows you how to make a fairy garden in a tree stump. Transform a tree stump into a beautiful fairy garden using natural materials, miniature plants, and a few of your favorite accessories using the instructions below. The finished garden becomes more than a decoration. It becomes a place where stories grow alongside flowers, and time is erased by moments of wonder. You might also enjoy this comprehensive fairy garden tutorial.
Related: DIY Outdoor Art Table and Mud Kitchen
Why Make a Tree Stump Fairy Garden?
A tree stump fairy garden gives new life to something many people would remove. Instead of grinding away an old stump. Or drilling holes in it and filling them with a high-nitrogen fertilizer like potassium nitrate to feed decay-causing microbes that help the tree trunk rot. You can turn it into a beautiful feature in your yard or garden that encourages creativity, exploration, and outdoor play.
This DIY fairy garden in a tree stump offers a magical play space for children and adults to develop their imagination. You don’t need to believe in fairies, woodland creatures, or gnomes. Miniature gardens like this one offer endless opportunities for creative play, outdoor learning, and quiet, calm moments for anyone who is fortunate enough to gaze upon one. Your imagination is all you need to make a fairy garden come alive.
Children and those young at heart love returning to their fairy garden day after day to check on growing plants, rearrange tiny scenes, chat with their fairy, gnome, or animal friends, and imagine new adventures. Adults often discover the process is just as relaxing and rewarding. I sure do!
Small gardens are also wonderful outdoor play areas for children to learn about plant care and develop their sensory system. You might also enjoy our other Fairy Garden DIY Step-by-Step Tutorial to learn how to plant and grow a fairy garden in various containers.
A Tree Stump Fairy Garden can:
- Recycle an old tree stump naturally.
- Create a peaceful backyard, playground, or park destination.
- Encourage imaginative play.
- Inspire storytelling.
- Help children learn to care for living plants.
- Attract butterflies, pollinators, and other beneficial insects.
- Become a part of a nature study area.
- Provide sensory experiences through texture, scent, and color.
- Become a year-round family, homeschool, or school project.
A Fairy Garden Lost Grows Again, Bringing Renewal and Hope
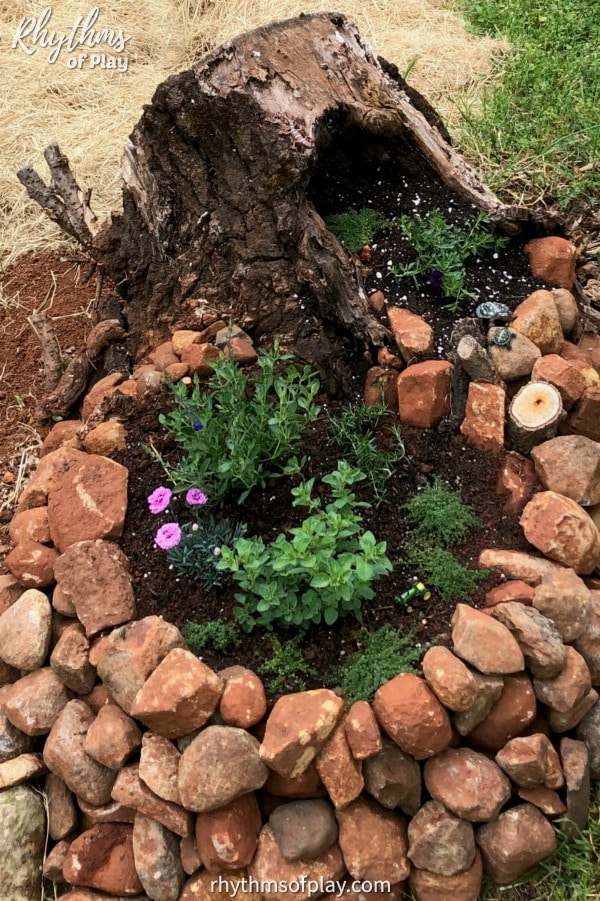
This particular tree-stump fairy garden has a beautiful beginning and a sad ending filled with hope. My brother, Kyle Miller, created the fairy garden in the photographs for this tutorial from an old stump and some garden rocks he dug up on his and our mother, Carol Miller, shared family property where they had separate houses.
It took me a long time to write about and create the tutorial for this DIY fairy garden because of the tragedy that overtook it just a few short months after it was made in the summer of 2018. On November 8, 2018, a wildfire known officially as the “#CampFire” burned the entire town of Paradise, CA, down, and it took this miniature tree stump garden with it.
You may have heard about this wildfire in the news when it was happening, as it was the most devastating wildfire that California had ever seen at the time. You might have even seen one of the documentaries or movies made about it since:
“The Lost Bus” (2025), starring Matthew McConaughey, the Netflix documentary “Fire In Paradise (2019), and the National Geographic documentary “Rebuilding Paradise” (2020) each share different visions of this tragic fire and its aftermath. You can see a picture of our family property after the fire on the Rhythms of Play Instagram Page HERE.
Nature is Resilient, and So Are the People of Butte County
The good news is that, like the town of Paradise and Butte County, where it resides, the fairy garden tree stump is regenerating. Even though it was completely abandoned, it is growing again, sending its message of hope, magic, and renewal.
Although the campfire destroyed this fairy garden along with nearly everything my family owned around it, including my baby pictures and all of our family heirlooms, nature had other plans. When one cycle ends, another begins, and the rhythm of life continues at infinatum.
Slowly, new plants emerged from the soil. Wildflowers made their return. Life found its way back to the tree stump fairy garden. Each visit reminds us that gardens, forests, and people all share something remarkable. Resilience and the ability to begin again. That lesson may be the greatest magic that any fairy garden can offer. #ButteCountyStrong
A Fairy Garden Even Boys Can Enjoy!
Whoever said fairy gardens were only for girls? My brother made this one, and my daughter decorated it with miniatures that even little boys will want to play with!
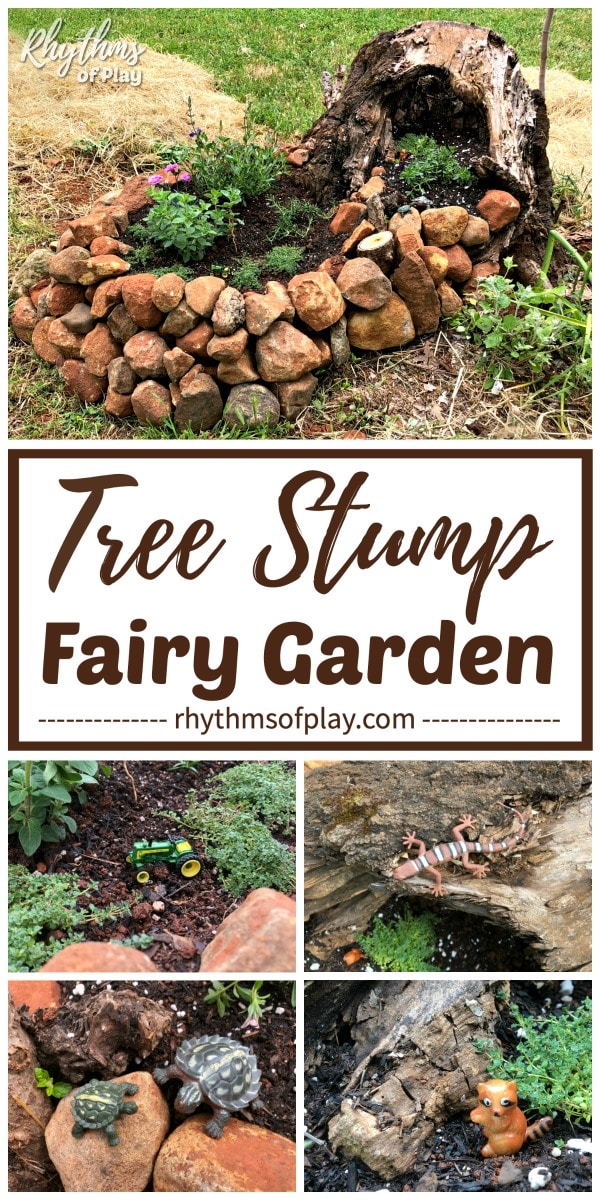
I took these photos, the only photos we have left, after my daughter completed adding fairy garden accessories to it. Instead of fairies, she chose to add a few simple animal toys and a small toy tractor to the fairy tree stump that my brother made. Look what a wonderful sensory play space they created together!
How to Make a Fairy Garden in a Tree Stump with a Stone Container:
Make a DIY fairy garden out of an old tree stump! There are as many ways to make a fairy garden tree stump as there are different shapes of tree stumps. This nature-scaped fairy garden how-to offers a fun way to make a fairy garden in or next to a tree stump with natural items you find in your yard or garden. This tutorial shows you how to make a DIY fairy garden featuring a stone-stack planter next to a tree stump.
Unfortunately, we no longer have any pictures of my brother making this tree stump garden because they were destroyed in the wildfire that also destroyed this fairy garden. So, the only pictures we have left of this tree-stump fairy garden are those I took with my cell phone a few days after my brother made it. The missing details are included in the step-by-step instructions that make it pretty easy to recreate, depending on the tree stump you are using. Each stump will require slight modifications.
Related: How to Make a Fairy Garden
DIY Fairy Garden Tree Stump Supplies:
- Tree Stump or an area near or under a tree
- Organic potting soil and/or compost
- Peat moss

- Small fairy garden plants and flowers from your local nursery. (See below)
- Gardening Trowel
- Fairy garden accessories or small children’s toys such as: fairies, gnomes, wizards, fairy houses, and other fairy garden furniture, accessories, and miniatures.
- Stones, pebbles, glass gems, sea glass, wood slices, sand, moss, etc.

Best Plants for a Tree Stump Fairy Garden:
Choose slow-growing plants that stay small and enjoy similar growing conditions. Selecting native plants is recommended for outdoor use. Native plants will always fare better, but exceptions can often be made depending on the climate and environment in which you live. Some favorites include:
- Irish moss
- Creeping thyme
- Sedum
- Baby tears
- Hens and chicks
- Miniature ferns
- Dwarf mondo grass
- Ajuaga
- Miniature hostas
- Small succulents for sunny locations
If your stump sits in deep shade, choose shade-loving woodland plants. Sunny locations work well with succulents and drought-tolerant groundcover. Please ask someone knowledgeable at your local nursery if you need more assistance.
Natural Materials to consider Adding to Your Fairy Garden DIY:
Some of the most magical fairy gardens use mostly natural materials. The tree stump fairy garden my brother made is among them. Consider adding natural elements such as:
- Stones, rocks, pebbles (you can even paint rocks)
- Wood slices
- Pinecones
- Acorn caps (try acorn marble ornament accents)
- Moss
- Shells
- Feathers
- Seed pods
- Bark
- Small branches, sticks and twigs
- Driftwood (you can also make a garden wind chime)
- Dried flowers
Spending time in nature gathering materials is as much fun as building the garden itself. Once you have a few supplies, use them to create natural features, decor, and fairy garden accessories. Creating simple crafts for fairy gardens is a fantastic way to extend the magic, fun, and learning for years to come!
Related: Fairy House Painted Rocks
Tree Stump DIY Fairy Garden Step-by-Step Tutorial
This step-by-step DIY fairy garden tutorial teaches how to make a miniature garden in or near a tree stump.
1. Envision how you’d like the Fairy Garden to look:
Every tree stump is different; therefore, every fairy garden tree stump will be made differently. So spend some time looking at the tree stump and imagining how you would like your fairy garden to look in it.
In other words, think of the old stump as a cloud in the sky. What fairy garden do you see made around, on top of, or within it? First, visualize how you would like your fairy garden tree stump to look. Then, collect your supplies and create your DIY fairy garden around the tree to match the picture in your mind’s eye.
Related: How to Grow a Sunflower House
2. Gather DIY fairy garden supplies:
Once you have decided on the type of garden you want to create next to the tree stump, collect fairy garden supplies to make your miniature tree-stump garden. Visit the materials list above and your local nursery to review and gather the supplies you need.
I recommend starting with just a few plants and accessories. In my experience, less is more, and quality is more important than quantity. The supply section above, along with my DIY tutorial “How to Make a Fairy Garden,” provides more garden materials, container options, and “how-to” suggestions.
3. Make, clear, or build a space to grow a fairy garden on, in, or next to the tree stump:
As rare fig farmers, my mother and brother dug several holes on our family property to plant a small fig orchard. As they did so, they dug up several rocks in the soil on the property. But they didn’t know what to do with all the rocks and stones they kept piling by the side of the house, until my brother came up with a brilliant idea. (Maybe some of the magic of my daughter’s fairy garden rubbed off on him.)
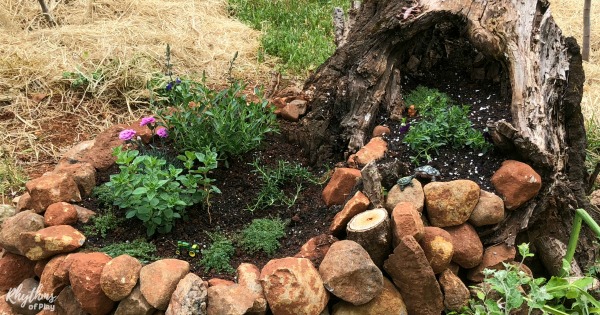
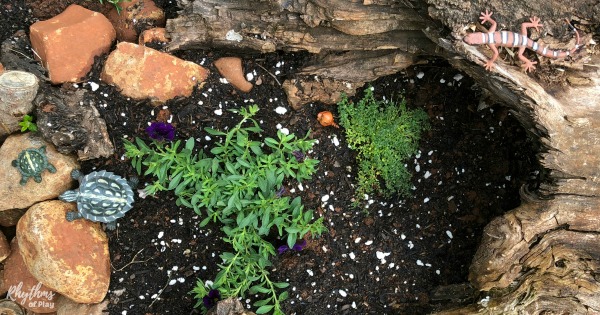
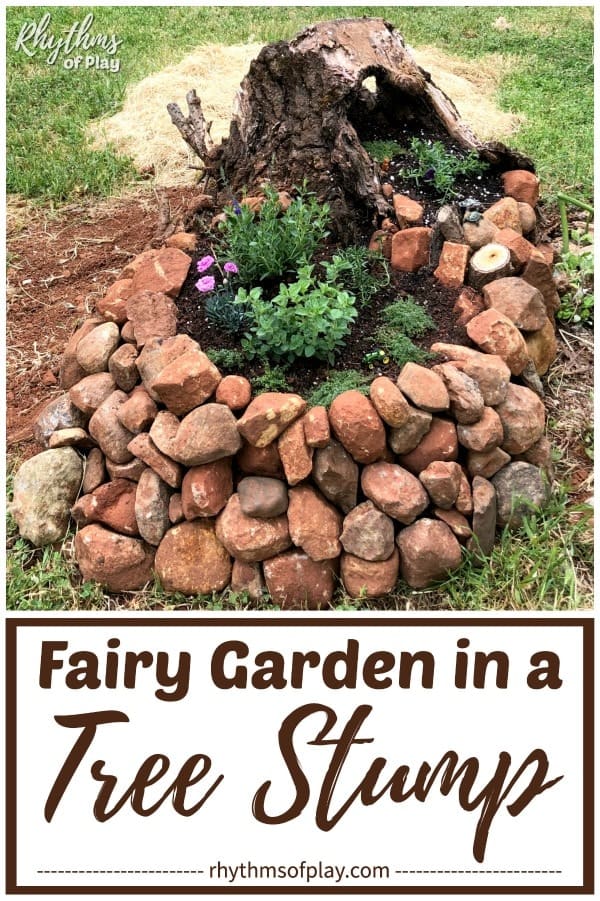
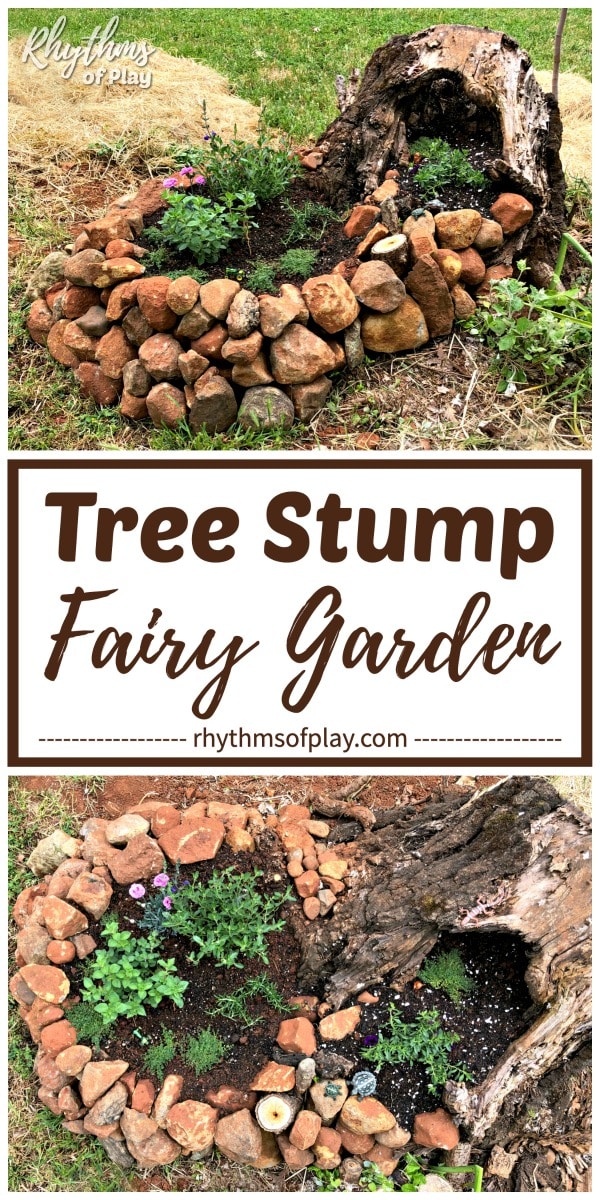
First, he built a stone container and turned the old rotting stump they couldn’t remove into a fairy garden. In other words, he used the rocks he dug up to build a natural adobe-like stone container to hold more soil beside the old tree stump, creating even more room for plants, fairies, and gnomes to find a home.
In doing so, he solved not one but two problems in my mother’s backyard: What do we do with all these rocks? And what do we do with that old stump in the yard? The answer was simple: make a fairy garden in a tree stump with a stone container. The next time my daughter and I came to visit, I was overwhelmingly impressed with his creation. As was my daughter, of course! You can see his beautiful natural stone container DIY in the photograph below. I told you it was brilliant!
How to Make an Optional Stone Container for the Fairy Garden:
Create a container with stacked stones to provide more growing space for plants near or in the tree stump fairy garden. Follow the guidelines and instructions below:
- Starting at the base, stack river rocks or garden stones in a circular formation, layer by layer, to make a container to hold more soil, as shown in the photograph below.
- Ensure the rocks are positioned and stacked as tightly together as possible.
- Make the planter wider at the base and smaller in circumference at the top by slightly spiraling the stones up as you work.
- Add soil and water a little bit at a time to the stone container as you complete each stone layer.
- The soil and water will slide between the balanced rocks and help solidify the stone structure, similar to how mud is used in an adobe house.
Related: Rock Balancing Stone Stacking Art
4. Mix soil into the tree stump garden:
The dirt in your yard is dead, while the soil is rich and alive. To help the fairy garden plants grow, I recommend creating a mixture of high-quality organic potting soil, peat moss, and compost (if you have any) for your fairy garden.
My brother added his homemade soil mix to the hole and crevices of the tree stump and to the stone-stacked container he created near it. Please visit this informative tutorial to learn more about Composting at Home.
5. Add plants to the tree stump fairy garden:
Plant a few small fairy garden plants in the organic soil you have added to the container or space you have created or cleared in or around the tree stump. Ensure you leave plenty of room to add fairy garden accessories and create different areas or scenes within it. For more information, please visit my DIY tutorial on creating a fairy garden. It includes much more information about creating fairy gardens for all ages to enjoy!
6. Add fairy garden accessories to complete the DIY garden:
My brother left the decision of the types of fairy figurines to put in his tree stump fairy garden up to his niece (my daughter). This was another one of his brilliant ideas regarding this cute DIY tree stump garden.
Instead of adding fairies, she decorated the tree stump fairy garden that my brother made with a few toy turtles, a lizard , some simple woodland animal toys, and a small toy tractor. It looked just as wonderful as fairies and gnomes! I told you he was brilliant for choosing her to decorate his DIY fairy garden. It was perfect.
7. Caring for and Maintaining Your Fairy Garden:
Like any miniature garden, a fairy garden needs occasional care. Because every fairy garden changes over time, there is no perfect way to maintain it. Follow the helpful guidelines below:
- Water when the soil becomes dry.
- Trim plants regularly as they grow; they can get out of control and quickly hide fairy garden elements within weeks.
- Remove weeds before they spread.
- Refresh mulch or moss.
- Add more soil if the soil level drops.
- Rearrange decorations seasonally, for holidays, or whenever inspiration strikes. (Look through the ideas in the seasonal updates below.)
- Replace seasonal plants as needed.
8. Update Your Fairy Garden Through the Seasons:
One of the best parts of a fairy garden is watching it change throughout the year. Updating the garden each season keeps children returning outdoors year-round. For example:
- In spring, plant tiny flowers and add nests or butterflies.
- In summer, include miniature picnic scenes and colorful blooms.
- During the fall or autumn, decorate with tiny pumpkins, acorns, and colorful leaves.
- In winter, create snowy paths, evergreen branches, pinecones, and miniature lanterns.
- Add holiday elements throughout the seasons, such as a Christmas tree (paint a small pinecone green, or leave it natural, then glue embellishments onto the scales, such as rhinestones or pom-poms) or hand-decorated wooden Easter eggs.
Fairy Gardens Invite Wonder
Fairy gardens remind us to notice the little things. In wonder, children naturally slow down to search for tiny leaves, smooth stones, and interesting bits of bark.
Like Alice in Wonderland, they begin imagining stories hidden beneath mushrooms or tucked behind miniature doors. Whether or not anyone believes fairies truly live there is beside the point.
The magic lies in paying attention.
Wonder grows whenever we look closely enough to notice the extraordinary in ordinary places. A weathered stump can become a miniature forest. Pebbles can become stepping stones, and a feather can become a fairy’s bed.
This way of seeing the world is one of childhood’s greatest gifts. Many adults delight in rediscovering wonder and magic alongside their children, because fairy gardens help keep this vision in sight. But that’s not all; fairy gardens have several other educational benefits.
Educational Benefits: What Children Learn Making and Caring for a Fairy Garden
Building a fairy garden naturally combines art, science, gardening, engineering, and storytelling. As children gather stones, dig soil, arrange and nurture plants, and create miniature landscapes and fairy garden scenes, they practice:
- Fine Motor skills
- Problem solving
- Creative thinking
- Planning and design
- Observation
- Patience
- Responsibility through plant care
- Language development through imaginative stories
Because the project continues long after the fairy garden is complete, children learn that living things change with the seasons and require ongoing care and maintenance.
Tree Stump DIY Garden:
Make a miniature fairy garden from an old tree stump in your yard or garden. Fairy gardens remind us that magic and the inspiration to wonder don’t have to be bought. These qualities can be cultivated from stones gathered on a walk, moss growing beneath a tree, and an old stump that has a story to tell, as this one does since it was overcome by a wildfire, but, as life often does, it found a way to regenerate itself.
Fairy gardens are fun for both children and adults to make. Whether your fairy garden becomes home to fairies, woodland animals, dinosaurs, tiny dragons, or imaginary friends, it offers something increasingly rare in modern times. A place to slow down, wonder, and imagine new worlds. They also make wonderful outdoor sensory play spaces for children.
Years from now, the plants may grow, the miniature paths can shift, and new stories will take root. But long after the tiny decorations disappear, the memories of building something beautiful together will often endure. Please visit “How to Make a DIY Fairy Garden for more information about these creative play spaces for kids and adults.
Please visit our About page to learn more about Rhythms of Play. For more information about this website and the author and photographer of this fairy garden tree stump DIY project, please visit the home page for Rhythms of Play or the author page, Nell Regan Kartychok.
More Ways to Learn in the Garden
More DIY Outdoor Play Areas for Kids
- How to Make an Outdoor Chalkboard
- DIY Outdoor Art Table and Mud Kitchen
- Best Backyard Sandboxes for Kids
- How to Grow a Sunflower House
- Best Sand and Water Tables








Leave a Comment