Learn how to make stretchy bead bracelets with wooden beads (and several other types of beads) with this easy step-by-step craft tutorial for kids and beginning jewelry makers of all ages.
Making a wooden bead bracelet is an easy craft and fun jewelry-making idea for beginners and first-time jewelry makers. Hand beading is a great fine motor activity that helps kids and adults of all ages develop or improve motor control. Best of all, no prior jewelry-making experience is necessary to make a simple wooden bead bracelet using the simple project instructions and method below. You might also enjoy learning how to start and finish a beaded necklace using three other easy jewelry-making techniques that make it easy for beginners to make hand-beaded wearable art.
The step-by-step tutorial below makes it easy for toddlers, preschoolers, kindergarteners, and elementary-aged kids to hand bead a bracelet for themselves, or someone they love. Moms, grandmas, nanas, teachers, and best friends always love to receive homemade gifts as gorgeous as these beaded bracelets are. And this makes hand-beaded DIY wooden bracelets great gift ideas for Mother’s Day, a birthday, or Christmas! You may also this list of beautiful gifts kids can make.
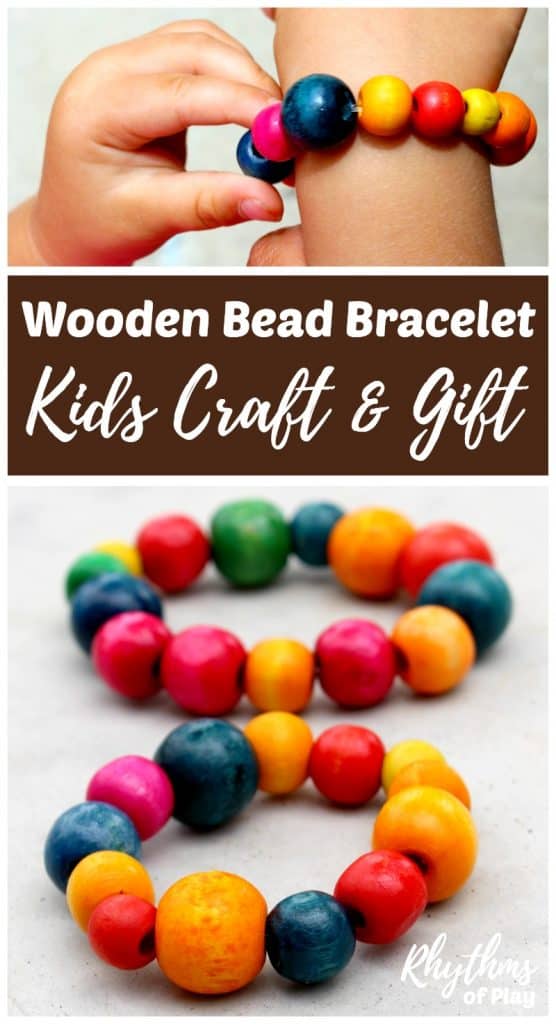
DIY Beaded Bracelets for Kids and Adults
Begin by showing kids how to make stretch bracelets with an elastic cord and wooden beads, pony beads, or letter beads with this easy beginner jewelry-making tutorial. Afterward, you can make beaded bracelets with other types of colorful beads. And as children continue to master the art of beading, many other types of beads will become available to them as a jewelry-making or crafting supply.
Because stretchy beaded bracelets can also be made with glass beads, gemstones, fabric-coved beads, and more with the same step-by-step instructions and DIY tutorial below. You might also enjoy creating beaded art with other DIY projects like these hand-beaded suncatcher crafts.
Is it Safe for Toddlers to Bead Bracelets?
Older children and adults with more advanced fine motor control will be able to make a wooden bead bracelet with minimal guidance from a teacher, parent, or caregiver. While toddlers, preschoolers, and kindergarteners are likely to need a little assistance when making beaded bracelets.
However, making beaded bracelets is generally a three-plus craft idea due to the size of the beads. Even large wooden beads and pony beads are too small for many young children, and can therefore present a choking hazard to toddlers and preschoolers. So please do not use small beads or offer this beaded craft activity to children that are still mouthing objects. Especially if the child is under the age of three.
What are the benefits of Stringing beads?
Bracelet making has several educational benefits for the developing child and the aging elderly adult. Not only is beading an excellent skill for fine motor development and hand-eye coordination. Making hand-beaded bracelets and other creations can also build memory skills, and help prepare children for reading and math.
And once kids learn how to make DIY bracelets and master the basics of beading, children can work on building patterns and different color combinations and making beaded necklaces and bracelets with more advanced jewelry-making methods and techniques. Which only adds to the many benefits of beading for kids. Especially if they decide to give away homemade gifts for friends and family, or sell their creations for money, as I did in my youth.

How to Make a Bead Bracelet with Wooden Beads, Pony Beads, Etc.
Gather the basic tools and DIY jewelry-making craft supplies for beaded elastic bracelets on the list in the next section. As mentioned above we like to use colorful wooden beads to make bead bracelets, but pony beads, gemstone beads, glass beads, and crystal beads work just as well.
When working with toddlers and preschoolers, it’s best to make sure you use beads that are large enough, and lightweight, to help children learn how to string beads. Smaller and heavier beads are more difficult for children to thread. You might also enjoy learning how to make a hand-beaded sea glass DIY wind chime.
Easy Bead Bracelet Craft Supplies:
Amazon associate affiliate links are provided below, if you click to purchase, Rhythms of Play will earn a small commission at no cost to you.
- Unfinished wooden beads, colored wooden beads, pony beads, glass beads, fabric-covered beads, and gemstone beads, or learn how to color wooden beads for DIY jewelry, home decor, and other craft projects.
- Bracelet bead board (optional)
- Elastic cord or stretch magic for jewelry making (Alternatively, you can use a pipe cleaner to string bracelets, but the beaded bracelet will not be stretchy, and it will need to be undone or untwisted in order to take the bracelet on or off.)
- Scissors
- Pipe cleaner–optional for younger children to help them string the beads onto the elastic cord used to make beaded stretch bracelets.
- Craft glue or jewelry bond for wood, plastic, etc. (optional–the jewelry bonding glue is for adults only–please keep it away from young children until the glue is dry.)
- Crimp knot covers, or crimp beads (optional)

How Long is a bracelet supposed to be?
The size or length of a bracelet depends on three primary factors; 1) the size of the person or wearer’s wrist, 2) the size of the beads, and (3) the style of the beaded bracelet.
Generally speaking, a bead bracelet fits best when it is at least an inch or two (five to 10 centimeters) longer than the circumference of the wearer.
With that said, some people like them significantly tighter or loser depending on the style of the bead bracelet, the type or size of beads on it, and preference. But bigger beads with a larger circumference will always need to be made into longer bracelets than bracelets made with smaller beads simply because of their size.
Start by measuring the wrist of the person you are making the bracelet for with a soft tape measure. Or measure the beaded bracelet by wrapping it around the wrist of the recipient as you work to better see how it fits. This can be done as you bead the bracelet, or before you start stringing it.
How long is a bracelet normally?
A bracelet can be anywhere from four to nine inches long but generally fall between the six to the seven-and-a-half-inch range. And sometimes they can even fall outside of those ranges.
An option that makes it easy to make beaded bracelets the perfect length is by using a bracelet bead board.
How many beads do you need to make a bead bracelet?
The length of cord and number of beads you will need to make a bead bracelet will depend on the same three factors mentioned above. The beaded bracelet’s length and style, and size of the beads. Bracelets made with bigger beads will need less, while a bracelet made with smaller beads will need a lot more.
Step-by-step Bead Bracelet Instructions for Kids and Adults
This easy jewelry tutorial for beginners shares the simplest way to make a beaded bracelet. Use the step-by-step instructions below to learn how to make stretchy bead bracelets with wooden beads, pony beads, gemstone beads, glass beads, etc.
1. Gather materials to make bead bracelets
- Choose the right supplies for the type of DIY bead bracelet you’d like to make from the craft supply list above, and put them on a table, desk, or another work surface.
- A thicker elastic cord such as stretch magic is stronger and holds up better than a thinner elastic cord.
- Or use a pipe cleaner instead of a stretchy elastic cord to bead bracelets, but they will not be stretchy, and the pipe cleaner will need to be untwisted or undone to take the bracelet on or off.
2. Lay out beads to create a pattern (optional)
- It’s always best to know what you’re doing before you start a beaded craft project. So first consider the beaded pattern you would like to create:
- Either thread the different colors of wooden beads on the elastic cord in random order without creating a pattern. And move on to step three in this beaded bracelet jewelry-making tutorial.
- Or, take a moment to think about the colors and pattern to string for the bracelet, or use a bead board to create a beading pattern by laying the beads down in the order or pattern you would like to use before moving on to the next step.
- Examples include:
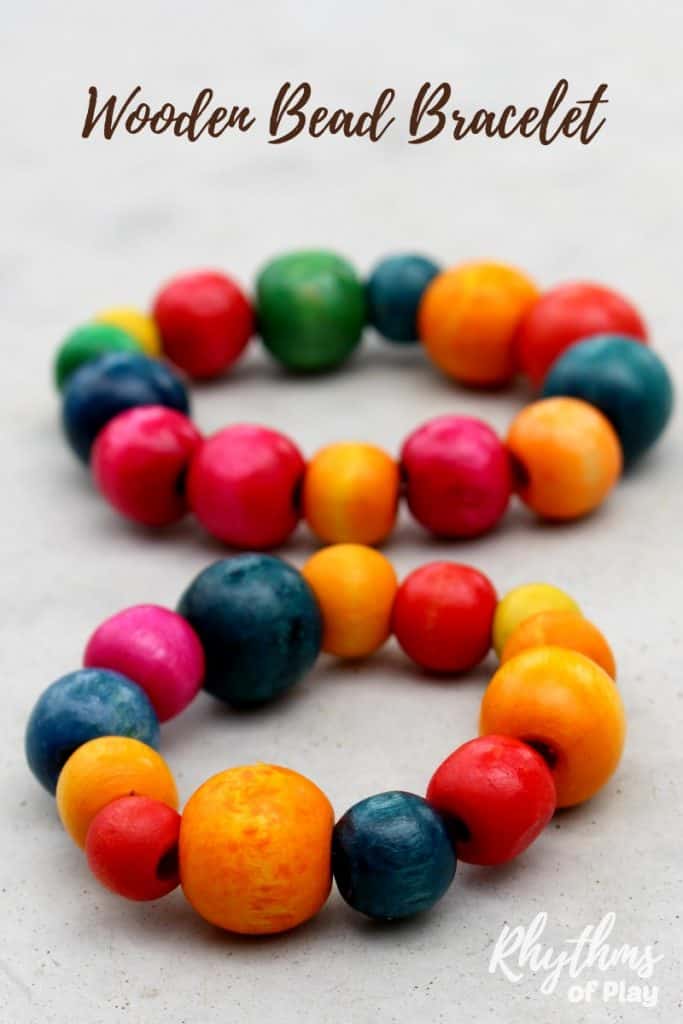
- stringing beads in rainbow order or pattern (as shown in the photograph below),
- or place two beads of one color, and three of another repeatedly,
- or sting one small bead and two larger beads,
- and so on–the opportunities to create beaded patterns truly are endless. And I have almost driven myself to madness several times considering the many options–lol! 😉

3. Cut and pre-stretch Elastic Cord or String
- Cut a length of cord (stretch magic) or piece of elastic at least two to three feet long. (Or use one or two pipe cleaners twisted together and skip to step 5.)
- Grab the free ends of the elastic cord and pull the ends away from each other a couple of times to pre-stretch the string and get it ready for beading.
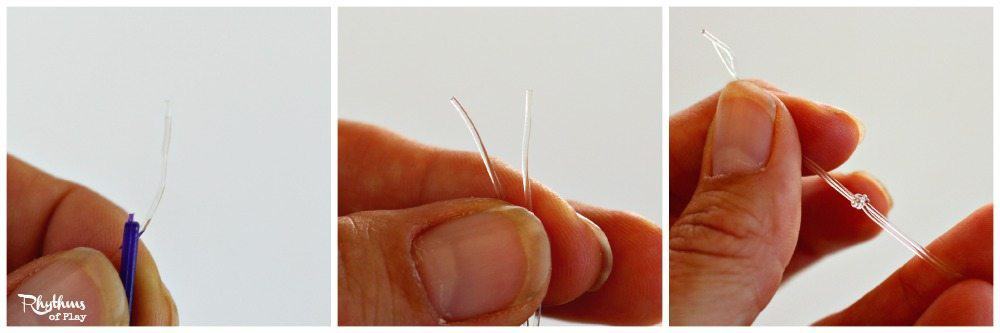
4. Secure or Tie one end of the elastic stretch cord
- If you are not using a pipe cleaner needle, tie a bead to one end of the cord using several square knots to make sure that the knot won’t unravel. (This will act as a bead stopper to help ensure that the beads won’t fall off the stretch cord.) Then continue to step 4.
- If you want to make and use a pipe cleaner needle, use large-hole beads, and follow the steps below before moving on to the next step.
- First, cut a pipe cleaner in half.
- Then fold the section of the pipe cleaner in half with the stretch cord sandwiched in between the two sides of the pipe cleaner.
- Next, twist the pipe cleaner together with the elastic cord inside at the base of the folded pipe cleaner. (This is how to make a pipe cleaner sewing needle to string the wooden beads, and is optional. It can be a useful trick for toddlers and preschoolers, but may not be necessary for kindergarteners, elementary school-aged kids, tweens, teens, or adults.)
- Pull the section of elastic cord or string through the makeshift pipe cleaner sewing needle.
- And finally, tie both ends of the elastic together to make a double line of stretch cord. (Or tie one end of the stretchy string to the pipe cleaner, and the other end to a bead to make a single line of stretch cord.)
- We like to provide beading options, so the photographs below show how to use a plastic sewing needle in place of a pipe cleaner to make homemade beaded bracelets. But pipe cleaner sewing needles usually work better because a lot of bead holes are too small for plastic sewing needles.
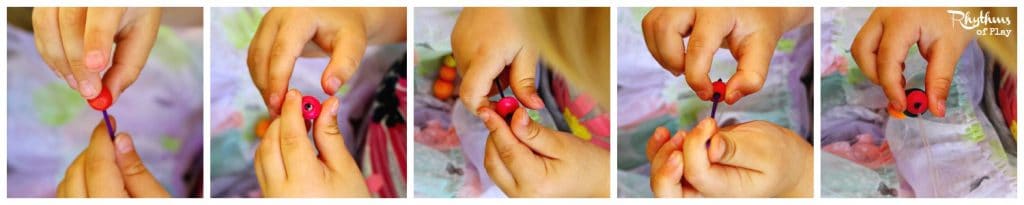
5. String beads onto the stretchy elastic cord, string (or Pipe Cleaner).
- Place the bead directly onto the elastic string or onto a pipe cleaner beading needle (or onto a single or double piece of pipe cleaner if you are not using a stretchy cord) to string wooden bead bracelets onto the line one by one.
- Pull each bead, or group of beads after stringing a few, all the way down to the bottom or end of the stretch cord, while ensuring that they don’t fall off the line. (Or string the beads to sit in the middle of the pipe cleaner if making pipe cleaner bracelets.)
- When working with toddlers and preschoolers and other young children, or if your children have never strung beads before, show them how to string a few beads on the line first. Show more than tell. Children learn best by watching and modeling the actions of others.
- You can see my daughter hand-beading the wooden bead bracelets shown in the photographs for this beaded bracelet how-to in the photo tutorial below.
6. measure and monitor the length of the bead bracelet as you work.
- If you didn’t start by measuring out the exact number of beads you need on a bracelet bead board, it’s best to take a pause every so often to measure the length of the beaded bracelet to check if it’s long enough to finish it.
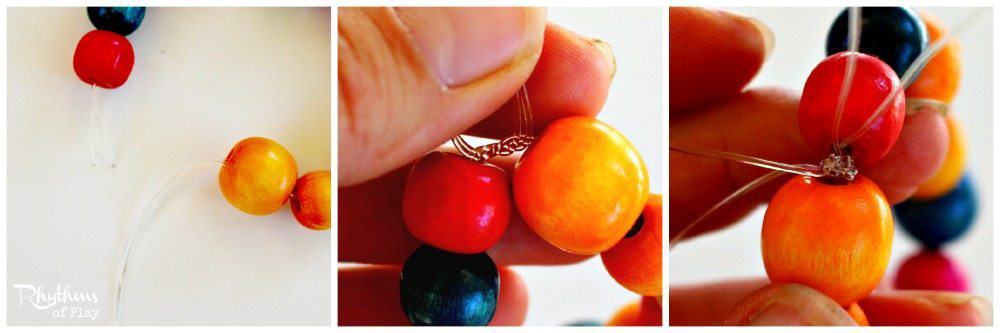
7. Tie a Knot to Secure the beading cord Together
- Once your bead bracelet is the desired length, it’s time to tie the stretch floss with a square knot or two, or a surgeon’s knot, to secure it. (Or twist the free ends of the pipe cleaner together if you are making beaded bracelets with pipe cleaners.)
- This step makes it important to start with enough stretch cord. The cord in the photo on the left below was a bit short but I was able to make it work.
- First, tie both ends of the stretchy cord together with a surgeon’s knot, or several strong tight square knots as shown in the photo tutorial below.
- Do your best to get the beads as close together as possible, without creating too much tension. In other words, tie the stretchy string so that it is just the right size to hold the circle of beads together without overstretching the elastic cord.
- And finally, trim off the excess cord with scissors (including the knot tied around a bead or the pipe cleaner beading needle if you started with either of those optional steps.)
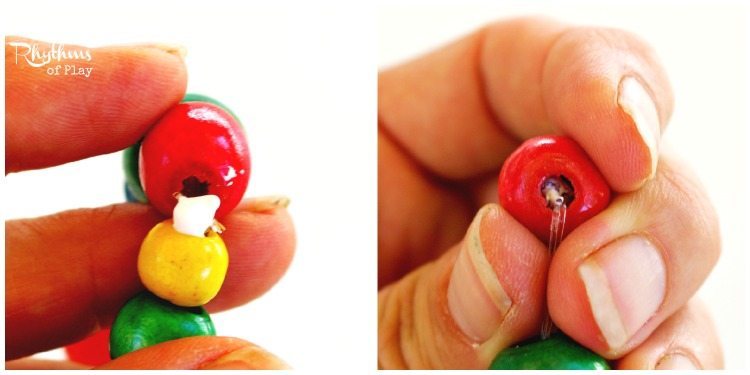
8. Secure wooden bead bracelets (optional but recommended).
- Place a dab of glue or jewelry bonding glue on the knot. (optional)
- Tuck the knot (with or without glue) into one of the beads with the largest hole as shown in the photographs below, or secure it with a knot crimp cover.
- Wipe off any excess glue with a cotton swab if needed.
- These optional but recommended steps can help secure the knot in place, keep the bracelet from breaking or pulling apart, and give homemade stretchy beaded bracelets a little extra strength.
DIY Beaded Bracelet Project tutorial for kids and adults
Learning how to make a wooden bead bracelet is a simple craft for first-time jewelry makers. Making beaded bracelets is an easy fine-motor activity for kids and adults of all ages. No prior experience is necessary to make beaded bracelets using this easy jewelry-making tutorial for beginners.
And, best of all, homemade or kid-made jewelry makes a great gift idea for Mother’s Day, birthdays, Father’s Day, and Christmas! You might also enjoy learning how to color or dye wooden beads to make beaded bracelets and other DIY craft projects like our wooden bead bunny crafts.
For even more ideas have a look at the hand-beaded DIY jewelry and home decor project ideas on the lists below!
DIY Jewelry-making Tutorials
- DIY Mother-Daughter Necklace Set
- How to Start and Finish a Beaded Necklace or Bracelet
- Hand-Beaded Alphabet Necklace
- How to Bead a Name or Word Necklace
- Hand-Painted Wooden Sewing Spool Necklace
Hand-Beaded DIY Projects


This is Eve! Do the supplies include bead bracelets and customer metal keychain.
Looking forward to cooperating with you.
Eve
Hi Eve! I’m not sure what you are asking? You need to have the supplies on hand or will need to purchase beads and stretch cord. I hope that helps!