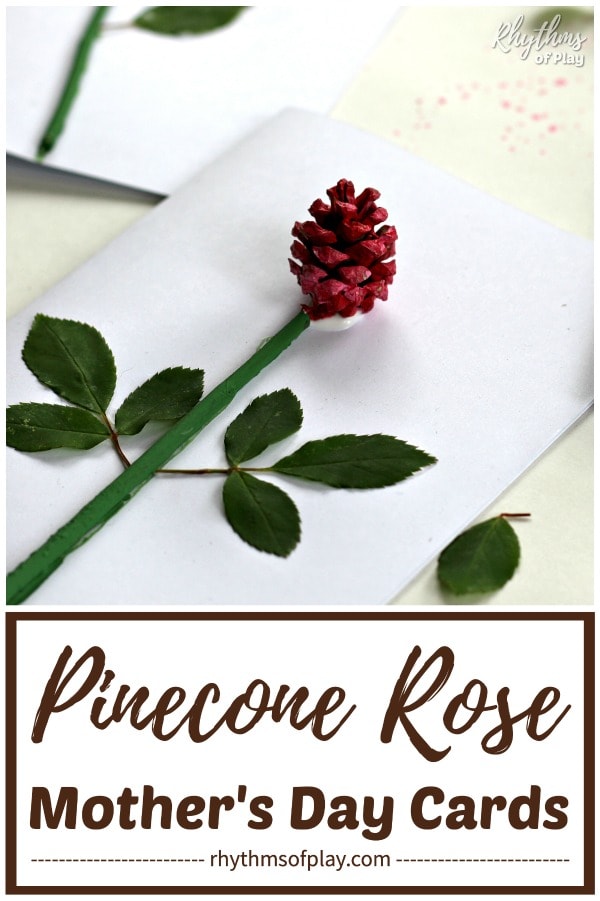
This pinecone rose craft can be made into 3D homemade Mother’s Day Cards that she will LOVE. Turn a small pinecone into a cute little rosebud to make pinecone roses with the easy Mother’s Day craft tutorial below.
Learn how to make pinecone roses on the front of a blank greeting card for Mom with the step-by-step Mother’s Day craft tutorial below. Mom, Grandma, and Nana always love receiving homemade cards from their children and grandchildren on Mother’s Day (or her birthday). First published on April 25, 2017, this pinecone craft tutorial is regularly updated to stay current.
So, use the easy pinecone craft tutorial below to learn how to make a pinecone rose Mother’s Day card or a DIY birthday card for her. Or, invite the kids to color or paint a rose with this printable Mother’s Day Card. You might also enjoy this list of Homemade Gifts Kids Can Make for even more Mother’s Day crafts and gift ideas.

How to Make A Pinecone Rose Craft
Unless you have small pinecones in your nature craft stash, start making pinecone roses by going on a nature hunt (or sending the kids off into the great outdoors) to find a few of the materials you need. Look for small pinecones, twigs (or rose stems), and fresh rose leaves. Or, we have provided a few other options you can try in the Mother’s Day craft supply list below.
Related: Gifts for Mom That Will Put You in the Good Book

Related: Personalized Mom Necklace
Pinecone Rose Card Mother’s Day Craft Supplies
Please read through the instructions before getting started so you know the steps involved and can make a more informed choice about the craft supplies you would like to use. This pinecone rose craft supply list includes Amazon affiliate links to some small pinecones and other craft materials you can use to make these gorgeous DIY Mother’s Day card pinecone crafts. (If you click to purchase, Rhythms of Play will earn a small commission at no extra cost.)
- Small Pinecones

- Twigs, dried rose stems, or small wooden dowels
- Fresh rose leaves or small leaf punch and dark green construction paper (optional; rose leaves can also be hand-drawn or painted)
- Acrylic or tempera paint
- Paint brushes
- Blank greeting cards with envelopes
- White glue, glue dots, or a glue gun with glue sticks
- Poster board (optional)
- Pruning sheers

 and dark green
 paint
paint


 , or a
Related: Personalized Mother’s Day Candle Holder
Pinecone Rose Craft Step-by-Step Directions
This easy nature craft tutorial shows how to make a homemade Mother’s Day card featuring a beautiful pinecone rose on the front. Please read through the step-by-step pinecone craft instructions below before getting started.
1. Gather the craft supplies to make pinecone rose cards and set up an area to paint.
- Choose the craft supplies you’d like to use to make pinecone rose crafts from the list above.
- If using acrylic paint, I recommend protecting the surface you will be working on with newspaper or a large poster board, especially if you are working with toddlers, preschoolers, or other young children. Acrylic paint is permanent when it dries, whereas tempera paint is washable.
- The downside of tempera paints is that, because they are water-based, they are not as opaque and do not cover wood and many natural materials (such as pinecones and twigs) as well as acrylic paints do. This means you can see what’s under tempera paint after the first coat, so you will often need to reapply more paint. Acrylic paint, on the other hand, is much less see-through after the first coat.
 is washable.
2. Paint a small pinecone rosebud in the color of your choice:
There is more than one way to paint a pinecone. Choose your favorite method from the tips and instructions below. Then invite children to make pinecone rose cards and create pinecone print process art at home or in the classroom with this fun art and craft project!
- Paint a small pinecone red, pink, yellow, or any other color you’d like your small 3D rosebud to be.
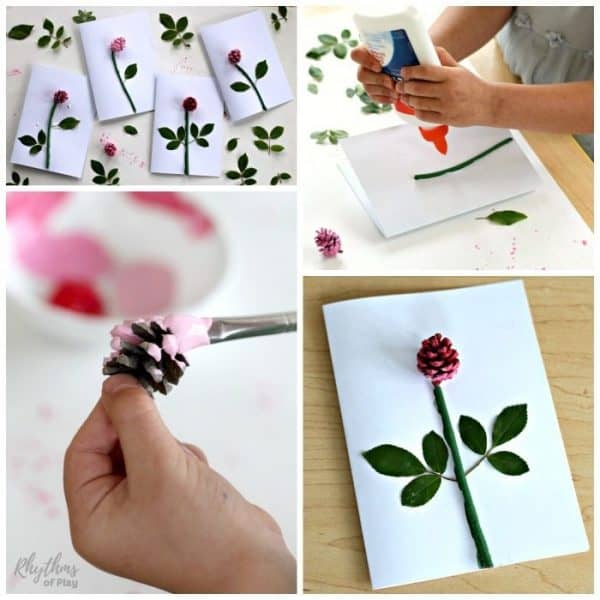
- My daughter used a combination of red, pink, and fuchsia acrylic paint for the pinecone roses shown on the Mother’s Day cards in the photographs.
- As you can see in the photos, she painted the pinecones while holding them.
- When she was done, she did some pinecone process art by rolling off the excess paint onto the poster board. I thought it was a brilliant idea, because not only did it remove the excess paint, but the pinecone prints were quite pretty. You can see the pink and red pinecone prints all over the poster board in the photos above and below.
- Alternatively, paint the pinecone rosebud in a small dessert bowl, a baggie, or a recycled container (yogurt and cottage cheese containers work well). Either roll the pinecone around in the container with a paintbrush until it has enough paint. Or put it in a baggie with a squeeze of paint and massage gently.
- Next, roll the excess paint off the poster board or scrap paper.
- If you want to watch how to paint a pinecone in a bowl, watch the video “How to Paint Wooden Beads.” The video shows how to paint a wooden bead, but a pinecone can be painted using the same technique.
3. Trim and Paint twigs, dried rose stems, or small wooden dowels to create a stem for each rosebud:
- Use pruning shears to trim each twig or wooden dowel to the desired size. 3 to 4 1/2 inches usually works well, but laying each one on the front of a blank greeting card to test for size is a good idea.
- Paint twigs or small wooden dowels green to resemble rose stems.
- My daughter chose Kelly green acrylic paint to paint the twigs shown on the homemade Mother’s Day cards in the photographs.
- Allow the pinecone rosebuds and the twig or wooden dowel rose stems to dry before moving on to the next step.
4. Glue pinecone roses and twig (or dowel) stems to the front of blank greeting cards.
- Glue the painted twig, dried rose stem, or wooden dowel onto the card.
- Add a dab of glue to attach the pinecone rosebud at the top of the twig to finish the pinecone rose craft.
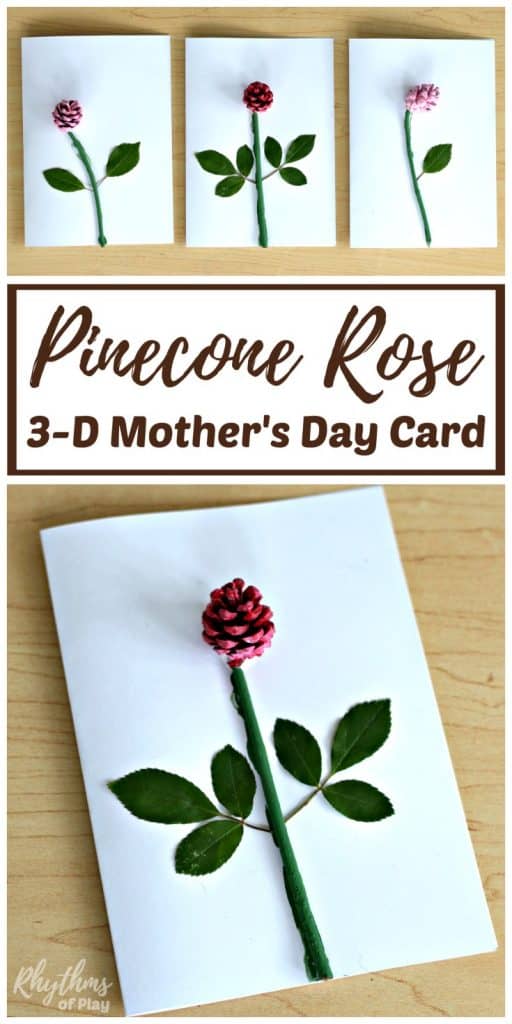
5. Glue, draw, or paint rose leaves onto each pinecone rose card to finish the Mother’s Day Craft:
- There is a wild rose bush growing in our backyard, so we picked some real leaves to glue onto our pinecone rosebud Mother’s Day cards.
- If you don’t have wild rose leaves growing nearby, try any of the following ideas:
- Use a green colored pencil or crayon to sketch or draw rose leaves onto the rose stem.
- Paint them with the green paint you used to paint the twig (or dowel) stem.
- Or, use green construction paper, a small leaf punch, and glue.

 , a
, a  , and glue.
Pinecone Roses DIY Cards Photo Tutorial
My daughter demonstrates how to make pinecone rose cards in the step-by-step photo tutorial below:
Related: Personalized Mother-Daughter Necklace Set
3D Rosebud Homemade Mother’s Day Cards
Mom will love this homemade pinecone rose on Mother’s Day! Make sure that you make one for Grandma and Nana, too!
To complete the gift, have a look at these gorgeous homemade gifts kids can make and Gifts for Moms she is sure to LOVE.
Learn more about Nell Regan Kartychok, author, photographer, and creator of this original craft HERE, and about Rhythms of Play HERE!

If You Like Pinecone Roses DIY, You May Also Like
- Nature Crafts and Nature Art Ideas
- Acorn Marble Necklaces
- Pinecone Activities and Crafts
- Best Flower Art Projects for Kids
- Real Flower Nature Crafts
- Rose Watercolor Art Project


Leave a Comment