This DIY Christmas nativity stable is a fun popsicle stick craft that kids and adults can create and display in a nativity scene!
Learn how to make a wooden nativity stable with popsicle craft sticks for Christmas with this step-by-step DIY project tutorial for all ages! Making a popsicle stick nativity stable at Sunday school or with family members is a fun Christmas craft for kids and adults. This simple DIY project provides an excellent hands-on Christmas activity that builds fine motor skills and creates a tangible product that can be set up as a festive seasonal display. This nativity stable craft can also accompany a conversation or a lesson about the true meaning of Christmas.
Make this easy craft to share the story of Christmas with children of all ages. Toddlers, preschoolers, and kindergarteners will need help from a parent, caregiver, or teacher to make this popsicle stick nativity stable craft. However, older children and teens can independently complete this festive DIY Christmas decor project from start to finish. You might also enjoy these meaningful Christmas traditions for a magical and joyous holiday season.

Making a Nativity Stable with Popsicle Sticks:
My preschool-aged daughter and I had a great time engineering this homemade wooden nativity stable with popsicle sticks for Christmas. Creating new and exciting crafts that others can enjoy is one of our favorite things to do together. We also enjoy making other Christmas arts and crafts, such as homemade ornaments and these adorable keepsake cards.
To our surprise, this handmade craft stick nativity stable is pretty solid once it is built. It may seem fragile, but it can last for several years when stored properly. First published on November 17, 2016, this Christmas-themed popsicle stick craft tutorial is regularly updated and republished to improve its content and keep it current.
My family has used this DIY nativity stable as part of a nativity display at the end of our Stone Advent countdown calendar. This simple popsicle-stick nativity craft also makes a lovely wooden stable for a simple Christmas nativity scene.

Related: Best Christmas Art Projects
Homemade Wooden Nativity Stable DIY:
Festive decor ideas like this simple Christmas craft can help children and adults develop their creativity and improve fine motor skills. This wooden nativity stable craft may seem challenging because of the number of steps involved. But I assure you that this popsicle stick craft is a super simple DIY Christmas decoration!
However, assembling this popsicle stick Christmas craft is much easier if you have a general idea of each step. It’s also best to understand how to make a popsicle stick nativity craft if children will be helping you create one. So, please read through the step-by-step instructions for the nativity stable craft below before beginning this DIY Christmas nativity craft.
That said, some of these Christmas nativity stable plans will make more sense once you have built your first wooden nativity stable craft. You might also enjoy making the Easy DIY Wooden Peg Doll Holy Family in the photographs to go with it.
How do you make popsicle sticks stand up?
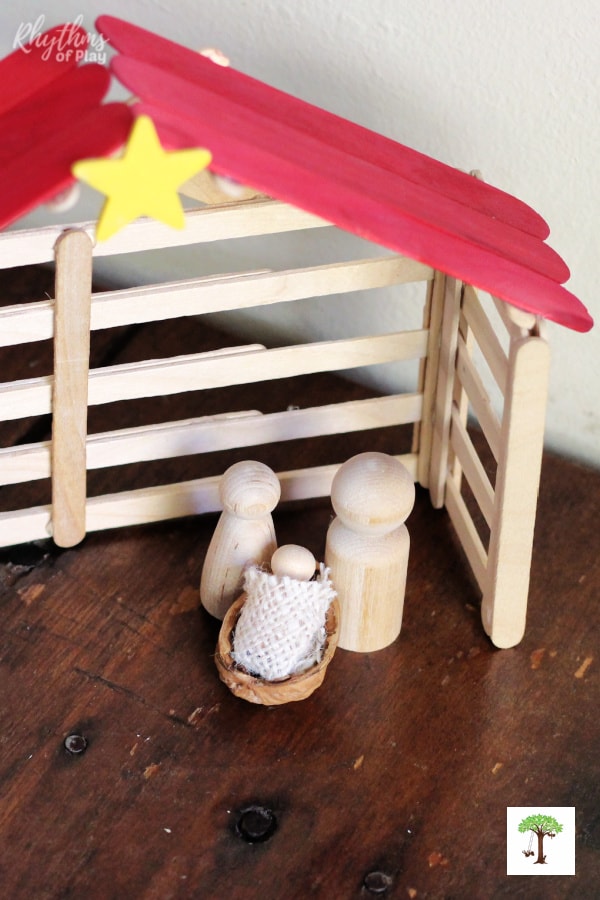
As you can see in the photograph below, this wooden nativity craft uses basic engineering and simple construction principles to keep the popsicle sticks standing. Once the side walls are attached to the back wall of this nativity stable at a 90-degree angle, the popsicle sticks easily stand and stay upright, as shown in the photo below. Follow the step-by-step DIY popsicle stick nativity stable instructions below to make this easy Christmas craft.
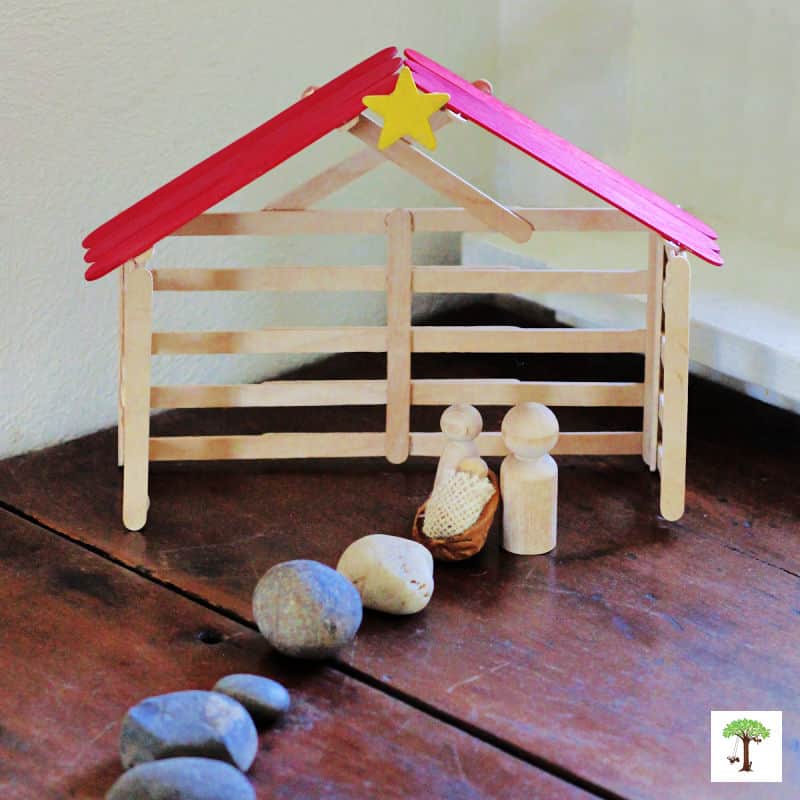
Popsicle stick Nativity Stable sitting with the Holy Family under the roof at the end of a stone Advent countdown calendar.
How to Make a Nativity Stable Out of Popsicle Sticks:
The irregularities of popsicle sticks can make building with them a tricky business. So, do your best to start by selecting craft sticks that are as straight as possible. Too many crooked popsicle craft sticks will make this DIY Christmas nativity stable challenging to complete.
It is also essential to construct the nativity stable as neatly as possible. So do your best to ensure the popsicle craft sticks line up flush. However, lining the popsicle sticks up and making them straight and flush can be challenging for different reasons, depending on the type of glue that you use and whether you will be working with children and their ages.
I recommend taking frequent craft breaks if you will be making this wooden Christmas nativity craft with toddlers or preschoolers. Use glue tape or craft glue that takes time to dry, instead of hot glue, and allow for breaks when working with young children.
It’s a good idea to take a break after one or two steps in the project, then return to your wooden Christmas stable once everyone has had time to rest, so little ones are less likely to get frustrated or upset. For more information about keeping kiddos calm and happily engaged, read through these self-regulation strategies.
DIY Nativity Stable Craft Supplies:
- Mini popsicle sticks for crafts (2.5-inch).
- Regular-size (4.5-inch) wood popsicle sticks (Craft sticks in most sizes are also available at the Dollar Tree, Dollar Store, and your local hobby or craft store).
- Colored wooden jumbo craft sticks (6-inch by 3/4-inch).
- These larger popsicle sticks are also known as tongue depressors when left unfinished.
- Pencil.
- Hot glue, glue tape, or wood glue.

- Wooden star (1.5-inch).
- Yellow acrylic paint (optional for star)
- Paintbrush


Safety Note: Please provide adult supervision and instruct children in the safe use of hot glue if they will use it to make this Christmas craft. Glue tape offers a secure, fast-drying alternative that also works well for this popsicle stick craft project. Wood glue also works well, but often requires setting (clipping pieces together while they dry) and has a longer drying time.
Related: Ultimate Family Gift Guide with DIY and Readymade Options

Popsicle Stick Nativity Stable Craft Step-by-Step Instructions:
Please read the instructions before making a craft stick nativity stable so you know the steps involved and what to expect. You might also enjoy this list of Christmas Art Projects and painting ideas.
1. Paint the wooden star yellow (optional):
- Use a paintbrush to apply yellow acrylic paint to a 1.5-inch wooden star, as shown in the photograph below.
- Complete this step before constructing the popsicle stick nativity stable.
- This way, once you build it, it will be dry and ready to attach to the wooden Christmas stable.
- Alternatively, leave it raw and unfinished.
 to apply yellow
  to a 1.5-inch wooden star, as shown in the photograph below.
Related: Walnut Shell Manger Christmas Ornament
2. Build the side walls of the popsicle stick nativity stable:
Here are the craft materials, step-by-step instructions, and a photo tutorial showing how to make each sidewall for the popsicle-stick nativity craft. Use a combination of regular and mini popsicle craft sticks to build two side walls for the wooden nativity stable according to the supply list and tutorials below:
Craft Supplies Needed to make each sidewall:
- Five regular-sized popsicle sticks (two more to use as guidelines, optional)
- Five mini popsicle sticks
- Hot glue, glue tape, or wood glue pen
- Pencil


 ,
, 

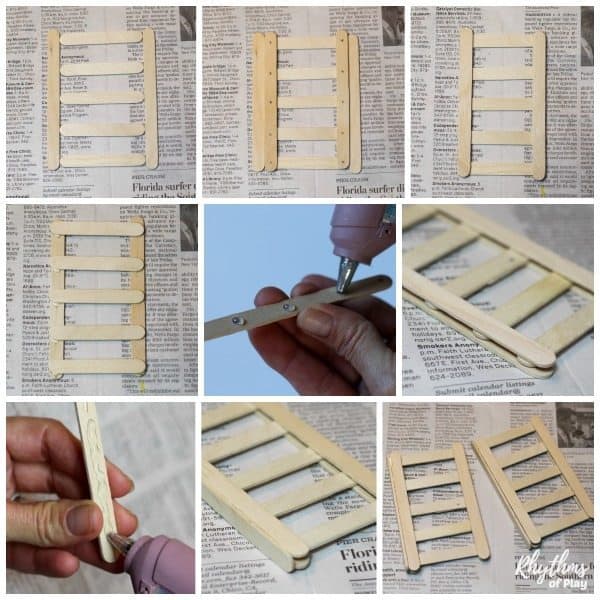
How to build the side wall of the popsicle stick nativity stable:
- Lay five mini craft sticks horizontally, as shown in the photo tutorial below.
- Then, place two regular-sized popsicle sticks vertically along the sides of the mini popsicle sticks to help line them up as straight as possible.
- Next, place a regular-sized craft stick on the right and left sides of the mini-craft sticks, which are placed horizontally.
- The side wall will look like train tracks.
- Use the two popsicle sticks you put along the sides, or grab another two craft sticks while keeping the originals in place to keep them lined up, as shown in the photograph below.
- Then, use a pencil to mark a dot where the vertically placed regular-sized popsicle sticks overlap the horizontal mini craft sticks.
- Place a dot of glue or a small piece of glue tape at each pencil mark, turn it over, and attach it to the tops of the sides at a 90-degree angle to the horizontally arranged mini craft sticks.
- Please do your best to keep the craft sticks straight and flush; try not to let them extend beyond the overlapped craft stick.
- Repeat this step on the other side:
- Flip over your little train track sidewall and use glue tape, a wood glue pen, or hot glue to attach two more craft sticks to the other side.
- Place a bead of glue along the bottom edge of another popsicle craft stick and attach it to one side of the side wall.
- Leave the other side of the sidewall as is.
- Do not glue another craft stick to it because it will be glued to the back wall of the nativity stable in a later step and, therefore, won’t need one.
- Repeat the steps above to create a second side wall, as shown in the photo tutorial below.
Related: Reverse Fingerprint Christmas Tree Cards Kids Can Make
3. Build the back wall of the nativity stable:
Twenty-two regular-sized Popsicle sticks are needed to construct the back wall of the wooden Christmas stable. The DIY popsicle-stick nativity stable instructions and craft photo tutorial below illustrate how to complete each step. Use these step-by-step instructions to build the back wall of the popsicle stick nativity stable:
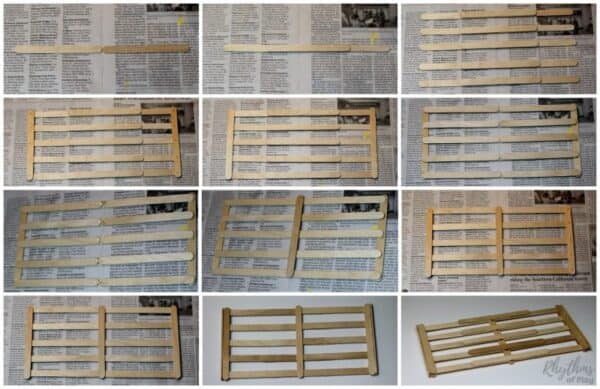
How to build the back wall of the nativity stable with popsicle sticks:
- Lay two craft sticks horizontally, tip-to-tip, as shown in the photo tutorial below.
- Next, place a line of hot glue or glue tape along the top of another craft stick, turn it over, and lay it horizontally on top of the two craft sticks to attach them.
- Repeat the above steps five times to make five extra-long craft sticks for the back wall of the nativity.
- Line the extended wooden stick backboards horizontally.
- Please do your best to ensure they are as evenly spaced as possible.
- Then, place two more regular-sized popsicle sticks on top of the far left and far right sides of the horizontally placed extra-long popsicle sticks.
- Use a pencil to place dot markers on the vertical popsicle sticks where the craft sticks overlap.
- Place a dot of glue or a small piece of tape at each pencil mark.
- Turn the wooden popsicle stick over and glue it to the back of the sticks on top of the horizontally arranged extra-long craft sticks.
- Once again, please do your best to keep them flush.
- Do not allow horizontal craft sticks to extend beyond the vertical craft stick on either side.
- Flip the back wall over, then repeat the steps above with two more regular-sized popsicle sticks on the opposite side.
- Keep the back wall turned over and put a bit of glue where each pair of craft sticks touches in the middle:
- Place a regular craft stick vertically over the glue in the middle of the back wall to attach it.
- This will cover the point where the craft sticks meet to help stabilize the back wall of this popsicle-stick nativity craft and give it more structural support.
- Place a bead of glue or a strip of glue tape along the edge of another craft stick:
- Attach this craft stick to one side of the back wall to cap the edge.
- Repeat this step on the other side to finish the back wall of the wooden nativity stable.
Related: Angel Peg Doll Christmas Ornament
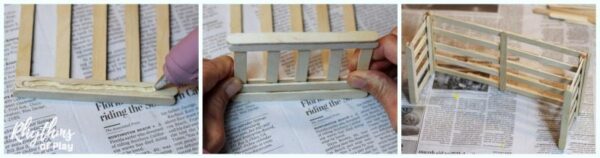
4. Attach the sidewalls to the back wall of the popsicle stick stable:
- Lay down the back wall so the vertical craft stick I-beam down the middle is on top of the craft sticks.
- Place a long bead of glue (or a piece of glue tape) along the upper edge of one side, as shown in the Christmas nativity photo tutorial below.
- Attach the sidewall at a 90-degree angle with the exposed side down and the craft stick capped side up.
- Repeat this step on the other side of the popsicle stick stable so that both capped side wall edges face forward, completing the side-wall construction.
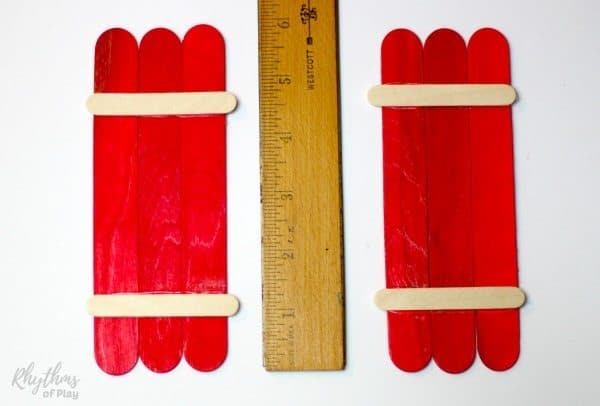
5. Build the roof of the nativity stable:
You will need three jumbo craft sticks and two mini craft sticks for each side of the roof. In other words, you will need six red jumbo popsicle sticks and four mini popsicle sticks to make the nativity-stable roof pieces. The jumbo sticks can be red as shown in the photo, left natural and unfinished, or painted another color. Once complete, put these two roof sections on top of the sticks and sit at the top of the manger to complete the Christmas nativity stable.
How to Build a Popsicle Stick Roof:
- Put three jumbo craft sticks side by side, as shown in the photograph below.
- Place a bead of glue or a strip of glue tape along the edge of a mini craft stick, turn it over, and attach it horizontally about 1 inch from the end of the red jumbo craft stick.
- Glue the second mini craft stick to the other side of the jumbo craft sticks, as shown in the DIY photo tutorial below.
- Repeat the steps above to make the other side of the pitched roof.
- Do not place the mini craft sticks too far from the end of the red jumbo popsicle sticks.
- The position of the craft sticks will ultimately affect the roof’s pitch.
Related: Craft Stick Peg Doll Boat for Kids
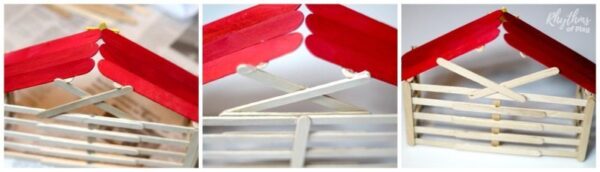
6. Attach the roof to the frame of the Christmas stable:
My daughter and I made three of these wooden nativity stable crafts together, and we never attached the roof in the same way twice. This is because how you construct the stable structure will affect how your roof will fit and what you need to do to make it work. Read through the step-by-step instructions below to make this DIY nativity stable craft. Then call it a STEAM challenge, and set the kids to work at home or in the classroom to figure out how to attach the roof onto the nativity stable.
How to Attach the Popsicle Stick Roof to the Nativity Stable:
- Play with both sides of the roof turned each way on both the left and right sides before you decide how to glue it.
- Move them around to find which way they fit best.
- Lean the mini stick I-beam attached across the underside of the red jumbo sticks at about a 45-degree angle on one side of the roof so that it fits into the cradle on the top of the sidewall, as shown in the photo tutorial below.
- Please find the best way to position it and glue it in place. You might need a lot of hot glue or glue tape to complete this step.
- Attach the craft stick crossbars from one side of the back wall to the opposite side of the roof, whichever way works best.
- Use the popsicle-stick crossbars and glue to help support and position the roof as best you can, as shown in the craft photo tutorials below.

Related: Ultimate Eco-Friendly Gift Guide for Kids
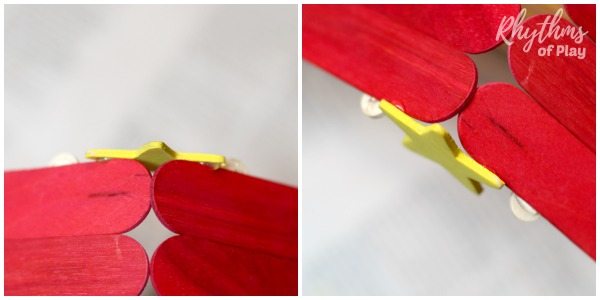
7. Attach the yellow wooden star to the roof of the nativity stable:
- Place a dot of glue or a piece of glue tape on the two arms of your star that touch the roof to attach it.
- Adding the star decoration on the front of the stable will help stabilize the roof and give it more structural integrity.
- The shooting star on the wooden nativity stable represents the “Christmas Star,” “Comet Star,” or “The Star of Bethlehem.”
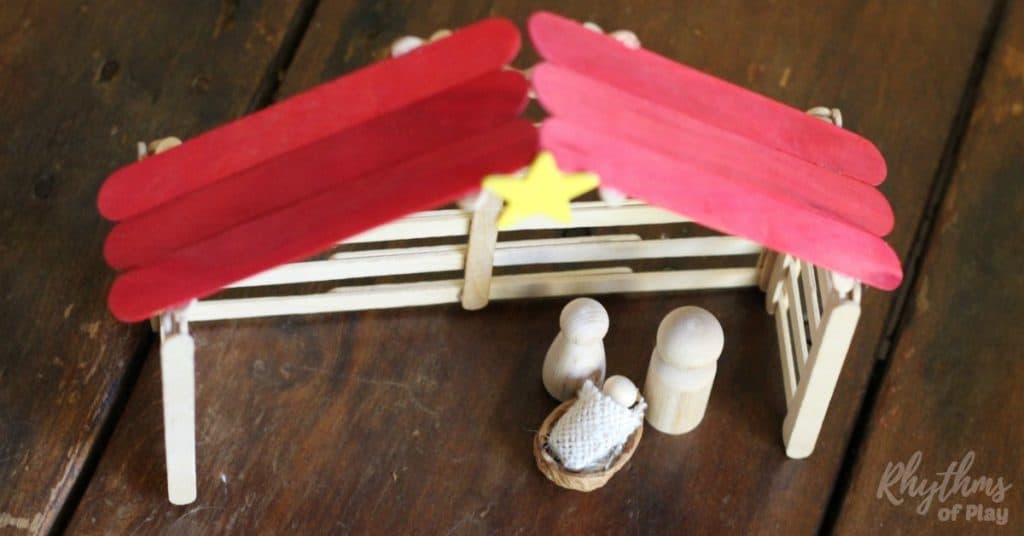
DIY Nativity Stable Made of Popsicle Sticks:
This DIY craft stick nativity stable looks lovely on display as a part of a nativity scene for Christmas. Use the simple DIY ideas below to make this easy wooden nativity craft to add to your festive home decor. A popsicle stick nativity stable also makes a great Christmas gift idea.
How to Use or Display a DIY Wooden Christmas Stable:
Use this easy Christmas craft to share the true meaning of Christmas with children, family, and extended relatives at home or Sunday School. Try these simple DIY Christmas decor ideas to use and display this craft stick stable:
- Make Baby Jesus, Mary, and Joseph with this Holy Family Christmas Craft tutorial to complete your homemade wooden nativity set.
- Use THESE instructions to set up a nativity scene with this popsicle stick Christmas craft and homemade wooden peg doll nativity characters, or use a store-bought Nativity set.
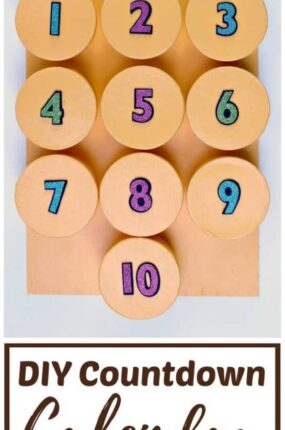
- Display this popsicle-stick nativity stable as part of a simple stone Christmas countdown calendar (as shown in the photo above) or as a part of a spiral advent display if desired.
- Click the links to learn how to assemble two Christmas countdown calendars with stones.
DIY Wooden Nativity Stable Craft and Gift Idea:
This handmade craft stick nativity stable makes a lovely homemade Christmas gift for someone special. Believe it or not, it’s pretty solid once you put it together. It may seem fragile, but it can last for several years if stored properly.
My daughter and I have also discovered over the years that we use them as part of our seasonal Christmas display, and that they are really easy to glue any broken parts back together.
You may also like these round-ups of Christmas gifts and Christmas ornaments that kids can make.
Don’t forget to check out Christmas Traditions for a magical holiday and our winter bucket list, filled with fun winter activities for the kids.
Learn more about Nell Regan Kartychok, author, photographer, and creator of this original popsicle stick nativity stable craft HERE, and Rhythms of Play HERE!


This is so beautiful! Love it!
Thanks, Karyn! So glad you like it! I have many more fun craft stick structures planned now that my daughter and I have mastered engineering them. I will be sharing more fun craft stick DIY’s in the new year!
I’m making this with my kids at daycare and I’m wondering what size star you used.
Thank you
Hi Rene!
I’m so glad you will be making this with your class! I used the 1.5-inch wooden star for this project. Enjoy!
Each store seems to have different dimensions for the mini craft, craft and jumbo craft sticks. Could you provide the dimensions? Thanks
I’m so sorry I missed your comment Diane! My family was on vacation for the holidays. I hope you were able to make it. For future reference, I don’t think it matters which mini, standard, and jumbo craft sticks you use. The roof may have a bit more or less pitch, and it might be a slightly different size when finished, but it should work just fine.
Hi,Seeing your share on the website gives me a lot of inspiration. It’s really great!
I’m so glad you like it and that it gives you inspiration, Helen! There are a lot of steps, but it is quite simple to make. 🙂
I was wondering if you could explain a little bit more about how you got the roof on. Mine isn’t coming on at all.
Hi Noah, I’m sorry that you are having trouble. The roof needs to be held in position while it is glued. It will not sit and stay until you glue it together. Its a bit challenging to figure out how to lean it just right, but I have confidence that you can do it.
I love this. Thanks so much! What dimensions would you recommend for the peg dolls, please? Thank you!
Thank you, Elizbeth!
My daughter and I had a lot of fun putting it together. The peg dolls that we used are in “Holy Family Nativity Scene” which you can find if you click the link. I will update this post to include them as well. Thanks again!
Planning to make this with my Sunday school kids, they are middle school age. I made one today to gauge how long it will take. Took roughly 45 minutes without painting. I’m going to make some of the pieces ahead of time just to help the process! Thanks for sharing this. My kids helped me pick it out themselves. They are very excited. I think I’m going to apply the same idea as the back wall to make a “floor” though. Just make the sticks touch instead of spaced.
Hello Nikki,
I’m so happy to hear that you are making this nativity craft with your Sunday school kids and that they helped you pick it out. I’m delighted you all like it–you are very welcome!
My daughter and I have made several popsicle stick nativity stables over the years, and they always turn out lovely. You will notice that they are a lot quicker and easier to make once you have made one. I like the idea of making the back wall with the popsicle sticks closer together–we may give that a try, too! Thanks for the great suggestion. 🙂
Nell