This step-by-step DIY tutorial shows how to make a height-measurement chart that looks like a giant ruler, using a wooden plank, to measure children as they grow.
A homemade wooden growth chart is a practical way to measure your children’s height as they grow from toddlers into teens. You can also use it to record your baby’s (or babies’) length at birth and during their wellness checks. In other words, you can add any length or height measurements you have already recorded or have written down to it post facto. One of the best features of this functional and sturdy height chart is that you can take the board with you when you move, instead of leaving all those precious, memorable marks behind on the wall, door, or door frame of your old house.
Making a DIY growth chart on a plank of wood eliminates the need to paint over it or update the area where your children’s or grandchildren’s measurements are, should you ever want to add new paint to your house’s walls. In other words, this DIY height chart can be easily removed from the wall so you can paint. Best of all, this height measurement chart is also a beautiful work of art that you can proudly display as DIY home decor, rather than a flimsy piece of paper that can be easily destroyed or lost. Please scroll down for the supply list and DIY details to make a gorgeous do-it-yourself six-foot growth chart on a wood board that looks like a giant ruler and keeps track of your children’s height as they grow. You might also enjoy these DIY sandbox ideas for kids.

How to Make a Wooden Height Growth Chart That Looks Like a Giant Ruler for Measuring Kids:
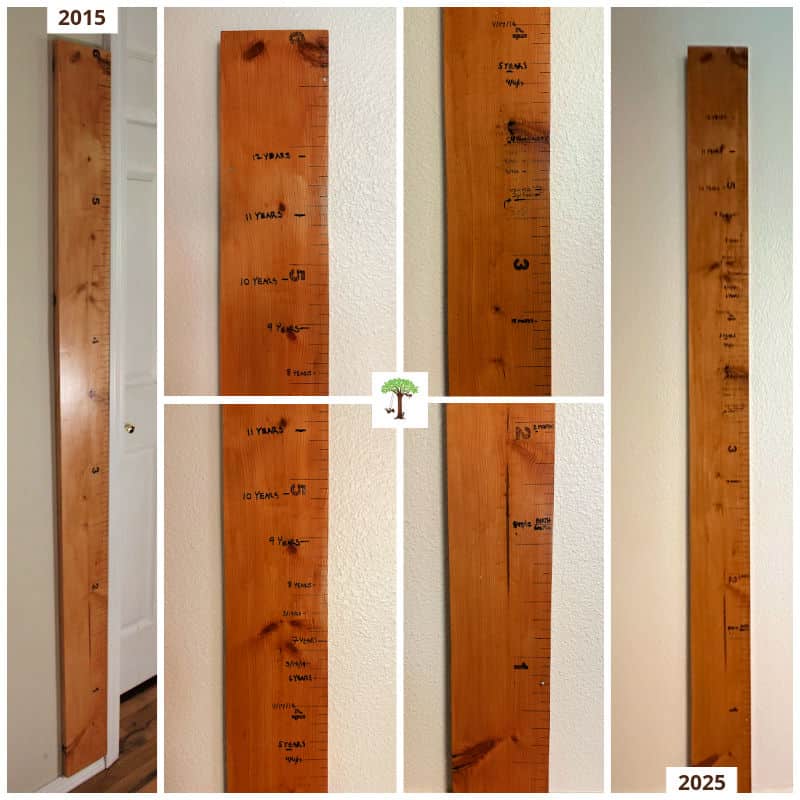
My husband and I transformed a six-foot-long piece of pine timber into a wooden growth chart, and it turned out fantastic! To this day, we still have it on display in our home and use it to measure our daughter’s growth every year around her birthday.
It’s such a meaningful and lovely piece of home decor that our family and friends always complement its beauty. You can see it then and now, along with a few close-ups of past measurements written on it in the photographs above and below. Learn how to make a height growth chart that looks like a giant ruler with the simple DIY project tutorial below.
Updated Height Growth Chart Ruler DIY Construction Guidelines:
In the photographs, you will notice that we originally constructed the height measurement chart to be flush with the floorboards and provided instructions to do the same in this DIY woodworking tutorial. Today, I recommend starting the measurements on the bottom of the growth chart at six inches.
This simple change leaves plenty of room for the baseboards below where the growth chart will hang, if any. It also creates a slightly higher (taller) growth chart, allowing for the accommodation of children who grow to over six feet tall when they reach maturity. Starting the measurement marks at six inches means the growth chart will end at six feet and six inches when a six-foot piece of wood is used to construct it.
These changes to this DIY home decor project enhance the tutorial, making it easy to install the growth chart above the baseboards in most homes. They also allow for easy removal if you move. Today, this DIY height chart tutorial also includes step-by-step instructions for several types of materials you can use to construct it, with the measurement marks and numbers on the right, as shown in the image above, or on the left.
The step-by-step instructions for this DIY woodworking project have been updated to reflect each of these changes since this post was originally published on May 4, 2015. Instructions for hanging the height chart and using it to accurately measure and record kids’ growth have also been added to this comprehensive project tutorial.
Supplies for DIY Growth Chart Woodworking Project:
Please read through the directions before starting this functional DIY home decor woodworking project to make a more informed choice about the optional supplies you want to use from the recommendations below:
- A wooden plank or piece of wood that is at least 1 inch deep, 4 inches wide, and 6 feet in height (length).
- The exact depth, width, length, and type of wood can vary based on space, taste, and budget. However, a wooden board pre-cut to 6 feet in height or length is recommended for this project.
- My husband and I used a 1-inch-thick, 5-1/2-inch-wide, 6-foot-long pine plank that we purchased at a home improvement store, ready to be transformed into the height growth chart ruler shown in the photos of this tutorial.
- Sandpaper or electric sander.
- Tape measure.
- Ruler.
- Carpenter’s square.
- Pencil.
- Choose one of the following to create numbers and measurement marks on the wooden board:
- Number stencils and a paint pen or woodburning tool.
- Number stickers, or small address numbers
- Wood stain or finish in color and type of choice: water-based wood stain, linseed oil and beeswax wood finish blend, oil-based polyurethane, etc.
- The directions for applying the stain or sealer (using a paintbrush, foam brush, or rag) and the timing of application will vary depending on the type of wood stain or sealer you choose. Additionally, the method for making measurement marks may differ, depending on whether you use a wood-burning tool or a black or white paint pen.
- Please read through the instructions for more information.
- The supplies needed to hang the board are included in the directions below for hanging a wooden growth chart.
- A permanent marker to record the kid’s measurements.
DIY Height Growth Chart Step-by-Step Instructions:
Please read through the step-by-step instructions before starting this project so you know what to expect and understand each step involved. You will notice that there are several alternative wood stains and construction options to choose from for making a height growth chart.
Each of these options is explained in detail in the directions to make it easy to create the perfect height growth chart for your needs. After reading the instructions below, choose the supplies and methods you prefer, and follow the corresponding directions in the step-by-step instructions to complete this DIY woodworking project.
1. Prepare the Wood:
- Use a piece of sandpaper or an electric sander to sand the wooden plank along the grain.
- Even out any rough spots on the wooden board and ensure it is smooth to the touch before moving on.
- If you are using a paint pen to create the measurement marks and numbers (or number stickers) for the growth chart, use a foam brush or a wood-stain paintbrush to apply a water-based wood stain, if desired. Allow it to dry completely before moving on to the next step.
- Alternatively, you can apply a linseed oil and beeswax wood finish blend or polyurethane finish following the instructions in step 6 after finalizing the measurement marks.
- If you are using a woodburning tool to make the measurement marks and numbers for this project, as shown in the photographs, please apply the wood stain, linseed oil, and beeswax wood finish blend, or polyurethane in step 6 after burning the marks and numbers and optional name into the wood; staining the wood or adding an oil-based finish before woodburning is not recommended.
2. Create measurement marks by measuring and marking feet and inches on the board for the growth chart:
- Measuring and marking off feet and inches are essential steps in making a growth chart.
- Use a tape measure (or a ruler), a pencil, and a carpenter’s square to mark the measurements on the board, as shown in the photos below.
- The height growth chart in the photographs for this tutorial is completed to the half-inch, which looks best. However, marking only the feet and inches looks nice as well.
- I marked feet, inches, and half-inch measurement lines on the DIY growth chart in the photographs for this tutorial to give it a giant ruler-like appearance.
- Because numbers only mark the feet, changing the size of the measurement marks (as directed below) also makes this wooden growth chart much easier to read, just like a ruler.
- This process of marking the board in this way also makes the final product turn out beautifully. As you can see in the photos, the different line lengths for each mark look excellent on the 6-foot-high, 5-1/2-inch-wide pine board we turned into a wooden height chart.
- The measurement marks run up the right side of the growth chart in the photos when it is hung on the wall, but you can just as easily make them on the left side if you prefer.
- Create measurement tick marks from the bottom to the top of the board with the photo tutorial below and the step-by-step how-to instructions and guidelines in the next section:
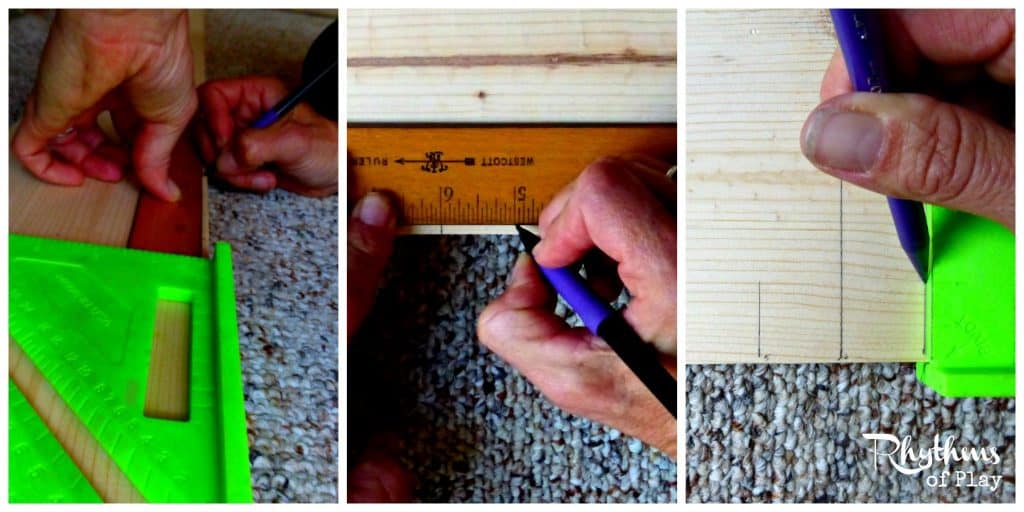
How to Create Measurement Marks on a DIY Height Chart:
- Starting from six inches, on the bottom of the board, create measurement marks or lines that are perpendicular to its height (or length) on the right or left side up to 6 feet 6 inches at the top of the DIY height chart according to the following instructions:
- Draw 2-inch lines for the foot markers (1, 2, 3, 4, 5 & 6 feet) every 12 inches.
- Create 1/2-foot markers every 6 inches, each 2 inches long.
- In other words, draw a 2-inch line every 6 inches on the board to mark both feet and half-feet.
- Create lines for 1/4 foot markers that are 1 1/2 inches long.
- 1/4 foot equals 3 inches.
- To complete this step, draw a 1 1/2-inch line to mark the 1/4-foot intervals between the foot (12 inches) and half-foot (6 inches) marks.
- In other words, draw lines that are one and a half inches long at one foot nine inches, two feet three inches, two feet and nine inches, and so on up to six feet and three inches.
- Draw 1-inch lines, 1 inch apart, to mark the inches between the marks already made every 3 inches.
- In other words, skip the existing marks and add two one-inch lines spaced one inch apart.
- Finally, draw 1/2-inch lines every half inch between the existing measurement lines to create the 1/2-inch measurement markers.
- If you look at a ruler, you’ll notice a similar variance and sizing.
- Double-check measurement marks for accuracy.
3. Make marks permanent: Use a woodburning tool or paint pen to finish foot and inch marks:
- Use a wood burner or paint pen to make the measurement lines permanent.
- In other words, trace or draw over the measurement marks you made with a pencil in step 2 with a paint pen or a woodburning tool to make the lines permanent and easy to see.
- Using a woodburning pencil is easy, but use caution:
- If you have never used one before, practice on a piece of scrap wood before completing this step of the project.
- Please be mindful. Woodburning pens are hot and dangerous tools.

4. Add Numbers at each of the foot markers on the height Chart:
- Place numbers on the height chart at each foot marker.
- They can sit upright or on their right or left sides going up the board, as shown in the photograph above.
- There are a few simple ways to put numbers on the height chart. Use one of the following techniques:
- Use a pencil and a number stencil to trace the outline of each number at the foot markers on the height chart.
- Next, make the numbers permanent by using a wood burner or a paint pen to outline and fill in or color the numbers created with the pencil and stencil.
- Alternatively, attach vinyl numbers or number stickers at each foot mark on the board to complete this step.
- Use a pencil and a number stencil to trace the outline of each number at the foot markers on the height chart.
5. Add Child’s Name (optional):
- Consider adding a child’s first name to the DIY height chart.
- Make one for each kid in your family!
- Alternatively, you can add the family’s last name to the height measurement chart to measure multiple children in a household.
- To add a first or last name to the growth chart, use a stencil with the alphabet, a wood-burning tool, a paint pen, vinyl letters, or letter stickers to complete this step.
- Choose the same method you used to add the numbers on the board.
- Alternatively, you can use a pencil, followed by a paint pen or a wood-burning pencil, to hand-letter the name.
- Put the first or last name at the top of the DIY height chart, or along the side opposite the numbers and measurement marks.
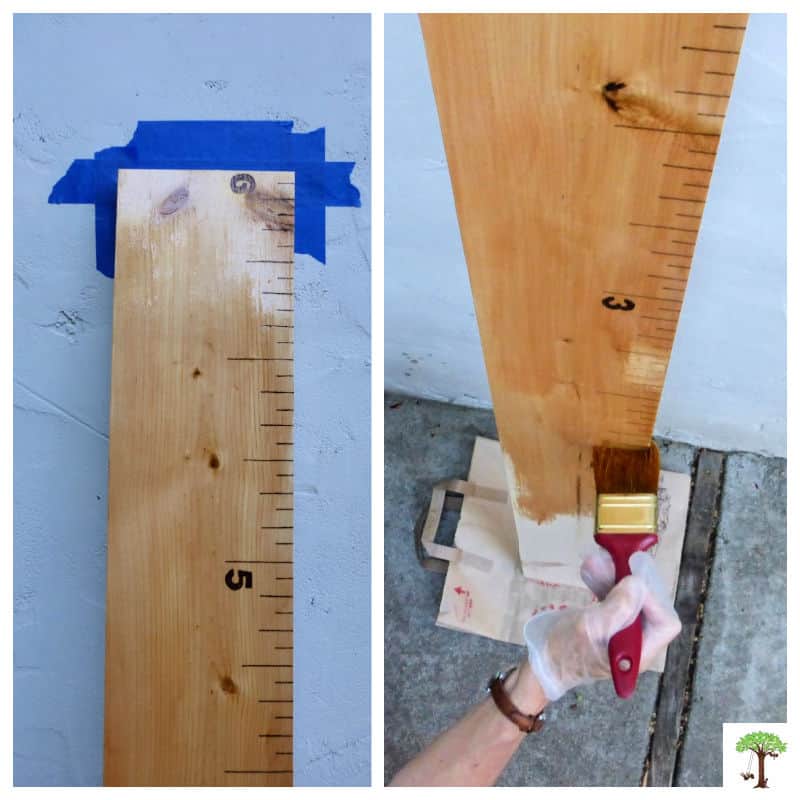
6. Stain, seal, and protect wood:
- Choose one of the options below:
- If you choose to apply a wood stain in step 1, apply a wood conditioner:
- Use a soft rag to apply the linseed oil and beeswax wood finish, sealing and protecting the wood during this step in the process.
- If not, apply one-step polyurethane stain and sealer, or wood stain, with a paintbrush or foam brush, if desired.
- Apply more than one coat if needed or desired, and allow each coat to dry.
- If you choose to apply the water-based wood stain, use a soft rag to apply linseed oil and beeswax wood finish to seal and protect the wood after the wood stain is completely dry.
- Alternatively, you can use a soft rag to apply linseed oil and beeswax to complete this step without first applying a wood stain.
- If you choose to apply a wood stain in step 1, apply a wood conditioner:
- I used an oil-based one-step stain and polyurethane with a golden oak finish to seal and protect the growth chart in the photographs because we had some leftover from a pantry shelf my husband built.
- There are several ways you can complete this step. Here’s how I did it, as shown in the photo below:
- I leaned the board against a wall outdoors and placed a large recycled paper bag on the ground beneath it as a drop cloth to catch drips.
- Next, I applied several pieces of painter’s tape to the wall where the board’s top edge touched it to protect the wall.
- Then I applied the polyurethane to the entire surface (front and back) with a paintbrush, using long, up-and-down “paint the fence” strokes. A foam brush also works well to complete this step.
- Allow it to dry completely before moving on to the next step.
7. Add Pre-Recorded Kid’s Height Measurements (If You Have Any):
- Use a Sharpie or another permanent marker to add any pre-recorded kids’ measurements to the wooden growth chart.
- For example, add your baby’s length at birth and the length of your baby (or babies) from their wellness checks or other doctor visits.
- Also, add any heights you have recorded elsewhere, such as in a baby book, on a previous growth chart, medical or school records, etc.
- Place the recording date, the child’s age, or both near the mark.
- If the kids’ growth chart is to be used for multiple children, ensure the child’s name or initials are added next to the date and/or age at the time of the height recording.
- Instructions for accurately measuring and recording the height of your growing children are provided below.
8. Hang, sell, or give the homemade growth chart as a gift:
- A handmade wooden height measurement chart makes a beautiful piece of home decor and a meaningful gift for families with young growing children.
- They are also a lovely homemade gift for grandparents that includes measurement marks of their grandchildren at the time of giving (and before).
- If you choose to sell them or give them as a gift, please let them know that you learned how to make a wooden growth chart on Rhythms of Play.
- Learn how to hang a wooden growth chart and use it to measure and record children’s growth with the step-by-step instructions in the following sections:

How to Hang a Wooden Growth Measurement Chart:
The following is a step-by-step tutorial for hanging a wooden height chart on a wall so that it is secure, level, and aligned with floor-height measurements. In other words, the one-foot mark on the chart will be one foot above the floor, providing an accurate way to measure and record the height of a growing child. Use the supplies and instructions below to stick a height chart to a wall in your home or school.
Tools and Materials Needed to Hang Height Measurement Chart:
- Drill and drill bits
- Wall anchors and screws:
- For drywall, use toggle bolts or drywall anchors.
- For wood or studs, use wood screws.
- Screwdriver
- Stud finder (optional but recommended)
- Level
- Tape measure
- Pencil
- D-rings (hanging hardware):
- Painter’s tape (optional)
Step-by-Step Wooden Growth Chart Hanging Instructions:
Follow the step-by-step instructions below to hang a wooden height chart on the wall:
1. Determine wall placement:
- Measure 6 inches from the floor.
- Use a pencil to make a small tick mark 6 inches from the floor.
- This will ensure that the numbers on the growth chart match the actual height above the floor, creating an accurate height-measurement tool.
2. Mark the top position:
- If the growth chart is 6 feet tall, measure 6 feet up from the 6-inch mark.
- Use a pencil to add another tick mark at that location to indicate the board’s top position. This is where the chart’s top will be placed.
- Use a level to ensure the top and bottom marks are vertically aligned.
3. Attach hanging hardware to the growth chart:
- Install D-rings 1/2 to 2 inches from the top of the growth chart on the back of the board, with one on each side, equidistant from the edges.
- Measure the distance between them to know where to place the wall screws in the next step.
4. Prepare the wall:
- Using the pencil marks for the top and bottom placement made in step 1, hold the growth chart up or use painter’s tape to simulate its final wall position.
- Use the D-ring distance to mark where the screws will go on the wall at the top level height.
- Use a stud finder to check for studs.
- If you hit a stud, use screws.
- If not, install drywall anchors or toggle bolts to ensure a secure mount.
5. Install screws:
- Drill pilot holes at your screw marks.
- Insert drywall anchors or toggle bolts if necessary.
- Drive in screws, leaving about 1/4 inch sticking out so the D-rings can hook on to hang the growth chart.
6. Hang the growth Measurement chart:
- Hang the chart by aligning the D-rings onto the screws.
- Use a level to ensure that it is hung perfectly straight.
- Measure from the floor to verify alignment, ensuring it is 6 inches from the floor.
- Also, measure to ensure the numbered foot marks on the growth chart are accurate.
7. Add an anchor at the bottom for stability (optional):
- If you want the growth chart to hang more securely, use a small command strip, a Velcro dot, or screws to add a bracket at the bottom of the board so it remains flat against the wall.
8. Clean up:
- Erase any visible pencil marks.
- Gently press the board to the wall to ensure it is secure.
- Start marking those heights as children grow into maturity, following the directions in the next section!

How to Accurately Measure and Record Height on a Growth Chart:
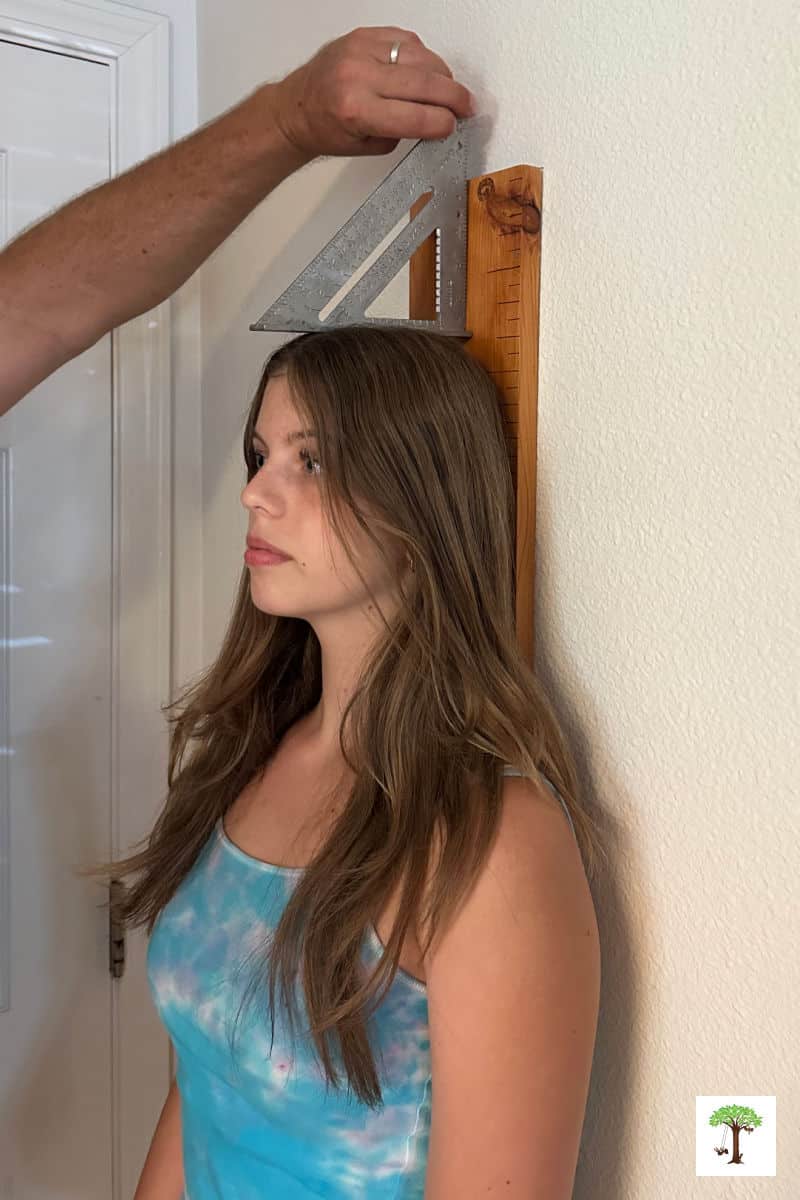
To accurately plot height on a growth chart, I recommend using a carpenter’s square and a permanent marker, as shown in the picture below of my husband measuring our daughter on her 13th birthday, under these step-by-step instructions. A carpenter’s square will produce a more accurate mark than a ruler on top of a child’s head because there is less room for error. Follow the steps below to measure children as they grow to maturity:
- Have the child stand with their heels against the baseboards (or bottom of the growth chart).
- Ask them to press their back and the back of their head firmly against the growth chart.
- Ensure the child is standing tall with shoulders back and their chin in a neutral position.
- In other words, no slouching.
- Place a carpenter’s square on the child’s head, with the wide edge resting on top of their head and the other side pressed against the growth chart.
- In other words, use the 90-degree angle provided by the carpenter’s square to measure the child’s height and ensure accuracy.
- Use a Sharpie or another permanent marker to draw a small tick mark to indicate their current height.
- Place the date when the mark was made next to it, or place the exact age of the child at the time the mark was made.
- Finally, add the child’s name near the mark and the date or age if the growth chart will be used to record the heights of more than one child.
Wooden Height Measurement Growth Chart DIY Home Decor Project:
This six-foot height measurement chart makes a beautiful display in any home. Handmade wooden growth charts are a fantastic family keepsake and gift for families with a new baby on the way or who have young children. This makes a growth chart an excellent DIY baby shower gift for a first-time pregnant mother. This DIY gift idea is also perfect for grandparents, as it allows them to record their grandchildren’s heights and names at the time of gifting (and earlier).
My husband and I receive endless compliments about our beautiful growth chart, and we bet you will, too! We didn’t expect our daughter to top six feet, but with how fast and tall she is growing, she just might — gulp! This is one of the primary reasons I updated this tutorial to help you make a growth chart that is 6 feet 6 inches tall, rather than only 6 feet.
You can see in the recent photos of the DIY growth chart that she reached five feet five and a half inches at only twelve years old. The good news is that we can create a new one that is even better than the first, and record her old marks, just in case she grows over six feet tall. You might also enjoy building an Outdoor Chalkboard, along with other DIY projects perfect for families with kids, listed below.
Learn more about Nell Regan Kartychok, creator, author, and photographer of this wooden growth chart DIY tutorial HERE, and Rhythms of Play HERE!
More DIY Projects for Families with Kids:
- DIY Building Blocks
- How to Make a Fairy Garden
- Best DIY Sandbox Ideas for Kids
- DIY Sand and Water Tables
- Tetris-Inspired Cube Puzzle
- DIY Waldorf Square Geometric Wooden Block Puzzle
- Homemade DIY Gifts Kids Can Make
- DIY Pallet Projects for the patio, porch, or backyard.
- Mud Kitchen and Art Table DIY
- How to Make Natural Cleaning Products


What a neat project!
Thanks — glad you like it 🙂
Oh my! I love this idea! Sadly we move often, and I’ve never been able to keep my children’s heights. I wish I had seen this idea many moons ago!
Love it, you did an awesome job!
Thanks, glad you like it. It’s never too late to make one 🙂
What a cute idea! Definitely making this when we have kids 🙂
Thanks! I hope you find it as enjoyable as we do 🙂
Just wanted to let you know that I’m featuring this at our weekly link party! http://www.thelifeofjenniferdawn.com/2015/05/a-little-bird-told-me-link-party-142.html
Thank you for featuring me at a little bird told me – and thank you for hosting such an awesome link party!
I love this site.
Hi Emma, I’m so glad you like this website. Thanks for letting me know, it makes it all worth the while. And let me know if there is a DIY project tutorial or craft you would like us to create.
What size stencils did you use for the numbering
Good question, Kim. I used one inch number stencils. Two inch would also work, but it would create a slightly different design aesthetic. Choose your favorite look and go for it. Thanks for alerting me of the need to include information about stencil sizing. I will update this tutorial soon to include that information, because I’m sure it would help others. I hope you enjoy crafting a DIY growth chart.