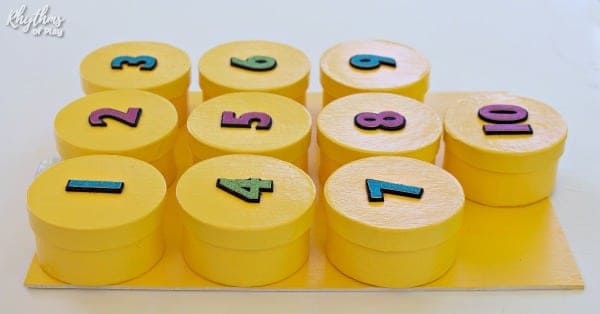
A 10-day countdown calendar for kids can be used to ease big transitions or just for fun. You can use this easy DIY countdown calendar to count down to almost anything; a family vacation, summer camp, going to visit relatives, back to school, a big move, a birthday, any holiday, a performance, weaning a toddler, or anything else you can think of!
If you have a spirited child like mine that has difficulty with transitions this can be a lifesaver.
I originally made this to help wean my daughter from breastfeeding, but it can be used to prepare for many different types of adventures and events in the same way an advent calendar can be used to countdown to Christmas.
Related: 15 Ways to Raise a Helper

Related: Books That Teach Kids Important Life Lessons
How to Make a 10-Day Countdown Calendar for Kids
Please read through the entire directions to make this DIY countdown calendar before starting to make it. The steps follow a specific order to make it quick and easy to put together.
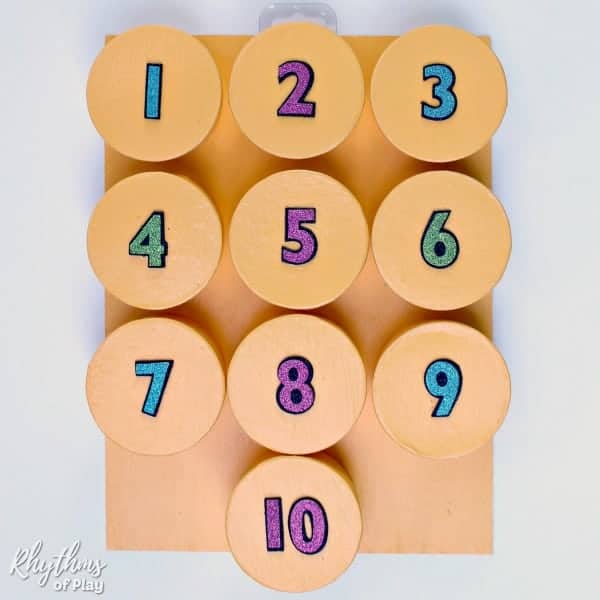
The countdown calendar pictured is a little misleading because it is actually counting up. I did not want to confuse my toddler that was just learning how to count, so I decided to start this countdown calendar with the number 1. Feel free to countdown starting with number 10 in the top right corner if you prefer.
Related: DIY Outdoor Chalkboard
DIY Countdown Calendar Supply List:
- Acrylic paint

- Mod Podge with a foam brush
- Paintbrushes
- Raised foam stickers OR number stickers OR number stickers OR number stencil
- 3-inch round paper mache boxes (We have also used these boxes to make our nature memory matching game and color matching boxes for our DIY rainbow peg dolls handmade toy for kids.)
- 9 X 12 wall plaque or thick recycled cardboard cut to size


 OR
OR 
 (We have also used these boxes to make our
 Related: How to Paint Rocks: Rock Painting Ideas for Kids
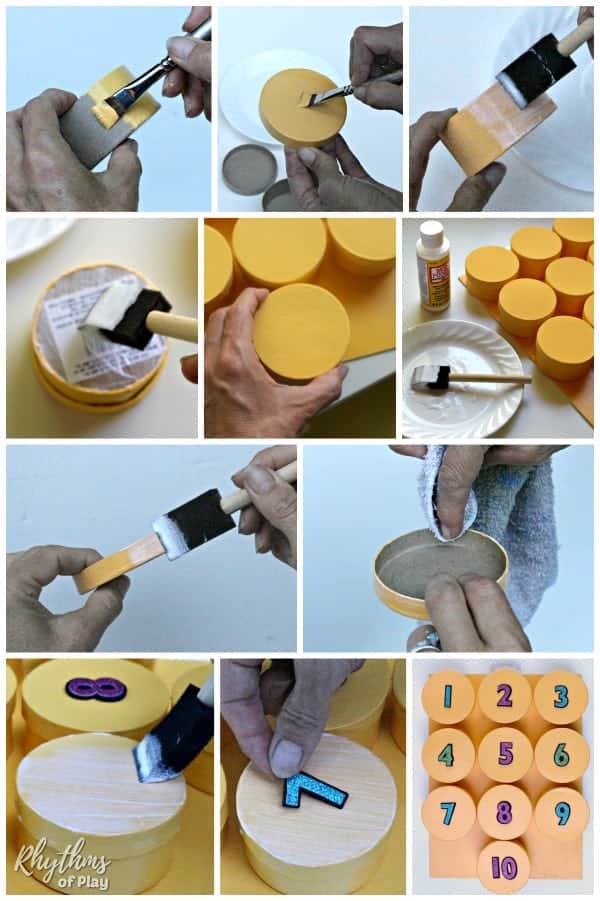
DIY Countdown Calendar Step by Step Tutorial
Step 1 – Paint the paper mache boxes and the wall plaque (or recycled cardboard)
- (Optional) If you are using recycled cardboard to make your wall plaque, cut out a 9 X 12 piece of cardboard.
- Use a paintbrush to paint the round paper mache boxes, the box lids, and the wall plaque in the color(s) of your choice.
- Optional – Paint the inside of boxes.
- Allow time for the paint to dry.
Step 2 – Apply Mod Podge with a foam brush to the sides of the boxes
- Use a foam brush to apply Mod Podge to the sides of the bases of the box only.
- Do not apply Mod Podge to the lids or the bottoms of the boxes yet.
- Work quickly it gets tacky.
- Allow time to dry.
 to the sides of the bases of the box only.
Step 3 – Mod Podge the plaque and the bottoms of the boxes and stick the boxes to the plaque
- Mod Podge is a waterbased glue and sealer so it is perfect for this project.
- Place un-Mod Podged lids on boxes to make sure that the boxes are spaced enough when you glue them down.
- Use a foam brush to paint the plaque with Mod Podge.
- Paint the bottom of each box and immediately place into position on the plaque to glue it down.
Step 4 – Apply numbers and seal lids of boxes
There are three ways to place numbers onto the lids of the countdown calendar boxes; raised foam number stickers, regular stickers, or a number stencil.
How to apply raised foam stickers to finish the countdown calendar boxes:
- Use a foam brush to apply Mod Podge around the edge and to the top of each lid.
- Rub off the excess glue on the inside of each lid with a rag.
- Stick the raised foam number sticker on top while the Mod Podge is still wet. Since Mod Podge is a glue and sealer it will both help the sticker adhere to the box and seal the lid to protect it.
- Repeat until all lids have been painted and numbers have been placed.
- Allow DIY countdown calendar to dry.
How to apply regular number stickers to finish DIY countdown calendar boxes:
- Peel and stick number stickers 1 through 10 on to the top of each lid.
- Use a foam brush to apply Mod Podge to the top and edges of each lid to seal and protect the stickers and the lid.
- Rub off the excess glue on the inside of each lid with a rag.
- Allow 10-day countdown calendar to dry.
 1 through 10 on to the top of each lid.
How to use a stencil to apply numbers to lids of countdown calendar:
- Use a number stencil and a stencil brush to apply acrylic paint over the proper number for each box.
- Apply Mod Podge with a foam brush to the top and edges of each lid to seal and protect the stickers and the lid.
- Use a rag to rub the excess glue off of the inside of each lid.
- Allow countdown calendar to dry.
 and a
and a  to apply
  over the proper number for each box.
Related: Simple Stone Advent Calendar
How to Use A Countdown Calendar
I originally designed this 10-day countdown calendar to help wean my toddler from breastfeeding, but we have since used it to count down to many different adventures and transitions.
A DIY countdown calendar is a fantastic tool to use to prepare children for big events such as family vacations, visiting relatives, holidays, a birthday, a big move, the last day of school (or the first day of summer), and even use it get ready to go back to school.
If you are tired of hearing questions like, “How many days until the end of school?,” ” When are we going to Disneyland?,” or “How many more days until Halloween?” a countdown calendar is the tool for you!
How do you use a countdown calendar?
- Begin your countdown 10 days from the event. (You can use it twice to double it for 20 days, or use it for as few as 3 or even 1 day!)
- Start the countdown on either the number 1 or the number 10–design your calendar to match the way you would prefer to countdown. This calendar is made to countdown for 10 days, but you can choose to design it for as many days as you would like to countdown.
- Place stickers, toys, treats or just a simple note inside sharing something about the adventures or event to come.
- When you get to the last day of the countdown is the BIG day; a family trip, performance, test, try-out, championship, big game, sporting event, birthday, Easter, summer camp, back to school, Halloween, or make a DIY advent calendar 24 days long to countdown to Christmas!
More ways to use these round paper mache boxes is by making a nature memory game, or boxes for DIY rainbow peg dolls to play matching games with.
Don’t forget to pop over to have a look at our seasonal and holiday family guide for all of our bucket lists and holiday ideas!
Learn More about Rhythms of Play HERE!


I love that this is for short term random counting down. Very good idea!
My daughter has difficulty with transitions so I made this to help when we have a big change looming. I hope it can help you too.
Loved the idea!
Can you elaborate or assist with an idea for a countdown calendar for kids in quarantine?
Hi Einat,
Thank you for the lovely request. I will see what I can do and get back to you.
Thanks,
Nell