
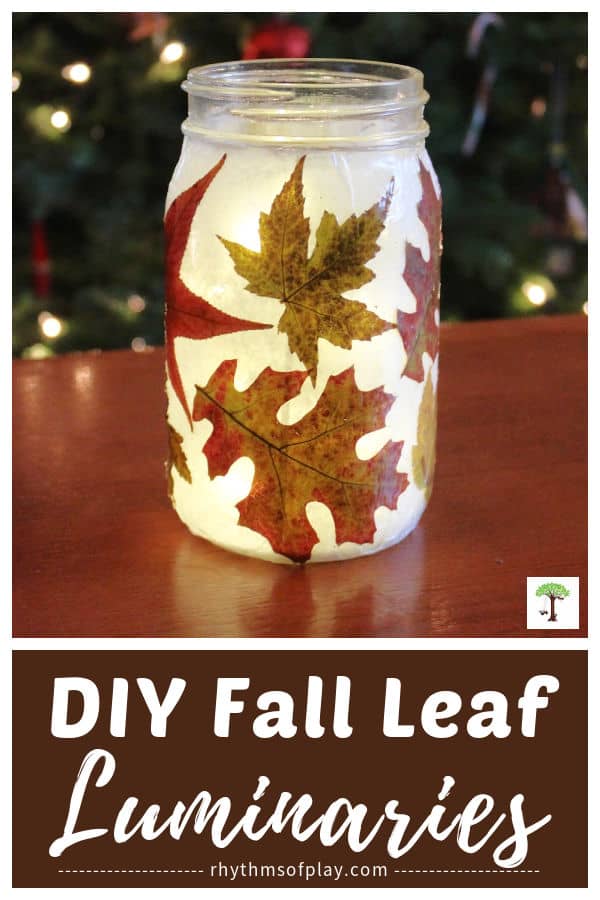
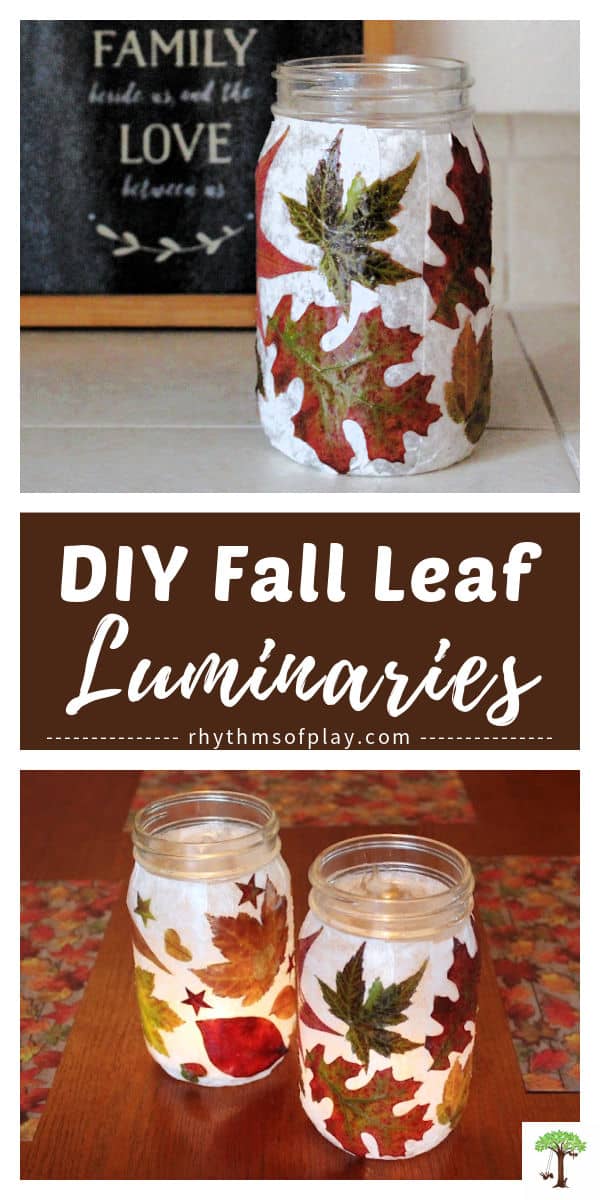
Discover how to make leaf lanterns and luminary crafts using natural, fresh, or faux fabric fall leaves and canning (or mason) jars, with simple step-by-step instructions and video tutorial below!
Learn how to make a gorgeous fall leaf lantern or autumn luminary with this DIY craft tutorial, complete with a step-by-step video tutorial. As nature lovers, my daughter and I enjoy creating leaf lanterns and luminaries with freshly fallen real leaves that we find on our daily excursions into the natural world. But artificial fabric leaves can also be used to make these DIY mason jar lanterns. Alternatively, you can create a fall leaf lantern craft featuring a cute turkey in the center to add to your Thanksgiving decorations. Or cut leaves (or paper) into heart shapes to make autumn leaf luminaries that add light to your hearts and homes during the dark days of late autumn and early winter.
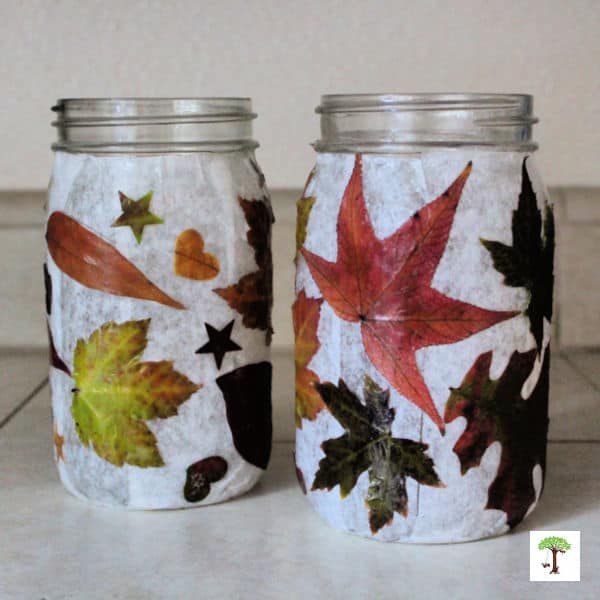
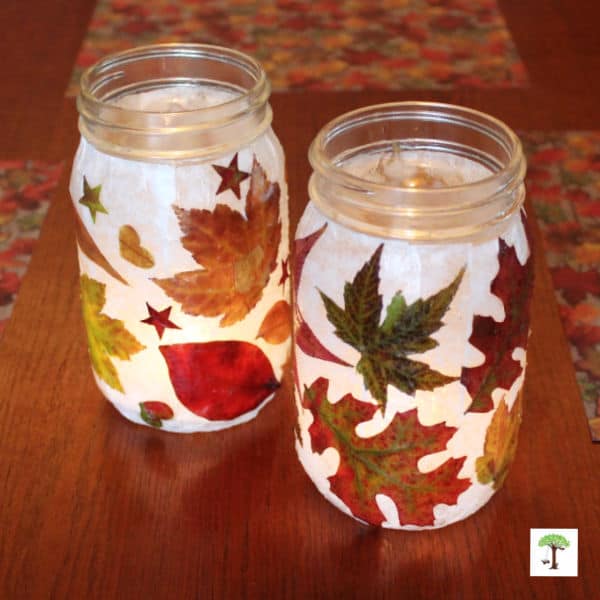
In the photo below, you can see that my daughter used natural leaves and leaves cut into star and heart shapes to create her DIY lantern on the left, while I kept my leaves whole to make the leaf jar on the right. Scroll down for the step-by-step instructions and video tutorial to learn how to make these easy leaf lanterns. For more fall leaf craft ideas, look at this list of nature craft ideas made with leaves and other natural materials from Mother Nature’s bounty.
First published on November 16, 2022, this fall craft is regularly updated to enhance its content. Update 2025: My family retreives our DIY leaf lanterns out of storage every autumn to use, although the colors of the leaves have faded a bit from sitting in the light of a candle flame over the years, the leaves are preserved and still look just as beautiful as the day we made them. You might also enjoy learning the best methods for preserving leaves.

Easy Fall Leaf Lantern Craft
Creating fall leaf lantern crafts is a creative way to celebrate the beauty of autumn. Mason jar lanterns covered with colorful autumn leaves add a lovely seasonal touch to your home decor. Place a small tealight candle, fairy lights, or flameless LED candle inside each leaf jar, and the light will gently illuminate the colors and patterns of the fall leaves, creating a stunning natural stained glass effect.
You can arrange these fall crafts on a windowsill, use them as a centerpiece for your autumn table, set them on your porch for a cozy glow, or add a handle to hang or carry them along with you on a lantern walk. Beyond decoration, fall leaf lanterns are also a festive autumn-themed craft to make with kids or friends during a fall gathering.
They can be used as Thanksgiving table centerpieces, Halloween decor, or bring a bit of the outdoors inside during the cooler months. A homemade leaf jar without a candle can be used as a thankful or gratitude jar. Please write down what you are grateful for on small pieces of paper and then drop them into the jar. Take them out to read everyone’s thankful thoughts at the dinner table for Thanksgiving or anytime during the holiday season. You might also enjoy these Thanksgiving gratitude activities and crafts.
Whether you’re crafting for fun, as a gift, or to set the mood for autumn evenings and family dinners, these DIY lanterns offer a charming way to make the most of this beautiful season. Please read the directions and watch the video tutorial below before starting this DIY project so you know the steps involved and understand what to expect. The leaf lantern video tutorial is below the written step-by-step instructions. You might also enjoy fall leaf watercolor painting.
How to make a Leaf Lantern:
If you are wondering how to make a DIY lantern at home, you’ve come to the right spot. This tutorial shares how to make leaf lanterns and luminaries with gorgeous, fresh, fallen autumn leaves or faux fabric leaves — a DIY project suitable for both kids and adults. As the leaves turn rich shades of red, orange, and gold, gather a collection of freshly fallen leaves that are still soft and pliable. These recently fallen leaves are ideal for crafting, as brittle leaves tend to fall apart.
Once you’ve gathered leaves, clean and press them so they are slightly flattened. Next, add strips of white tissue paper to decorate glass jars or votives with a thin coat of Mod Podge or another clear-drying glue. Then, glue the autumn leaves on top of the tissue paper layer. The result is a warm, glowing lantern that captures the spirit of fall. Gather the recommended supplies below, then scroll down for the complete step-by-step instructions to make DIY leaf lantern crafts.
Leaf Lantern Craft Supply List:
- Freshly fallen or fabric autumn leaves
- Leaf press or paper and heavy books
- Wide-mouth mason or canning jars (32-ounce shown in photographs)
- Tissue paper: white or colored
- Scissors
- Mod Podge or slightly watered-down white glue, such as Elmer’s glue
- Foam brush
- Beeswax tealight or votive candles, flameless candles, or fairy lights
- Wire hanger or handle for wide-mouth mason jars (optional)
DIY Fall Leaf Lantern Step-By-Step Instructions:
Impress neighbors, family, and friends with DIY lanterns crafted from natural, fresh-fallen autumn leaves. Alternatively, you can make a handmade leaf lantern craft with a turkey or hearts. (Visit the tutorials to make turkey or heart mason jar lanterns if desired.)
Use the easy step-by-step instructions below to make leaf luminaries for your fall lantern walk, autumn DIY home decor, a fall wedding, or to add to your festive holiday decor for Halloween, Thanksgiving, the winter solstice, or Christmas.
1. Collect fresh fall or faux autumn leaves:
- Encourage kids or adults to go outside to look for beautiful, fresh, fallen autumn leaves.
- Or purchase faux silk fall leaves to make leaf lanterns.
- You can use any remaining fall leaves to make other arts and crafts, such as Leaf crowns, watercolor art, sewing cards, and more!
2. Clean and press leaves:
- Clean and press fall leaves before using them to make leaf lantern crafts, following the steps below.
- Rinse autumn leaves with water and wash with a small amount of dish soap to ensure they are clean and free of dirt and other debris.
- Gently pat dry with a towel.
- Use a leaf press to flatten leaves gently OR:
- Place several leaves between paper or paper towels to absorb any excess moisture.
- Place a large, heavy book or another heavy, flat object on top of the paper and leaves to flatten or press them.
- Allow leaves to dry for several hours before using them to create leaf luminary crafts.
- Learn more about pressing and preserving leaves–>HERE.
3. Wash and Dry a Mason Jar, Votive, or Bottle:
- Thoroughly wash and dry a mason jar, votive, or a heat-resistant (tempered) glass bottle from the recycling bin to ensure it is free of dust and debris.
- Ensure that the jar, votive, or bottle is large enough to display the autumn leaves you want to use.
- I don’t recommend using a bottle or jar that is not heat-resistant if you plan to put a candle inside, as it can shatter and break.
- I recommend using a wide-mouth jar that you can fit your hand inside.
- This will make the lantern easier to assemble, as well as facilitate the insertion or removal of a candle.
4. Cut strips of tissue paper:
- Cut white tissue paper (think gift wrapping, not toilet tissue) into 1-1/2-inch to 2-inch strips.
- These tissue paper strips should be approximately 2-3 inches longer than the mason or canning jar you are using to make the lanterns.
- The pieces of tissue paper need to be long enough to wrap around the bottom of the canning jar and extend just past the center of its base.
- Tissue paper provides a slightly opaque cover that improves the dimension and contrast of the lantern, making the fall leaves stand out in a way not possible without it. It also gives the lantern a subtle glow, especially when lit.
- Mason jar leaf lanterns don’t look as beautiful without the tissue paper underneath the leaves, so I don’t advise skipping this step or gluing the leaves directly to the glass.
- The tissue paper covering the glass jar also helps to protect it and prevent the glass from shattering or breaking if the jar accidentally falls or is dropped.
- One of our heart leaf lanterns fell on the tile several years after my daughter and I made it, but because the glass was covered with tissue paper, I was able to repair it, and we still use it today!
5. Brush glue onto a mason or canning jar:
- Pour glue into a clean, reusable container with a lid.
- Recycled sour cream, cottage cheese, yogurt, and whipped cream cheese containers work great for this purpose.
- Mix the glue with a small amount of water to thin it if needed.
- I used Mod Podge to make the lanterns in the photographs, and did not add water.
- Place your non-dominant hand inside the jar to hold it.
- Use a foam brush (or a glue brush) to apply white glue to the mason jar in long, brushstrokes, from just below the threads of the canning jar to the bottom of the jar, as shown in the video tutorial below.
- I don’t recommend using a real paintbrush unless you plan to turn it into a glue brush. Paintbrushes can become damaged when used with glue.
- Ensure that the bottom of the glass jar is also covered in glue.
6. Lay the strips of tissue paper on top of the glue and wrap them around the bottom of the jar:
- Carefully lay each strip of tissue paper into the glue on the jar, starting just under the threads of the mason jar.
- Wrap each strip around the bottom and cover it with more glue, as shown in the photo collage tutorial and step-by-step video below.
- Lay the next strip of tissue paper right next to the last, slightly overlapping the strips to ensure no light shows through.
- Repeat this process until the entire jar is covered with thin strips of tissue paper wrapped around the bottom and secured with glue, as shown in the video tutorial below.
7. Gently brush glue on top of the tissue paper strips that cover the jar:
- Brush glue on top of the tissue paper strips that cover the jar to ensure the entire jar is covered.
- Refer to the photo tutorial below to gain a better understanding of how to complete each step so far. Alternatively, scroll down to watch the DIY lantern video, which is posted below the remaining written instructions.
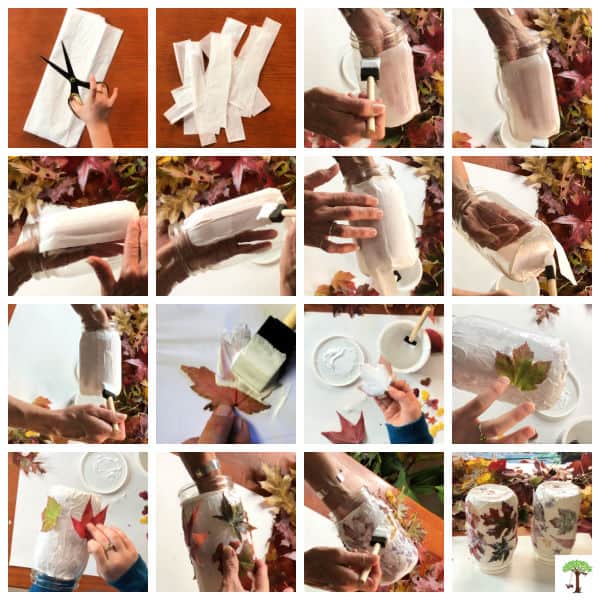
8. Arrange and glue fall leaves onto the mason jar:
- Gently arrange each leaf onto the mason jar and secure it in place with glue.
- Some leaves can be applied to the jar without adding extra glue, while others are easier to attach to the canning jar when the glue is brushed onto the bottom of the leaf before placing it onto the jar.
- If you would like to cut leaves into hearts and stars as my daughter did, use the directions HERE.
9. Ensure each leaf is covered with glue:
- Apply glue on top of and under each leaf to seal, protect, and ensure they are securely in place.
10. Place the leaf lantern Craft upside down to dry:
- Carefully remove your hand from the mason jar and place it upside down to dry.
- Check on the fall leaf luminary periodically as it dries, gently pressing the leaves back into the glue on the mason jar and smoothing out any air bubbles.
11. (Optional) Add a hanger or handle to the leaf lantern craft:
- Once the glue is completely dry, you can add an optional hanger or handle to it if desired.
- A handle makes it easy to hang your autumn lanterns, both indoors and outdoors.
- Adding a hanger or handle also makes it easy to hang or hold if you take it with you on a fall lantern walk or Advent spiral walk.
- If you’d like to add an optional handle to the top of your fairy jar under the threads, choose one of the following options:
- Add a stainless steel mason jar handle to the top of the leaf luminary.
- Wrap and tie a string (such as twine) around the top and tie it in two places on either side of the jar to create a simple handle.
- Brush glue onto the jar where you intend to wrap the twine before starting to help secure it in place.
- Fingerknit a strand of yarn to make into a handle for the lantern.
- Wrap it around the jar and tie it tightly in place.
- Tie the remaining long end of the fingerknit strand of yarn on the opposite side to create the handle.
12. Put a candle or fairy lights in the mason jar lantern to add a subtle glow:
- Add a beautiful glow to the leaf lantern by placing a candle or small light string inside. Choose one of the following options:
- Beeswax tealight
- Votive candle
- Flameless candle
- Fairy lights.
- If you use a real candle, consider adding a bit of sand to the bottom of the leaf lantern before placing it inside for added safety and to make cleaning the jar easier.
- I recommend using natural beeswax candles in leaf lanterns to enhance your DIY home decor, and flameless candles or fairy string lights to hang, hold, or walk with, as they are less hazardous, help prevent accidents, and are less hot to hold than candles with a flame.
- Either option makes leaf luminaries look simply divine!
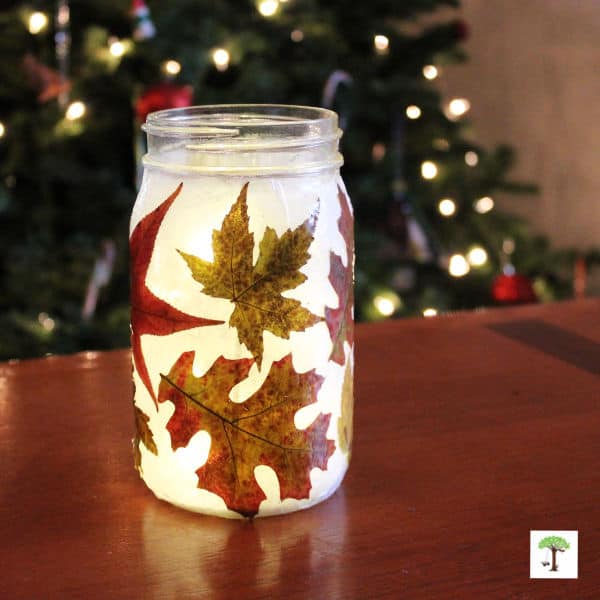
- The photograph below features a DIY lantern with fairy lights inside. Doesn’t it glow magically?
DIY Leaf Lantern Video Tutorial:
Here’s the how-to video to help you understand how to make these easy leaf lanterns with natural autumn leaves. It is much easier to make autumn leaf lantern crafts with clean leaves. As stated in the instructions, I recommend cleaning, drying, and pressing fresh autumn leaves before beginning this DIY project. However, this essential first step is not shown in the video tutorial below. Watch the step-by-step instructional video below to learn how to make a DIY lantern as instructed in the written tutorial above.
DIY Fall Leaf Luminaries and Autumn Lanterns
Homemade leaf luminaries make festive decorations (beautiful when lit with a candle and unlit) when displayed as a centerpiece for a fall wedding, Thanksgiving, or even Christmas. These gorgeous fall crafts look lovely adorning shelves and in other locations, you might place a candle to light your way at night.
Homemade leaf lanterns also make gorgeous luminaries for a fall lantern walk or an Advent spiral walk for the winter solstice.
In addition to luminaries, a leaf jar also makes a great gratitude or thankful jar. Write down what you are grateful for on a small piece of paper, then fold it up and drop it into the jar. Take them out to read at the dinner table for a simple way to share your gratitude with family and friends. You might also enjoy these gratitude crafts and activities.
Autumn leaf luminaries are among my favorite things to make in the fall because they create festive holiday decor and make a lovely, handmade gift idea for the holiday season. Make one for the chef or chefs cooking your holiday meals to show your appreciation, or browse this list of homemade gifts kids can make for inspiration and additional DIY gift ideas.
Happy Fall Crafting!
I hope you and your little nature lovers enjoy making these fall crafts as much as my daughter and I do. Alternatively, you can use fall leaves to make DIY leaf lanterns with a turkey or hearts. Click the links to learn how!
Learn more about Nell Regan Kartychok, author, photographer, and creator of this original leaf lantern craft tutorial HERE, and Rhythms of Play HERE!
More Fall Leaf Crafts for Kids and Adults:
- Sewing with Fall Leaf Lacing Cards
- Leaf Baby Book Inspired Art Project
- Fall Leaves Watercolor Painting
- How to Make Marbled Clay Leaves
- Fall Leaf Crown Crafts


Can you do the tissue layer first and let it dry- to make this easier to do with younger kids?
Hi Rachel, great question. Yes, you can do the tissue layer first and let it dry before allowing children to glue the leaves to the jar. You can also apply more glue, or remove a little, as needed once the children are finished making their leaf lanterns. Happy leaf lantern crafting!