Use the easy step-by-step instructions below to make rustic DIY Baby Jesus Christmas ornaments to decorate your Christmas tree! (First published December 2, 2016; this post is updated and republished to improve the content.)
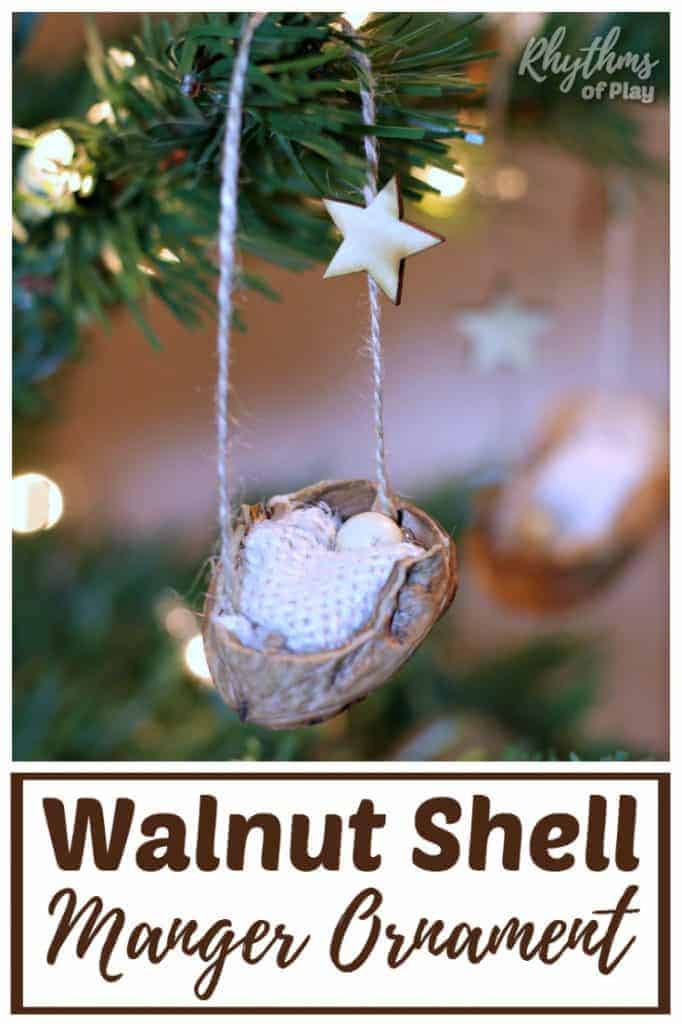
Make Baby Jesus ornament crafts in a half-walnut shell with this DIY walnut shell Christmas ornaments tutorial. Kids, teens, and adults can make this easy baby Jesus Christmas craft. Crafting a baby Jesus ornament in a half-walnut shell is a beautiful way to connect with the kids and share the story of Jesus’ Birth this holiday season. You might also enjoy this list of Christmas Traditions.
These gorgeous Baby Jesus ornament crafts make a unique gift idea for friends and family. Hang Baby Jesus Walnut shell ornaments on the Christmas tree, or make a homemade Baby Jesus ornament in a walnut shell to include in a nativity scene. For more homemade Christmas ornament ideas, look at this collection of DIY ornaments for kids or adults.
Homemade Baby Jesus Christmas Ornaments
Creating DIY Baby Jesus ornaments for Christmas is a charming and heartfelt way to add a personal touch to your holiday decorations. One popular use for these ornaments is decorations on a Christmas tree, which adds a unique and meaningful element to the twinkling lights and tinsel.
Additionally, these simple yet beautiful walnut shell ornaments can be designed to serve as Baby Jesus figurines in a Nativity Scene display, bringing a rustic homemade charm to this traditional representation of the Christmas story.
Whether hanging from the branches of your tree or gracing a Nativity Scene, these sweet homemade Baby Jesus ornaments offer an excellent opportunity to engage in a festive crafting activity while focusing on the spiritual essence of the holiday season.
The kid-made baby Jesus ornaments in a walnut shell shown in the photographs are inspired by the children’s book “Room for a Little One: A Christmas Tale.” There is just enough room in a half-walnut shell for a “little one.”

Related: 50 Fun Family Christmas Traditions for a Magical Holiday
How to Make Baby Jesus Christmas Ornaments in a Half-Walnut Shell
Baby Jesus Ornament crafts are a fun Christmas book activity for homeschoolers. Crafting a Baby Jesus ornament in a walnut shell is also a lovely Sunday School craft idea. You might enjoy making THIS popsicle stick nativity stable craft to go with it.
Toddlers, preschoolers, and kindergarteners will need assistance from a caregiver to make homemade walnut shell Christmas ornaments. However, older children and teens trusted to use a glue gun safely can complete this walnut nature craft project from start to finish with minimal assistance.
Related: Christmas Ornaments Kids Can Make
DIY Baby Jesus Christmas Ornament Craft Supplies
- Whole walnuts in shell or walnut shells
- Wooden beads or round wooden balls sized 10mm, 12mm, or 14mm (1/8, 1/4 to 1/2 inch). We used 12mm wooden beads to make the Baby Jesus crafts shown in the photographs, but a wooden bead or ball a little smaller or larger would also work.
- Walnut cracker
 with nut picks, flathead screwdriver, or butter knife
 - A scrap of ivory burlap or burlap by the yard
- Natural jute twine
- Wooden stars (3/4 to 1 inch or about 2 centimeters)
- Glue gun with glue sticks
 with nut picks, flathead
 or
or 
 (3/4 to 1 inch or about 2 centimeters)
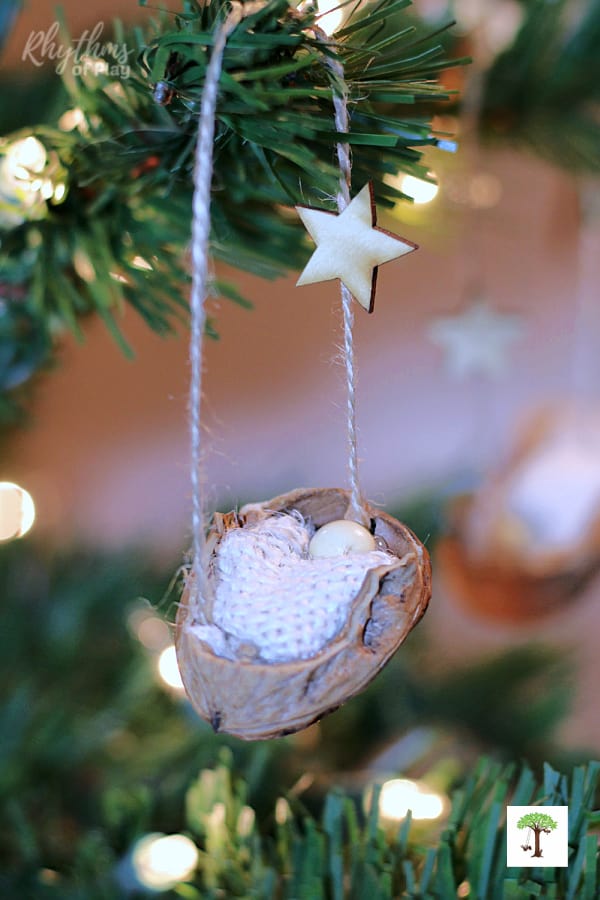
Baby Jesus Walnut Shell Christmas Ornaments Step-by-Step Directions
Please read through the step-by-step instructions below before making DIY Baby Jesus Ornaments, so you know the steps involved and what to expect. You might also enjoy making these beautiful angel ornaments or these gorgeous rustic acorn marble ornaments to hang on the Christmas tree along with them.
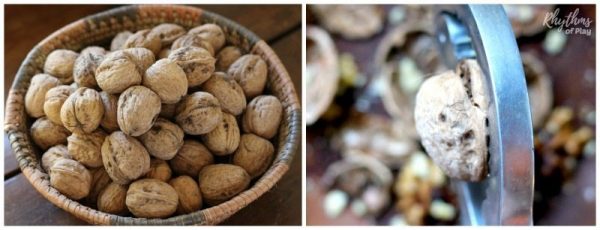
1. Crack walnuts for Baby Jesus walnut shell Christmas ornament crafts.
- My daughter loves cracking walnuts and eating them. So the first time we made homemade Baby Jesus ornaments, I put a bowl of walnuts in front of her with a walnut cracker we found at a thrift store and let her go for it. Once finished, she had a tummy full of walnuts, a pile of shells, and a handful of useable walnut shell halves. Not bad for a four-year-old! If you have enough walnuts, save a few just in case, and pass the walnut cracking off to the kids. It’s a fabulous hand-strengthening activity!
- Since then, we have learned the best way to crack open walnuts (so you have two useable halves) to make walnut shell ornaments (and other walnut crafts) without any broken shell waste. Learn how to crack walnuts perfectly for crafts with the step-by-step directions and video tutorial–>HERE. (A link in the post makes it easy to return to this Baby Jesus Christmas craft tutorial.)
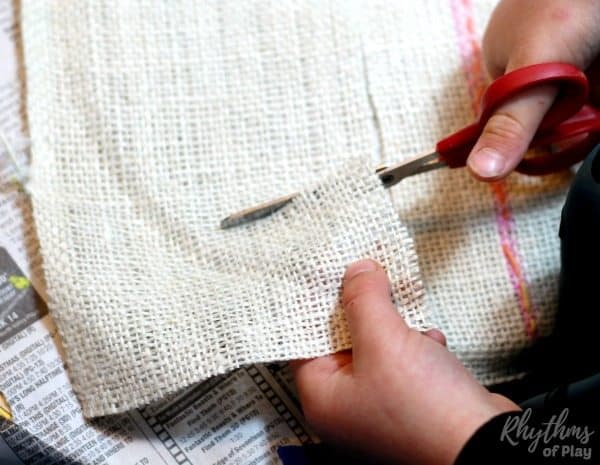
2. Cut small burlap squares for the Baby Jesus Christmas ornament crafts.
- Cut one small square of burlap for each DIY Baby Jesus Christmas ornament.
- You can see my daughter cutting a burlap square from scraps left over from a beginning sewing project in the photograph below.
3. Cut twine to make hangers for walnut shell Christmas ornament crafts.
- Cut jute twine into eight to twelve-inch sections to make hangers for the Baby Jesus walnut shell Christmas ornament crafts.
- Tie them together to make a loop, as shown in the photo craft tutorial below.
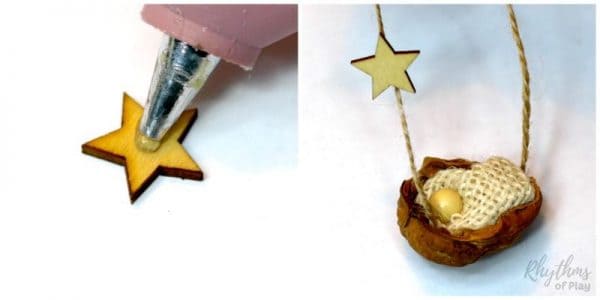
4. Glue twine, burlap, and a wooden bead or ball into each half-walnut shell.
- Place a twine loop into half a walnut shell, ensuring the knot is glued into the bottom, as shown in the photograph below.
- Prepare burlap square by folding all edges into the middle until you have a little wad of burlap to tuck into the walnut shell messy side down.
- Keep hold of your burlap as you fill the 1/2 walnut shell with a big dollop of glue right on top of the twine.
- Quickly tuck the burlap into the shell before the glue begins to dry.
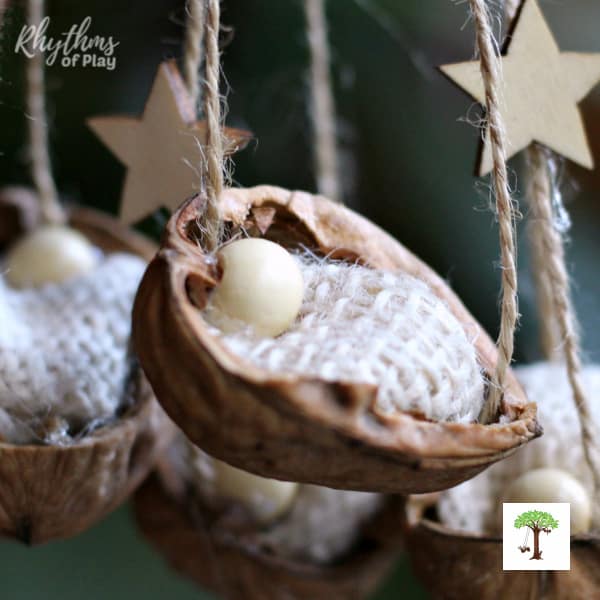
- Place another dollop of glue where you would like Baby Jesus’ head to rest, and quickly place the wooden bead into the glue before it dries.
- I helped by holding the walnut shell for my daughter, so it was easier for her to glue the twine, burlap, and bead into each Baby Jesus Ornament, as shown in the photograph DIY Baby Jesus ornament craft tutorial below.
- Safety note: Glue guns are hot and dangerous tools. Please ensure children are under direct supervision when a glue gun is plugged in and understand how to handle it safely before inviting them to help make DIY walnut shell Christmas ornaments.

5. Glue a star onto the twine hanger above Baby Jesus to finish the walnut shell Christmas crafts.
- Place a dollop of hot glue on a 3/4 to 1-inch wooden star and attach it to the twine approximately two inches above the head of baby Jesus in the half-walnut shell.
Related: Snowman Ornaments Kids Can Make
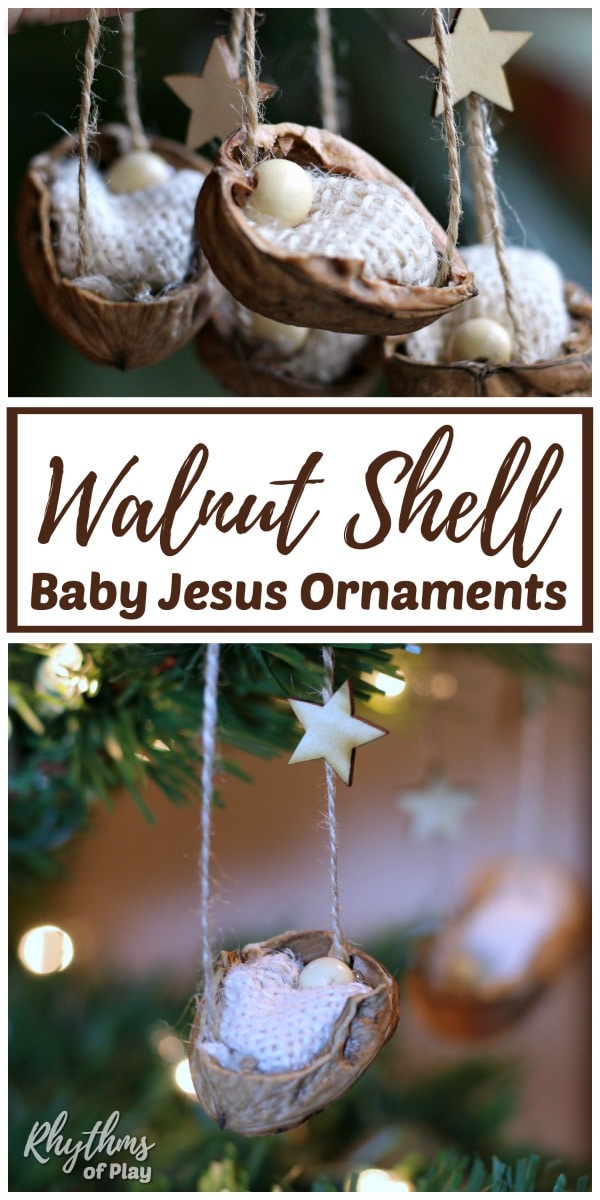
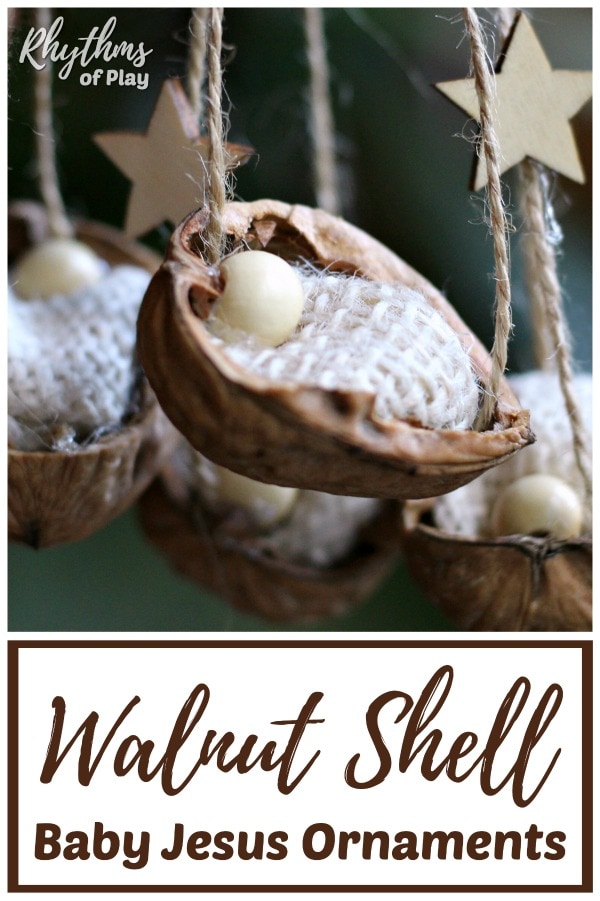
Handmade Walnut Shell Baby Jesus Christmas Ornament Crafts
Awww–aren’t our little walnut shell baby Jesus ornaments, darling? My daughter and I are in love with them! We decorated our Christmas tree by placing each homemade Baby Jesus Ornament next to our handmade wooden angel Christmas ornaments. When hung this way, the angel ornaments look like they are watching over the baby Jesus ornaments.
Handmade ornaments like this kid-made baby Jesus in the manger nature crafts are perfect for the Christmas tree. They make beautiful decorations and are a fabulous keepsake gift idea for moms, dads, and grandparents! You might also want to make a few of these DIY ornaments to hang on the Christmas tree along with them.
You can also use these Baby Jesus crafts in a Nativity Scene. Or, put together a simple stone advent calendar. And be sure to check out our gift guide with DIY and ready-made gift ideas for the whole family and meaningful Christmas traditions for a magical holiday.
Learn more about Rhythms of Play HERE!
If You Liked DIY Walnut Shell Christmas Ornament Crafts, You might also like:
- DIY Christmas Ornament Crafts for Kids and Adults
- Homemade Gifts Kids Can Make for Parents and Grandparents
- Elf Peg Doll Christmas Ornaments
- Ultimate Gift Guide for Kids
- Christmas Art Projects for Kids
- Homemade Christmas Card Ideas
- Fun Family Christmas Traditions


This is so sweet, and is bound to be one of your daughter’s favorite ornaments for the rest of her life. She’ll always remember making it with you!
I have no doubt that you are right. You should have seen the look in her eyes and smile on her face after she hung them on the tree. She sat there proudly staring at them for a long time, and I sat there proudly staring at her. It was a lovely moment.
This is so sweet!! I’d love to make these with my children
Thanks, Rachael! My daughter and I had a lovely time making them together.
Oh my! The walnut shell is heart shaped. How much more meaningful can it get? It’s way beyond cute. It’s heart wrenchingly appropriate.
Awww… thanks, Dineen! You officially just make my day 🙂 These little cuties are my favorite. They look so sweet with our peg doll angels hanging nearby.
when you need English walnut shells whole not cracked into bits. do NOT use a nutcracker of any kind! Instead you a flat headed strewdriver. insert the point of a flat headed screwdriver into the top of walnut and twist! you will get two half-shells both perfect! This is easier then cracking the shells . just a twist and it’s open. If you just want to eat the nuts inside . This is still the easier way to open English Walnuts. if you just want the nut inside
Oh my goodness Janet!! Thank you for the wonderful tip! I have always wondered the best way to open walnut shels to get useable halves. A flat head screwdriver sounds like it works brilliantly–thank you!!
What size wooden bead did you use for baby Jesus’ head? Also, what size wooden stat?
Hi Emily, great question. Although I have added links to the craft supplies needed to make these walnut shell Christmas ornaments, it would help to write down the sizes. Thanks for asking.
The wooden bead for the head can be between 10mm, as pictured, and 14mm. The wooden star is about 3/4 inch to 1 inch in diameter, but a little larger, or smaller, will work. Happy Christmas crafting!
Nell
i’m going to gold leaf my walnut!
Gold leafing the walnut sounds lovely, Evey! I’ll bed it turns out beautifully!
Loved this ornament and would love to give as gifts. My kids are grown but as a crafter, I am always looking for simple and inexpensive ways to share. You are awesome and I look forward to seeing more from you
Wow, thanks for the incredible compliment–I’m speechless with gratitude. We have lots of fun arts and crafts on Rhythms of Play and have plans to publish many more! Thanks for your vote of approval–Happy Crafting!