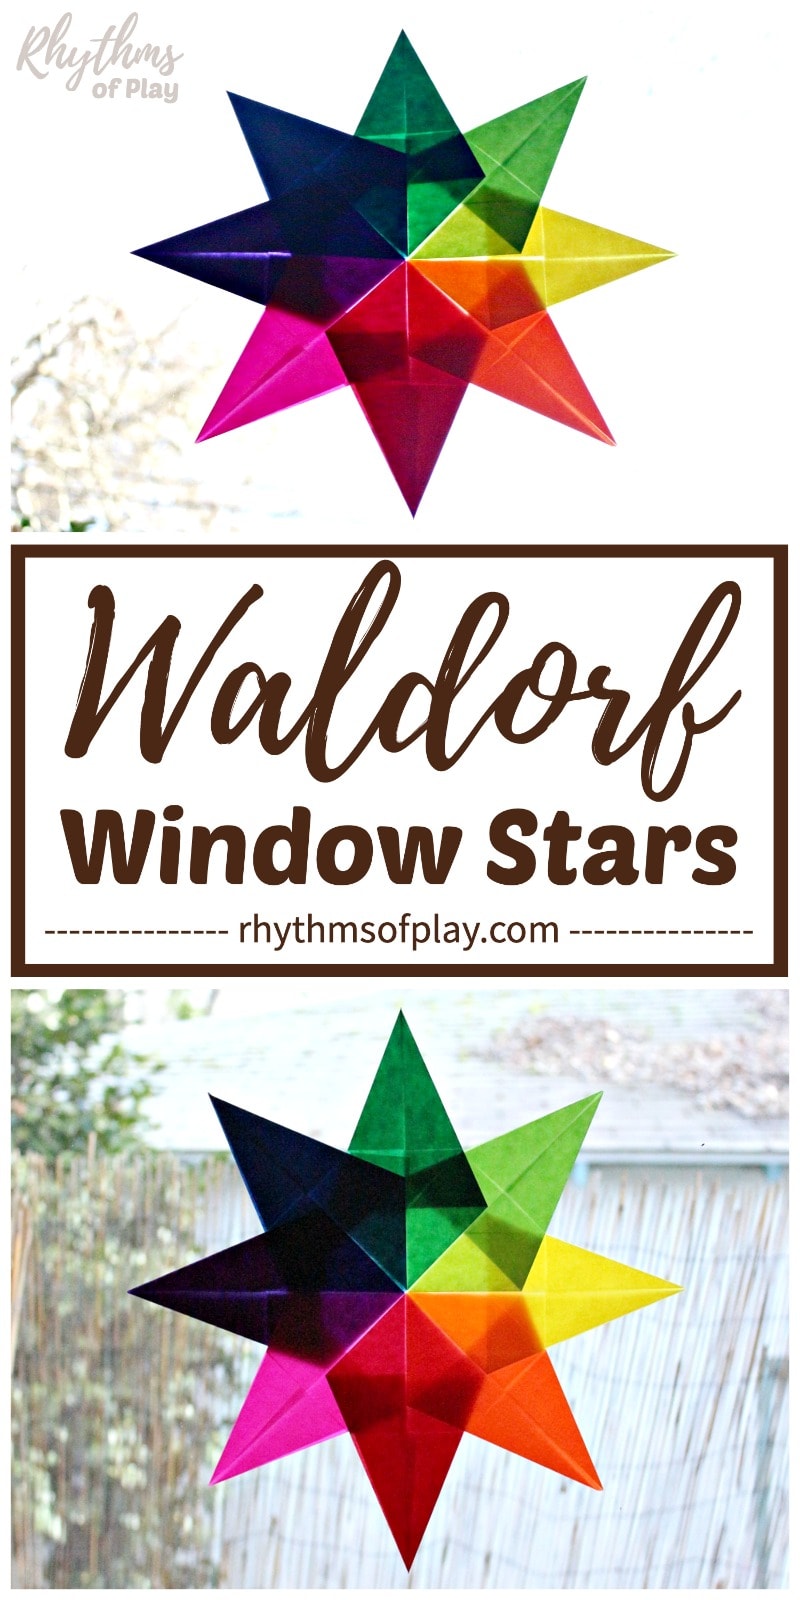
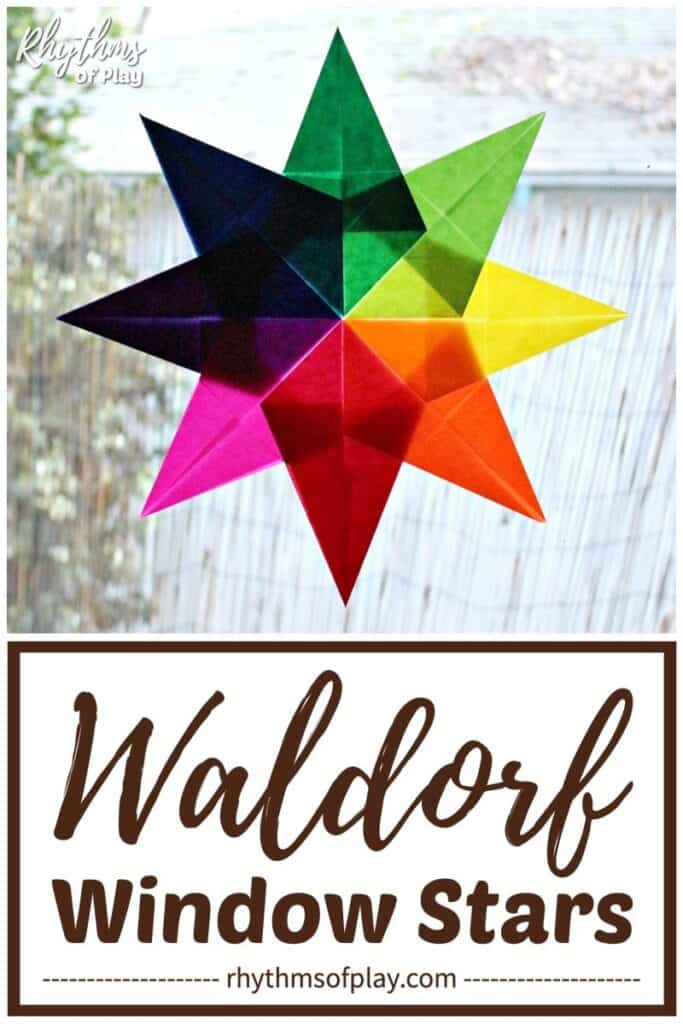
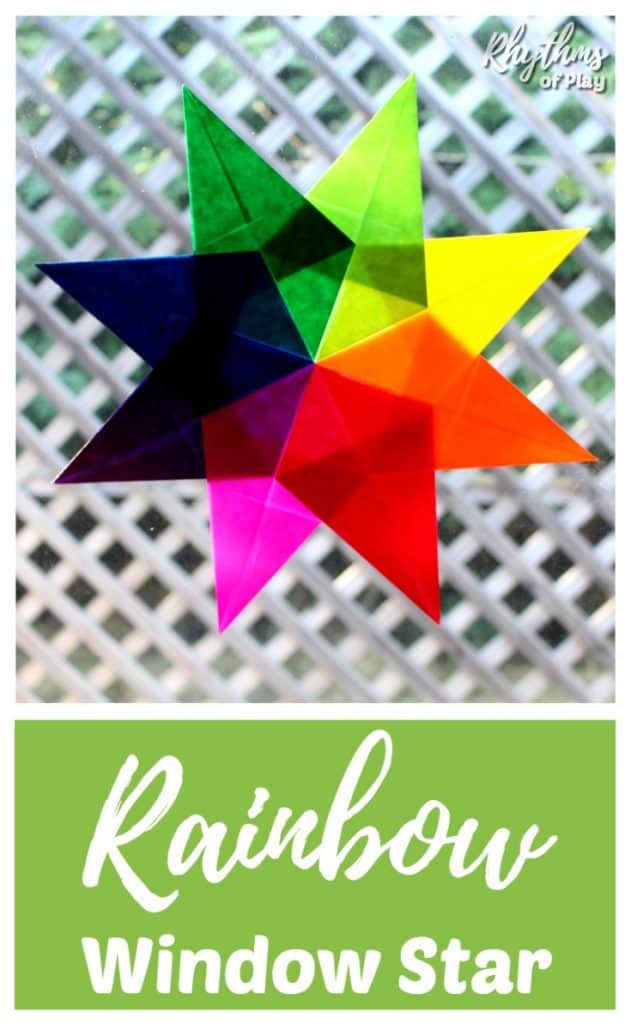
Learn how to make window stars in a rainbow of colors with these easy step-by-step Waldorf window star instructions, complete with a video tutorial. (First published February 16, 2016; this post is updated and republished to improve the content.)
Waldorf window stars are typically made in Waldorf schools and homeschools during winter. Making folded stars with colored paper is an excellent way to brighten a barren landscape. However, this simple folded kite paper star craft can add a beautiful splash of color to the view from any window, any time of year. You might also enjoy these Rainbow Suncatcher Crafts.
This easy window star tutorial will show you how to make standard eight-point Waldorf Kite Paper star crafts in a rainbow of colors to brighten anyone’s day! Making rainbow window stars is a great fine motor activity for young children and elderly adults. Make something beautiful while strengthening the fine motor muscles in the hand with this colorful Waldorf craft idea. You might also enjoy these Winter Art Projects and painting ideas.
Rainbow window stars are a fun Waldorf craft for kids or adults to make at home or in the classroom. Learn how to make beautiful paper origami stars for your window with the DIY window star craft tutorial below. You might also enjoy 7 Reasons to Add the Waldorf Colors of the Day to Your Weekly Rhythm.
What is a Waldorf Star or a Waldorf Window Star?
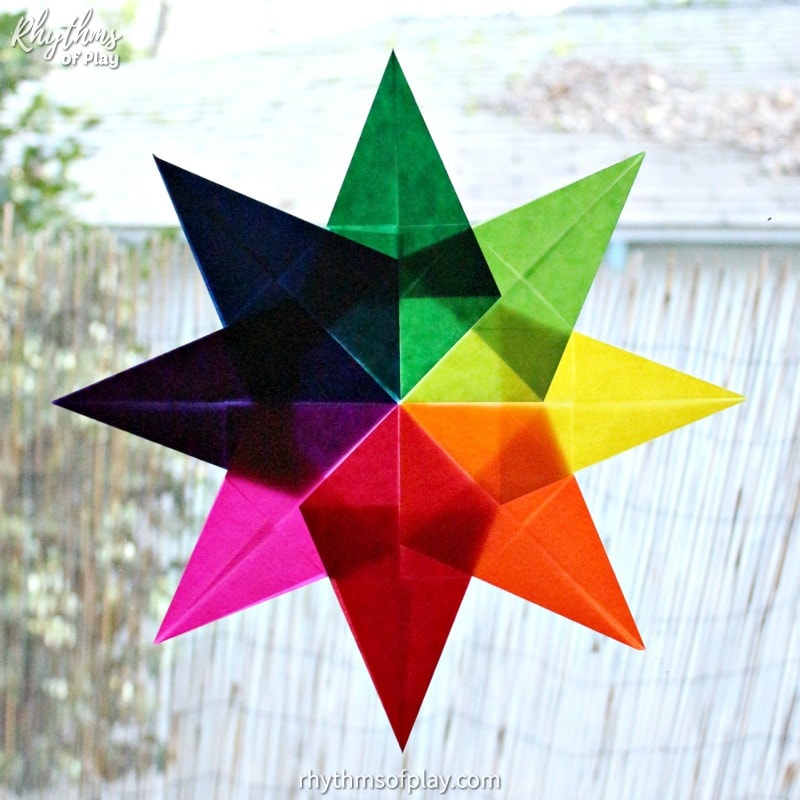
A Waldorf star, also known as a Waldorf window star, is a type of window decoration commonly used in Waldorf schools and homeschools by those who practice or appreciate Steiner or Waldorf-inspired crafts and activities. These gorgeous paper stars are usually made with colored translucent kite paper and are folded and cut into intricate, symmetrical designs. When placed on a window, the light shines through the paper, creating a beautiful, stained glass-like effect.
The design of Waldorf stars can range from simple to complex, often featuring multiple layers and vibrant colors. Making these stars is seen as a craft and an educational tool in Waldorf education. These vibrant window suncatcher crafts are made in Waldorf education worldwide. The goal is to help develop fine motor skills, patience, and an appreciation for artistic beauty in children.
These stars are most often crafted in Waldorf schools and homeschools during the holiday season. Still, they are also used year-round as a decorative element in homes and schools that follow or are inspired by Waldorf principles across the globe. The designs can be adapted to suit different themes and occasions, making them a versatile and creative craft.
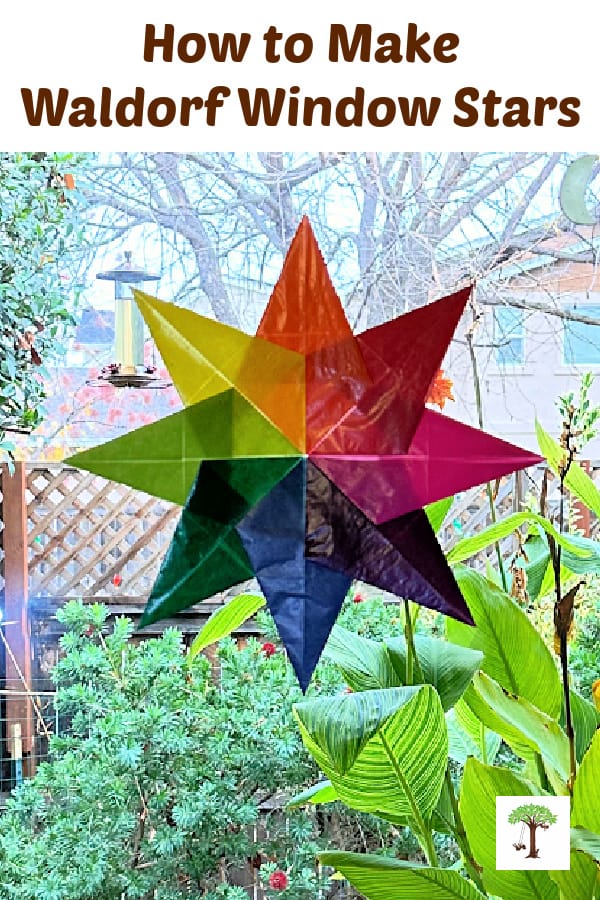
How to Make Waldorf Window Stars
Making window stars is very similar to folding origami crafts. Like origami crafts, Kite Paper squares are folded into different patterns to make gorgeous paper crafts, including the window star art shown in the photographs of this post. Scroll down for the step-by-step DIY Waldorf window stars instructions, complete with a video tutorial that shows how to make a standard rainbow window star craft with colored pieces of kite paper.
But please understand that Kite Paper can be folded into intricate window star patterns above and beyond the basic eight-pointed window star pattern shared in this post. A few craft books contain different kinds of Waldorf star folding instructions to make beautiful variations and other transparent widow scene crafts. Our favorite window craft book recommendations are below:
- Crafting Magical Window Stars: How to Make Beautiful Paper Stars
- Transparent Window Scenes Through the Year
Paper Window Star Suncatcher Craft Supplies
You only need two simple craft supplies to make these paper star suncatchers to brighten someone’s day. Gather the following craft materials, and learn how to make Waldorf window stars with the easy step-by-step paper window star instructions below.
- Kite Paper – This pack contains enough squares of paper to make several window stars and other kite paper crafts.
- Glue stick
- Scissors (optional) – Use scissors to cut smaller squares to make window stars or create simple cut patterns and designs.
Please note: Although tissue paper and origami paper can be substituted, we recommend using kite paper to make Waldorf window stars. Tissue and origami paper fade and lose color compared to kite or glassine paper. Kite paper can retain its color even when placed in direct sunlight for much longer than origami or colored tissue paper.
Related: DIY Rainbow Peg Dolls
What is kite paper?
Glassine, also called Kite Paper, is a translucent wax paper that makes it easy to create window art and many other craft projects that retain their vibrant colors month after month. This beautiful type of paper is made with wax and traditionally used to make kites, hence its nickname, Kite Paper.
Is Kite Paper the same as wax paper?
Kite paper is colored wax paper that folds easily. Its translucent and vibrant colors make it perfect for making window stars and other paper crafts.
What can you do with Kite Paper?
Kite paper is an excellent craft supply for making kites, lanterns, origami, suncatchers, and many other fun papercraft in addition to these gorgeous window star crafts. Glassine sheets are sold in various sizes and hues, including the Kite Paper squares needed for the basic Waldorf window star pattern shown in the photograph below.
How do you stick Waldorf stars to a window?
Many people ask, how do you hang a Waldorf star? To hang or stick Waldorf stars to a window, you only need a couple of dabs of glue. First, flip the completed folded paper star over and put a tiny dab of glue in the center of the star’s backside and each tip or point of your star. Then, press the folded paper star to the window and press it to stick, as shown in the photograph below. Scroll down for the complete step-by-step instructions to make and hang this easy Waldorf window decoration and craft.
Waldorf Window Star Craft Step-by-Step Instructions
How do you make a paper star for a window? Please read the instructions before making folded paper window star crafts so you know the steps involved and what to expect. Or, scroll down to view the video tutorial for this Waldorf craft.
Related: Rainbow Rainy Day Art
1. Determine the color pattern for window star crafts.
- Get out eight squares of kite paper in the color(s) of choice:
- Choose a color pattern. Window star crafts can be made in various colors and design patterns, including a single color.
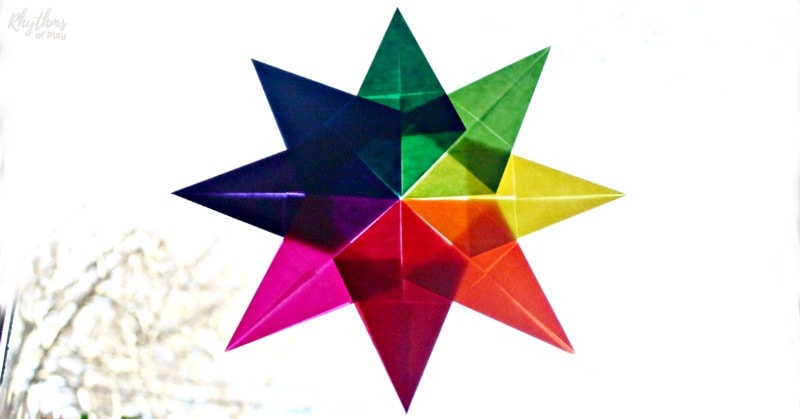
- Purple, blue, dark green, light green, yellow, orange, red, and pink kite paper was used to make the rainbow window star pictured, but there are infinite color variations.
- Folded paper window star crafts also look great in single, two-, four-, and eight-color combinations.
- Tissue or origami paper can also make Waldorf window stars, but we do not recommend it. Those types of paper can fade and lose color in direct sunlight, while kite paper will retain its color and will not fade even in direct sunlight.
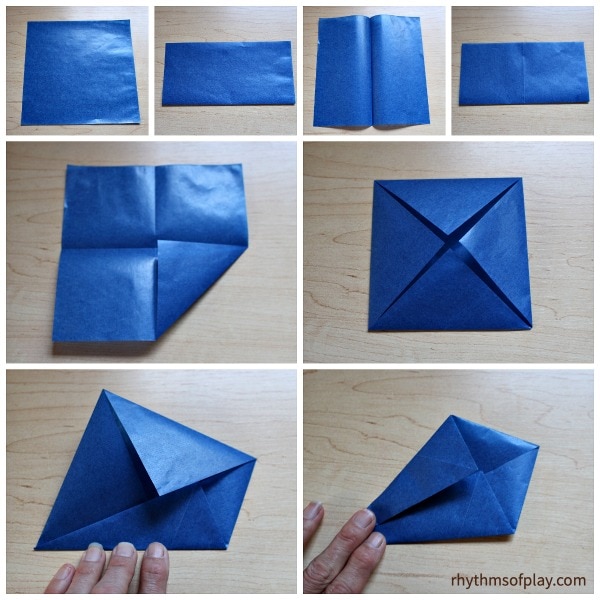
2. Fold each piece of paper into a kite-shaped petal.
- First, fold one of the eight single-color squares of kite paper in half.
- Then open it up, turn it a quarter turn, and fold it in half again.
- Unfold it to reveal four equal squares you can use as a guideline for the next step.
- Next, use your fingertip to fold the top corner of the square into the paper’s center line or middle crease.
- Then, fold each remaining corner into the same center point to create a smaller square with four petals. (In other words, fold each corner of the kite paper square into the center point, as shown in the photo and video tutorial below.)
- Fold one side of the square into the middle crease.
- Then, repeat this step on the opposite side. This last step will create a small kite or diamond shape. This kite shape is one petal of the Waldorf window star.
- Repeat these steps until you have eight kite-shaped petals for your window star suncatcher, as shown in the photo and video tutorials below.
3. Press window star Kite Paper petals.
- Place the eight folded kite paper window star petals or points flap side down under a book to press them flat.
- It’s best to allow them to press flat for several hours before making a window star with the folded points.
4. Assemble the rainbow window star.
- Place one of the kite paper window star petals flap sides down.
- Use a glue stick to smear a bit of glue onto the upper right corner of the kite paper petal.
- Place the next kite paper petal on top of the glue so the left top edge of the second star point is along the middle or center crease of the first kite paper petal.
- Glue the remaining Waldorf window star points together using the same method. (Photos and a video tutorial are included below)
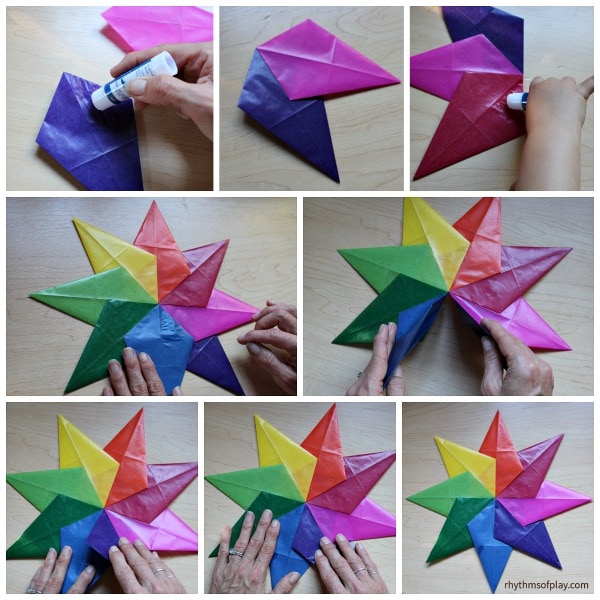
5. Connect the two sides of the folded paper window star craft together.
- Once you have glued all the kite paper petals to each other, it’s time to connect the two sides of the rainbow window star to complete the craft.
- First, dab glue on the top right corner of the last petal, as shown in the photo tutorial above and the video tutorial below.
- Next, open the star to glue the last kite paper petal on top of the first star point or petal.
- Tada, you now have a completed folded paper window star.
6. Press window star crafts to flatten before hanging
- Finally, put the completed Waldorf window star under a stack of heavy books to press the folded kite paper star flat for at least a few hours before hanging it in a window.
7. Hang the finished star suncatcher in a window.
- To hang window star crafts in a window, dab a tiny bit of glue in the middle of the front (or back flap-side) of the kite paper window star and on each petal tip or star point.
- We like hanging them with the backside toward the window so the flaps tuck in, while others hang them with the front or finished side of the star glued to the window so the front of the star faces out the window. Hang window stars according to your personal preference.
- Don’t add too much glue; it can tear when you take it down. A little goes a long way.
- Press the finished star onto a window, glue the side down, and hold for 30-60 seconds or until it sticks.
- Smooth the star down from the center outward to each point of the star with your hands or fingers so it lays flat against the window.
- Add more glue to each point of your star and press it back onto the window if it ever becomes detached.
8. Make more paper window star suncatcher crafts.
- Use the instructions to repeat the steps above to make more Waldorf window stars!
- Hang them in your windows to beautify the view, or give them to family and friends.
DIY Window Stars Video Tutorial
Related: Waldorf Square DIY Geometric Puzzle
Folded Paper Star Suncatchers
As mentioned above, there are many more Waldorf star folding patterns that you can try. The books recommended below contain Waldorf window star instructions for some gorgeous variations.
- Crafting Magical Window Stars: How to Make Beautiful Paper Stars
- Transparent Window Scenes Through the Year
More Fun Art and Craft Ideas
- Rainbow Rainy Day Art
- Art and Science: Experiment with Watercolor Resist
- DIY Rainbow Peg Dolls
- Wet-on-Wet Watercolor Painting
- Winter Art Projects
- DIY Rainbow Colored Blocks
- Fun Winter Activities for Kids and Adults


How long do you recommend leaving the book on top of the petals?
Good question, Christina. A few hours will work but leaving the books on top of your finished Waldorf star overnight is best. Flattened window star petals make it easy to put a small dab of glue in the middle to hang it. Enjoy!